Friday 29 February 2008

Epson 4800 printer nozzle clogging and cartridge pressure?

I have mentioned before that I am becoming convinced that the cartridge pressure or ink level in a cartridge on my 4800 has a major effect on the nozzle loss issues I repeatedly experience. Recent experience makes me a little surer...


As you may have seen in my previous posting I had considerable problems persuading my Magenta to reappear.

After several cleaning cycles and soaks it was stubbornly refusing to come back - the cartridge level was not worrying the printer, whereas during the process I had to change two cartridges (LK & LC) that were showing low and the printer would not allow me to run cleaning cycles until new ones were installed.

I decided to try installing a new Magenta cartridge and Hey Presto the very next clean it reappeared!

I can't think of any sensible explanation other than that the cartridge is not "pushing" ink through - if it were just air in the line or print head why would a new cartridge suddenly cure the problem?
Read more...

Epson 4800 printer nozzle clogging – new strategy report

Last time I blogged about my struggles with my Epson 4800 inkjet printer and its random loss of whole colours I had got fed up and decided not to molly coddle it, but to try the strategy of leaving it until I wanted to print a good amount of photos. So how did the new strategy work?


When I last tried to use the printer I failed to clear it in time to print what I needed to so left it with the LK, Y & C colours missing. At that point I updated the firmware and drivers, and then left the printer turned off for 17 days – untouched and unloved.

Then one morning I turned it on and ran a nozzle check – Now the M was missing as well, but not much worse than when I left it. I ran a puddle clean (I’ve posted my recipe for this on this blog) for 1.5 hours, followed by a cleaning cycle. M was still missing and half of Y, but the rest came back. Another 3 hours of puddle soaking and a cleaning cycle and Y was mostly back and some of M. I then left if in “fixyourownprinter” cleaning solution overnight. One cleaning cycle brought back M, but half of Y is still missing. I ran a colour patch print to see how it looked and then went back to soaking again…

After an overnighter it was not much better, so running out of time I left it again for a few days.

To save you the bother of reading all this again below is a screen shot of my spreadsheet records of what I did.


Double click on the image to expand it so that you can read it

Well you get the picture…

What a palaver… but no worse than usual when this happens, molly coddled or not.

I think that the new strategy is yet to be proven one way or another, but I don’t think it was any worse than if I had treated the printer kindly all this time, so the real test will be next time I leave it for some time – this time it will go into hibernation with all nozzles working perfectly.

I can see some significant effects from the new firmware:
  • The amount of ink used per nozzle clean seems to have reduced from around 14ml or 5ml to 9ml or 4ml - which should save lots of ink
  • I am asked whether I want to run an auto nozzle check when I turn the printer on rather than the power clean offer that it has always offered before
Read more...

Updating an Epson 4800 inkjet printer's firmware

As well as taking a new tougher strategy with the printer I have seen a few suggestions on the web that I ought to update the firmware for the printer as well.


I found and downloaded the new firmware version A00775 (my printer had the original as supplied firmware version A0045A), then read through the pdf instructions to find that I also had to update the driver to 5.52 or higher.

I updated the driver first, then ran the firmware update through the Epson LFP remote panel. It took a few minutes but there were no problems.

I then found that I had to update the System Monitor software as well to v.3.

All these downloads can be found on Epson.com's website

Has it made any difference – it is too early to tell, but …
Read more...

Thursday 28 February 2008

Scheppach Lonos 2 garden shredder review

This is the third of four reviews I shall be posting on my experience with garden shredders.

After a good deal of research and seeing one demonstrated at The RHS Malvern Spring show I bought the Scheppach Lonos 2 electric garden shredder shown in the photo opposite in mid 2004. I have used it regularly ever since for around 40-60 hours of shredding a year, usually for several hours at a time. This review is based on my real life experience with it over the four years.


My purchase criteria were:
  • Able to shred soft as well as hard material
  • Reasonably quiet
  • Less than £350 (cheaper still if possible)
  • Robust and likely to have a good service life
  • Easy to move around the garden
I was not particularly interested in a massive solid wood shredding capacity as I cut anything much over an inch in diameter to use as firewood, so I did not buy the Lonos 3, which is essentially the same as the Lonos 2 but has a slightly larger motor and hence larger shredding capacity.

Scheppach is not a company usually associated with garden machinery – I knew it as a German producer of woodworking machinery. In 2004 there were few suppliers of the machine although I notice that there are many more now (2008) and it has featured well in newspaper group tests.

The specifications of the Lonos 2 can be found on the Scheppach web site, but it essentially met all my requirements – in theory at least.

The machine uses a low speed (39rpm) rotating cog cutter cutting against a counter rotating nylon wheel (as shown in the diagram) to chop material into short lengths (around an inch or 25mm in length), and can take material up to 40mm in diameter. Because the distance between the input slot and cutters is less than an arm’s length the input is quite restricted to stop anyone putting their hands into the shredder. This makes feeding the shredder more restricted than I would have liked, but has proved to be OK in use. The photo below shows the view from the top of the shredder, through the input down to the cutter with its nylon counter wheel (arrowed in the photo) – it shows the shape, along with the dimensions, of the input slot. The 40mm square usefully making sure that you can’t put in a round branch that exceeds the shredder’s capacity.


While it chops the material it is really designed to crush rather than cut the woody stems opening up more of the material to the composting action of bugs and microbes. Because it is low speed the shredder is quiet (it is rated by Scheppach at 82db) – it produces a low frequency “chugging” noise and does not get much louder when actually shredding. It has proved to be neighbour and user friendly for use hours on end – I suspect that “Lonos” is a play on the words “low noise”.

The 24kg Lonos 2 is fitted with a couple of solid wheels and I have had no trouble manoeuvring it around the garden. A standard 40l tub fits neatly under the outlet so it is easy to collect the shreddings without making any extra mess to clear up around it.

Performance when new
When I first used the shredder it was immediately a massive improvement over the Bosch 18-35 silent shredder I had used before this one. I found that I could put any reasonably straight woody material into the hopper and it would draw it in and chop it. So long as I did not feed in too much wet material at a time and put some woody material in with it, it pretty much ate anything I threw into it. I was very happy with it. It produced a nice evenly chopped and crushed material that composted down well. Before I learnt how to use the machine properly it did clog up fairly often, but if was simple to just reverse the cog rotation direction and clear the clog. I never failed to clear it this way.

How has it performed over four years?
Of course the way something performs when new may not be reflect how it will work long term, as my experience with the Bosch showed. The Lonos 2 performed pretty well for about two years at the 40-60 hour per year rate that I was using it at. Inevitably a few chunks of stone ended up in the machine but they did not seem to do too much harm.

After about two years, however, the performance had clearly diminished. It was still able to chomp its way through the large woody stuff, but I started to notice that it clogged up much more often and that I had to feed the material more accurately into the cutters; otherwise it tended not to pick up the material and just sat there chuntering away but doing nothing. It also started not chopping completely through the stems of sappy material, leaving strings of bruised material (see photo below, which also shows the effect of the crushing action of the shredder on woody material). While this may not impact the compostability of the product it did mean that it tended to wrap itself around the cutting cutter and cause more blockages as well as making me work harder on feeding the cutter more accurately.


Additionally as the cutting edge of the cogs blunted the machine was less able to deal with the “knuckles” of woody material (see photo below) – when they reached the cutter they would sit there until firmly pushed with a pusher of some sort - I usually use a solid branch of wood which I want to shred anyway as a pusher so that if it does end up in the cutter there is no risk of damage. When new the cutter used to cut chunks out of the knuckle nibbling it away until it was small enough to work its way through. All this meant that I had to prepare the input material more carefully, removing side branches with secateurs and feeding them separately – which was, of course, both much more time consuming and tedious.


I talked to a couple of dealers and they told me that the cutter did not ever need sharpening as they were not designed to be particularly sharp; rather I should look at changing the nylon counter rotating wheel. This I did, although taking the machine apart was not particularly easy (despite my engineering experience) as various bolts holding it all together and shims had rusted. At the same time I also took the opportunity to clean up the cog’s cutting edges with a file.

I think that the performance did improve a bit, but it never returned to the as new condition.

After about three years the machine suddenly stopped working mid-session. I thought it might have been some sort of safety trip, but it proved to be more serious – the on/off switch had given out. The spare cost me £45 to buy, which I fitted myself.

After four years I still use it, but the rate of production has become too slow for the quantity of material we now produce – I measured the time taken to produce a tub of shreddings using pretty much ideal input; mostly Buddleia prunings that have matured for a couple of weeks. The 40l tub below took 20 minutes to produce.


The photo below shows what the shreddings look like in more detail.


When composted properly (as I will describe in more detail in a later posting) they help produce a sweet compost without any large bits in it direct from the bin like that shown on the fork below.


Conclusion
For most of the four years I have been very happy with the Scheppach Lonos 2 - it produced many m3 of shreddings that have composted down to produce good quality compost. Our garden has simply now outgrown the capacity of the machine. It is true that I have been disappointed by the reliability - I would not expect the switch to fail in this sort lifetime, but with a sample of one I don't think that I can draw any conclusions on the machine's reliability.

So for a garden of a bit smaller than a ¼ of an acre, with a reasonable amount of shrubs, but not loads of hedging, I think that this machine would be ideal. It should quietly chomp through most things that you will be able to throw into it.
Read more...

Lightroom - some useful keyboard shortcuts

I have been using Adobe Lightroom for a couple of months. There are plenty of lists of shortcuts around, but they tend to be too long to be useful. The most useful one I have found was in the back of John Beardsworth's book - Adobe Photoshop Lightroom: Digital Photographer's Guide. I have had to search about for a couple of others so here is a table of some useful keyboard shortcuts that I needed.


Keyboard shortcutDescription
F2
Rename selected file names
X
Mark selected images as
rejected
ctrl+G
Stack selected images
S
Open or close selected
stack of images
alt+0169
Code to insert “©” into copyright
notice etc
G
Switch to grid mode


Read more...

Sunday 24 February 2008

Bosch AXT 18-35 quiet garden shredder review

This is the second of four reviews I shall be posting on my experience with garden shredders.

In early 2000 after my early experience with the small Al-Ko shredder I decided that shredding was a good idea, but I needed a much better machine if I was going to do much shredding without pulling all my hair out.


Drawing on my earlier experience I drew up a list of key purchase criteria, which were:
  • Able to shred soft as well as hard material
  • Easy to unclog if it clogs
  • Reasonably quiet and neighbour friendly
  • Cutting capacity of >30mm
  • Less than £250 (cheaper still if possible)
  • Easy to move around the garden
I had a look around the market and the quietness requirement seemed to be the determining factor – this limited the options to the low speed cog/drum cutters and Bosch’s spiral cutting system. At the time the cog/drum cutting system was fairly new on the market and there were only a few alternatives around. The only shredder that met my criteria was the Bosch AXT 18-35 (see photo below – not one of mine, but this one comes from Bosch publicity material for the current model which looks the same as mine), which is very similar to the current slightly more powerful Bosch AXT 2000 HP; even then it exceeded my budget by £10. The cog/drum based shredders were all considerably more expensive.

The shredder uses Bosch’s unique spiral cutting system (see diagram) with the cutting spiral working at the relatively low speed of about 160rpm. The “18” of the “18-35” model number indicated that it had a 1.8kw motor and the “35” of the “18-35” that the cutting capacity was 35mm. All the material to be shredded went into the same slot in the top of the machine.

It weighed in at around 23kg and its noise level was rated at about 84db. It proved easy to manoeuvre around the garden with its wheels and was blissfully quiet compared with the demented shriek I was used to hearing from the Al-Ko.It was also easy to catch the output in a bucket to keep the work area relatively tidy.


Performance when new
Not surprisingly the Bosch was immediately a massive improvement over the Al-Ko. It took in all sorts of material; the spiral cutter drawing the material into the machine, although it preferred relatively straight semi-ripe woody stems. It did block up with too much wet and soft material, but it was easy to unblock simply by reversing the spiral cutter’s direction. It was possible to jam the machine with dry hard wood, but again it was easy to clear out. I noticed that the rotary movement of the cutter tended to make long branches sticking out of the top of the shredder whip around a bit when not held, but that was never a real problem to me.

I have no record of how much it could munch through in an hour, but I did see a review in a paper suggesting that it was about half the speed of a drum/cog machine and I would not quarrel with that.

So I was happy – the machine produced good quality shreddings, relatively easily and quickly enough for my patience and the size of shredding piles we were creating.

How did it perform over time?
Well… after a Spring and a Summer happily shredding away I began to notice a significant fall off in performance. The shredder no longer drew material into it automatically and it was much more prone to blocking with fibrous material. The fibres tended to wrap themselves around the spiral cutter causing it to jam. Reversing it released it, but I had to put in some dry woody material to clear it out.

I talked to the dealer who supplied it to me and they exchanged it under warranty as it was not supposed to deteriorate like it had.

The new machine performed as the old one had when new (not surprisingly), but after a further year or so of use its performance too started to drop off in the same way. This time there was no chance of an exchange so after 18 months when it had become almost unusable I took it apart to check the spiral cutter. It looked OK, so I sharpened it with a file and put it back together again. (If you would like to see what it looks like inside then go to www.fredshed.co.uk for a photo of a disassembled machine).

It was definitely better, but the improvement did not last more than a couple of months before it was noticeably worse again. This time I investigated the possibility of getting a new spiral cutter unit, but if I did the work myself the spares cost was about half of a new machine, which did not seem to be a bargain. Getting it repaired by a Bosch approved technician was still more expensive.

I battled on and finally took it apart again to really work out what was going wrong. It looked to me as if it was not really the spiral cutter itself that was the problem, but rather a clearing blade at the end of the cutter that was blunt and bent. This meant that instead of clearing the material from the spiral it was smearing it back into it, clogging up the exit. There didn’t seem to be a repair solution for this as I could not take it apart, so only new parts would do.

Since the machine worked OK’ish, albeit very slowly, with mature woody material I soldiered on until 2004 before deciding that a new, quicker machine was needed as the garden was really increasing its production.

Conclusion
This sounds like a litany of woes, but I worked these machines quite hard in the time I had them and they were OK for much of the time. If you want a quiet, relatively low volume shredder to use a few days a year then this one would be OK. In the eight years since I bought mine it may have been improved and it is certainly cheaper than it was (around £200 now, compared to the £260 I paid for it eight years ago).
Read more...

Al-Ko H1100 electric garden shredder review

This is the first of four reviews I shall be posting on my experience with garden shredders over the next couple of weeks.

The aim of this review and the other garden shredders in this blog is to pass on my experience of the machines I have used. I have found it very difficult to get real advice on what machines are really like. I have found it a bit like trying to buy financial services – the only sources of advice seem be the dealers who sell them and there is little if any independent information around. Even with the internet there is not much review information around other than the odd newspaper or Consumers Association group tests. Usually these do not cover the machines I am interested in, nor do they offer anything other than a superficial comparison. My reviews aim to give more depth to the ones I have used.


Sometime around 15 years ago before garden shredders were an established product I saw a demonstration of a small Al-Ko electric shredder at a garden centre. I had not given much thought to how I prepared material for my compost bins until that moment – all I did was to chop it up into convenient lengths so that it fitted into the bins and wondered why the results were pretty average.

So I bought the shredder, an Al-Ko H1100 (see photo), to give it a go as the idea seemed sensible; it should save me time chopping up the woody bits and would ultimately make better compost. It had three spindly legs and the material was fed from the top, or for straight woody material into a side chute, into a rapidly rotating chipping knife with the material coming out the front; and it was orange.


What was it like to use?

The three spindly legs made it difficult to move around as the only way to do so was to lift it and it was an awkward shape to lift, although not particularly heavy. The infeed was small to avoid the chance of getting hands into the cutting blade so it was only possible to feed tiny handfuls of material into it.

It was very noisy – it emitted a high pitched electric motor shriek that was not at all neighbour friendly.

It was OK at chopping small diameter, straight, dry’ish woody material. Anything at all damp or soft very quickly clogged up the exit. There was no easy way to unclog it – I simply had to unscrew the top (with the thoughtfully supplied spanner) and clear out the offending material by hand. I probably had to do this about every 5 minutes if I was shredding anything remotely damp – it made shredding most things very time consuming and tedious. It certainly did not save me time…

The resulting shredded material, however, was well chopped, composted well and it did convert difficult to compost woody material into useful compost much quicker than before.

Conclusions
I had the shredder for about five years and as you may imagine did not use it for much other than the occasional ideal woody prunings. Luckily at this stage we were living with a small garden and when we moved to a much bigger garden (1/3rd of an acre) there was not much other than grass to worry about.

I did, however, learn quite a lot about what good shredded material could do in the compost and what to look for in a shredder. I was also convinced that a shredder was an excellent idea – they produce excellent compostable material, save many trips to the waste tip (and save the car interior from damage at the same time) and I discovered that producing tubs of evenly shredded material from a pile of thorny, woody material was a strangely satisfying thing to do.

After a couple of years in the new larger garden we started to produce piles of woody material that needed shredding and it was time to think about getting a much better shredder…

While I am sure that my experience with this machine designed and built around 15 years ago does not represent today’s machines at all it did remind me that you usually get what you pay for and that a better machine would cost more, whatever the state of technological development.
Read more...

Friday 22 February 2008

Gardening - Composting and shredders

For the last 15-20 years I have been a keen recycler, especially in the garden. This means that I have spent a lot of time composting garden and kitchen waste of all types. During that time I have learnt how to make good sweet compost and worked out how important it is to shred as much of the materials as possible before composting it.


For the last ten years my wife and I have been progressively cultivating around 1/3rd of an acre of garden. Originally it was simply laid out to grass, but we have progressively put in beds, vegetable patches and hedges. Trees and shrubs have matured and the amount of organic material both produced and required by the garden has continually increased.

Over the next few weeks I plan to post articles on composting itself and my experience with four shredders that I have used over the last 15 years. While they will not be definitive reviews they will in report my real life experience with them, in some cases over several years of use.

I plan to write about how I get this:

to look like this:

Three of the four shredders I shall review I have owned and used over several years, the fourth petrol driven one I have managed to borrow:
  • A simple Al-Ko H1100 electric shredder - around 15 years ago
  • A Bosch ATX 18-35 Silent electric shredder - bought in 2000 and used for 4 years
  • A Scheppach Lonos 2 electric shredder - bought in 2004 and still in use
  • A Eliet Minor petrol shredder - recently (2008) borrowed for a couple of weeks
One thing I should make quite clear is that I have no connection in any way with any of the manufacturers of the equipment I shall comment on.
Read more...

Monday 18 February 2008

Epson 4800 “Puddle Method” for clearing nozzle clogs

I have been experiencing serious nozzle outages with my Epson 4800 inkjet printer for sometime. If simple head cleaning cycles do not work one of the methods for clearing nozzle clogs them is the so called “Puddle Method”, which I have seen attributed to Scott Graham of the Yahoo Epson4000 forum. Here is how I use the method.


I learnt the basics of this method from several postings on the Yahoo Epson4000 • Epson 4000/4800/4880 Support Group and I shall try to answer some questions that I had along the way – but, while I use this method on my own machine I can not advise you to use it on yours – that choice is up to you.

Tools & materials needed:
  • 20 ml syringe with a plastic extension tube (Kwill) fitted
  • Distilled water
  • Torch

The Method:
  • Start with the print head parked to the right.

  • Turn the printer off.

  • Fill a syringe with 15 – 20 ml of distilled water.

  • Release the print head, either by using the command on the printer menu “Cutter replace => Exec” or by my preferred option of pressing in the spring loaded cutter release (the top of the light blue release arrowed in the photo below), and move it to the left as far as necessary to be able to get at the print head cap.


  • Identify the right place to puddle. In the photo below the print head cap is arrowed – this is where you want to create the puddle. The pad next to it is the Flushing box, also arrowed in the photo below (sometimes called the purge pad), which I assume is where the ink goes when you purge the lines for changing over between photo and matt black inks and run head cleaning cycles.


  • Gently squirt some distilled water into the cap and watch it leak away (it ends up in the maintenance tank). I do this several times until the cap looks clean – the distilled water washes out the pad leaving it fairly white. Then fill the cap to the brim. (See below for the photos of the process).


  • Quickly, before the puddle leaks away, move the print head back to the right until it clicks into place.

  • Turn the printer on and off again to make sure that the print head is properly parked and capped.

  • Leave for an hour or two, or however long it takes. I start at an hour and move up to leaving it overnight.

  • Turn the printer back on. Decline any offer to run auto nozzle checks or power cleans and run a normal clean cycle, then a nozzle check.

  • If this has not cleared the problem run another cleaning cycle and nozzle check.

  • It that does not work, then puddle again…

If the distilled water does not do the trick I then try Fixyourownprinter Epson inkjet head cleaning solution – I follow their instructions and use around 1 ml of solution, although I don’t follow their advice to run three cleaning cycles.

I follow the general advice from various on-line sources not to do more than two clean & nozzle check cycles without printing a full spectrum image (I use a RGB colour patch that I use for generating ICC profiles to make sure that all the colours are exercised) as many uninterrupted cycles can make the problem worse.

I am aware that there is quite a lot of controversy about what fluids to use (Windex is often mentioned but it is not available in the UK and I have certainly not tried anything other than distilled water and FYOP solution); whether it is better to leave the printer on or off etc, etc. This method works for me, but no doubt it will be refined further over time.

So far I have not yet failed to get my printer back to perfect nozzle checks, but it seems to be a basic design flaw with these printers that we should have to even consider this process, let alone do it routinely. I would truly love to find a solution to these recurrent problems and make this method redundant.

Still when working it does produce beautiful prints…
Read more...

Sunday 17 February 2008

Update to Canon G9 RAW writing times...

In my earlier posting about my first impressions of the G9 I reported my experience with RAW file write times in single shot mode. I have since repeated the experiments in continuous mode.


The specifications suggest that the G9 ought to be able to reel off 1.5 frames a second in continuous mode with "fixed" focus - which I take to mean manual focus - and 0.7 frames per sec in continuous AF mode. Since I use RAW mode I was interested to see what times I would actually get.

Repeating the tests in both continuous AF and manual focus modes I found that with the Sandisk Extreme III SD card I was getting a shot every 1.5 secs (which is about 0.7 frames per sec), whereas with the much slower Toshiba SD card I was getting a shot at just under every 3 secs. So definitively here the card speed shows up. The faster card was yielding real world times twice that of the slower card.

I did not find any significant speed differences between
continuous AF and manual focus modes for either card, although I did sense that the time between the first and second shot was faster than subsequent shots with the Toshiba card. This would make sense if the buffer is large enough to accommodate a second shot, but that subsequent shot times are governed by card write times.
Read more...

Using Lightroom to produce image files for blog postings

I have been using Lightroom for a couple of months now and blogging for a few weeks. Being a photographer I want to include images in many of my posts. Before buying Lightroom I would have had to convert the RAW file and process it in Photoshop, but I thought it ought to be easier in Lightroom. So is Lightroom any good for this?


The short answer is - Yes.

Since I use RAW for nearly all my photography Lightroom allows me to take an unconverted RAW file, adjust it quite well enough for web viewing, then simply export it to a jpeg for uploading. It is quick and easy to do.

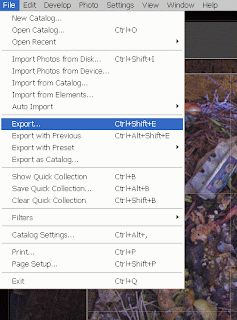
I make the adjustments I want to in the Develop module; then from the File drop down menu click on Export (see screen shot below).


Below are my Export settings, saved as a preset for producing blog images.


Most of the options are self-explanatory - My choices that I feel that may need some explanation are:
  • jpeg is the obvious format to save the image in and I have found a quality setting of 50% works well enough

  • I chose sRGB as the colour space as that is usually the recommended one for web viewing

  • I resize the image so that it is quite small, but not tiny with 500 pixels along the short edge

  • I set a resolution of 100 pixels per inch - 72 is often recommended, but screens vary and I have seen 100 recommended in preference to 72 by quite a lot of "experts" recently

  • I add in a © notice for my pictures - You can set up pretty much whatever you want to say in Lightroom and it puts it in white inside the image, in the bottom left hand corner

  • I chose to minimize embedded metadata at I don't see any benefit to including it

That's it - No need to convert to a TIF, or whatever your choice is, process it etc. Even using actions in Photoshop it would take me much longer and the © notice is an extra bonus, which again I can do in Photoshop but it would be a much more involved process.

All-in-all I am pretty happy to use Lightroom to produce images for blog postings from RAW files.

Read more...

More about tables & HTML in blogs ...

As I have mentioned before I have had more trouble with getting tables to look right in blog postings than anything else so far. Despite improving things with creating tables in Google docs and pasting the HTML code into the posting I am still having problems and having to do quite a lot of hand corrections.

I recently came across this on-line HTML tutorial on tables, part of a series on HTML programming from the Maricopa Center for Learning and Instruction, which is the most complete one I have come across so far.


Read more...

Saturday 16 February 2008

How to start to learn Lightroom?

OK, so I've downloaded Lightroom and I've got 30 days to decide whether to commit to it or not - so how am I going to learn how to use it?


There is no problem using the actual software as it is a fully functional version, just time limited to 30 days. If I decide to buy it I can just enter the code in the version I am using and I will not lose any of the work I have done in the trial period.

First off the version I have downloaded is Lightroom 1.3 - why is this important? Well when Adobe first brought out the commercial version of Lightroom (v1.0) they very soon brought out a significantly improved version with over 100 improvements in v1.1. So quickly in fact that most of the tutorial material and books written early on were based on v1.0 and are not very helpful if trying to understand what v1.3 can do. v1.3 is very similar to v1.1 so any books based on v1.1 should be fine.

When trying to learn software like this I tend to try to find a few books on the subject and possibly a video tutorial. I then watch the video the scan through the books while trying the software - so this is what I did this time. I don't tend to use the web at this stage for general learning other than to find out where to look for good source material (and to buy them of course) but later on the web is invaluable for answers to specific questions.

First I knew that Michael Reichmann (the publisher and primary author of my most used source of photo information web site - Luminous Landscape) and Jeff Schewe had produced a series of downloadable video tutorials including a v1.3 update - about 5 hours in all for $14.95. So I bought them and watched them over Christmas.

Secondly I normally try to see what books I can get from the library - Oxfordshire County Library service has an excellent on-line catalogue search and book ordering system. For 85p I can get any book in the catalogue sent to my local library from any of the county wide network on libraries. Unfortunately for fast moving technical subjects like this they do not often have many books.

I found Adobe Photoshop Lightroom: Digital Photographer's Guide (Lark Photography Book) by John Beardsworth which I picked up from my local library a few days later.


I also decided to get three other books which I thought would cover it all by authors I have read before and been impressed by or have been recommended:

The Adobe Photoshop Lightroom Book: The Complete Guide for Photographersby Martin Evening - this covered v1.0, but the publisher had caught up with v1.1 by offering a pdf update on their web site, which I downloaded and printed out as a companion to the book. I have always found his Photoshop books really helpful.


Photoshop Lightroom Adventureby Mikkel Aaland - a general all round intro to Lightroom v1.1. This book if recommended by Michael Reichmann so I thought it ought to be interesting.


Real World Camera Raw with Adobe Photoshop CS3 (Real World)by Bruce Fraser and Jeff Schewe - since the develop module of Lightroom v1.1 is supposed to be almost the same as Camera Raw 4 which this book covers and I use PK Sharpener for most of my image sharpening in Photoshop which was developed by Bruce Fraser et al I thought it ought to give me as good a guide to RAW conversion in Lightroom as any.

I read John Beardsworth's book first simply because it arrived first - it turned out to be an ideal real introduction to newbie Lightroom users, although based on v1.0 as far as I could see. It's quite short, well illustrated and easy to work through. Also at the back is a one page of key keyboard shortcuts (I have found a few on the web, but they are so complete that they cover several pages and I can never find what I am looking for) - in fact I liked the book so bought it despite it not covering v1.1.

By the time the 30 days had run out, just after Christmas, I had watched the video tutorials, read John Beardsworth's book, started on Lightroom Adventures and skimmed through Martin Evening's book - in both cases focusing on specific issues that arose while playing with the software. I have yet to work through the Camera Raw book, but have every confidence that it will be really useful as all their previous books have been.

So what did this all do for me? Well after about a week I had pretty much decided that v1.3 did enough of what I wanted and I bought it at the end of the 30 day trial period.

Essentially the cataloguing worked well, but I still download through Downloader Pro (into a watched folder in Lightroom) and use Breezebrower Pro as my viewer to edit as it is much quicker and tuned to my needs for now. I will continue to use Qimage for printing display photos (I'll post my comparison between Lightroom and Qimage in due course). I'll use Lightroom for image management (when I have finished keywording the 6,000 photos in the library) - I really like the stacking function and virtual copies, contact printing, RAW converting G9 photos (I have not done any comparison with Capture One LE for the 10D & 30D yet) and any web work I get around to doing. My early B&W conversions and prints in Lightroom have been encouraging.

... and continue to learn how to use its huge functionality and adapt my photo storage from a folders based approach to a catalogued keyword approach.

I will post further thoughts on Lightroom over the next few weeks as I find interesting (to me at least) things to say.
Read more...

Creating screen shots for blog postings

For some of the postings I plan to create screen shots of the active windows are pretty much essential. I have never been satisfied with the quality of the output that the simple “PrintScrn” keyboard command produces, so I did a bit of research on the best way to do this with a PC.


The most useful piece of advice that I came across was to use GIF files as they are both smaller than files like jpegs, but also displayed better quality screen shots than other file formats.

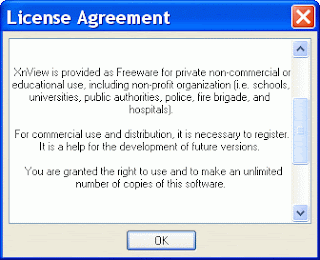
To replace the “PrintScrn” keyboard function I looked around the web and came across a few freeware and paid for screen capture utilities. After several trials and errors I settled on XnView. This is a multi-featured piece of freeware (see licence agreement screen shot below) and amongst the features it offers a screen capture function.


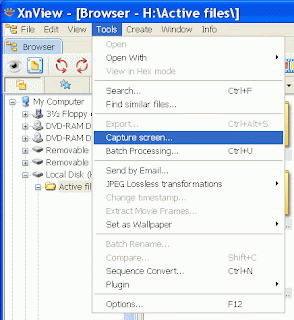
To use the screenshot go to “tools => Capture Screen” (see screen shot below).


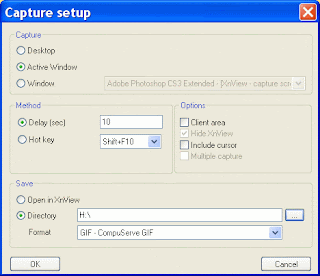
This brings up the options of what to capture, how to capture it (hot key or timed), what format in which to save the output and where to save it (see screen shot below).


I tend to use the time lapse method as I have found using hot keys in some applications I have screen shot from respond to pretty much any hot key combination I chose in some unpredictable, and usually unhelpful, way. After the elapsed time a window appears (see screen shot below) offering various settings for the file – I usually use the default setting and just press “OK”. The resultant file sizes tend to be in the 10-30Kb range.


The requisite GIF file appears on my desktop (I used to be a Mac user and I still find the desktop the most intuitive place to put new files before deciding what to do with them) and I can either use it as it is, or crop it down in Photoshop as needed. Then simply upload to the blog posting - easy.
Read more...

Friday 15 February 2008

Canon G9 ISO 800 Lightroom noise & sharpening settings

When I chose the Canon G9 one of my reasons was that I hoped that lots of people would be buying one and sharing their experience on the web of how to get the best out of it. I am happy to have found some examples of that happening.


On the Luminous Landscape forum there has been quite a lot of discussion about image noise and sharpening settings in the Develop module of Lightroom, with some from Thomas Niemann (of PTLens fame) for the G9 at ISO 800 being reported and discussed.

I have tried out the settings recommended in Lightroom 1.3 (shown in the screen shot above and the table below) and they work pretty well as a starting point for me, so I have saved them as a preset to repeat at will, although I have added in a Vibrance setting of 17% for this image.

Presence
Clarity25
Noise reduction
Luminance80
Color100
Sharpening
Amount60
Radius0.8
Detail30
Masking0


There are a few of other blogs with G9 specific information that I have found which look useful:

Read more...

Wednesday 13 February 2008

Inserting tables into blog postings

I wanted to insert a table into the G9 purchase decision posting, but it took me some time to work it out. A blogger help posting eventually showed me how, but I had to work out some things for myself to make it work, and even then it is not quite perfect...


I tried several HTML editors including Word, but none of them looked anything other than awful in a blog posting.

Someone advised that creating the table using Google document, switching to HTML editing mode and cutting and pasting the code into blogger would work.

It did, after a fashion.

One of the irritations that I have yet to work out is how to get controlled different column widths without editing the % for each cell in the HTML code - I could do it, but for a biggish table it would be very tedious and prone to error, although using a search & replace function in another editor might make it easier. You also have to work out exactly how you want the table to look at the insert stage as it does not seem possible to change the stroke width of the borders etc after insertion, except by directly editing the code again.
Read more...

Early impressions of my Canon G9

In an earlier blog I laid out my reasons for choosing the G9 above all the other compact digital cameras around. I have had the G9 for about two months now and here are my first impressions of it.

First off I am pretty impressed with the quality of the images it produces and I have printed photos up to A3 which I am very happy with - I am happy with my purchase decision.


The first thing I did was buy a couple of Sandisk Extreme III 2Gb SD cards and the cheapest 2Gb SD card available at the same shop (a Toshiba) as an emergency spare card, along with a couple of generic spare batteries (£9.99 for two vs. £37.99 each for genuine Canon NB-2LHs); all from the 7dayshop. I have used generic batteries from the 7dayshop for some years and never had a problem - not only are they much cheaper, but they tend to have higher capacity as well; in this case 750mAh vs. 720mAh for the supplied Canon battery.

I don't spend a huge amount of time reading through manuals if I can avoid it, so after a cursory flick through to see if there was anything I really needed to know (which there wasn't) I got on with using the camera. Since I have used Canon cameras for some time most of the controls were reassuringly obvious. I have found, as expected, the separate ISO knob extremely useful as I try to keep the ISO as low as practical with small sensor cameras to keep image noise low. The controls I use most are the flexizone focus control and exposure compensation - both of which have separate buttons to activate and use the 4-way button and rotary control on the back of the camera to adjust.

I nearly always use cameras in Aperture Priority (Av) mode and the G9 has been pretty much permanently set in that mode since I started using it. As is my normal practice I have only used the camera in RAW mode and I am very happy with the RAW conversions that I have done in Lightroom so far.

Parliament Square & Big Ben

I have used it as a general carry anywhere camera so I had it on me when I found myself in Parliament Square late one afternoon when the light was warm and clear. I picked a good shot and processed it from RAW in Lightroom, through CS3 and printed it up to A3 from both Lightroom and Qimage (more about that in a later blog), producing the photo of Big Ben with the London Eye in the background above. At the widest focal length on the G9 and the angle that I was using the camera at to fit the scene into the frame there was considerable perspective distortion, particularly of Big Ben. In a perfect world I would like less barrel distortion wide open as well, but for the type of camera it is I am happy to accept it for its portability. To improve the shot a bit I used PTLens in Photoshop to correct for the lens distortion and perspective a bit - trying not to overdo it and unnaturally "stretch" the image.

100% crop from above photo

I was very impressed with the resulting overall photo, but I was really happy and surprised with the detail that the camera captures at the short end of the camera’s focal length range; equivalent to 35mm. The 100% crop from the Houses of Parliament roof shows what it can pick up – I certainly did not notice the roof ladder when I was looking at the scene. This is exactly the sort of photo I bought the G9 for – a grab shot that I can print to a good size and be happy with.

Wide angle grab shot

One of my reasons for settling on the G9 instead of the Ricoh GX-100 was the longer reach equivalent to 210mm. This came into its own when I was on a walk in the countryside and I looked over a bridge to see a sleek animal getting out of the water – at first I thought it was a cat, but realised that that was unlikely. I ducked out of sight and got the G9 out of my jacket pocket, turned it on and eased my head back over the parapet. The animal was still there so I took a grab shot in case it disappeared then extended the lens to its full length and waited for the creature to show itself again. The light was low and the image stabiliser was essential at the long focal length. I took several shots and was not much the wiser what it was, other than it was like a large weasel or small otter. Back home I downloaded the images – around ten in all before it disappeared. Some were a bit blurred with the creature’s movement but as you can see it showed clearly that it was a Mink; according to Wikipedia, with that white chin patch it might be a European Mink. Anyway I was happy to have the reach, image stabilisation and speed of RAW capture file writing.

Mink with 210mm focal length


So what else have I learnt?
  • It is a little bulky, but very pocketable - jacket pockets rather than trouser or shirt pockets though.

  • Since manufacturers always seem to quote the weight of cameras excluding battery and card I weighed my set up. My G9 with battery, SD card and wrist strap is 376g, against the quoted figure of 320g exc. battery and card.

  • The RAW file writing speed is OK (using the Sandisk Extreme III 2Gb SD); at the top end of acceptable, but very usable. Using a stop watch, with the G9 in single shot mode, I timed the practical time between shots as about 3.5 secs - What I found was that a shot could be taken when the "busy" sign went out on the display, which is before the green flashing LED by the optical viewfinder goes out and just about when the detailed review display comes up (if you have set it to show details information on review). Just keeping your finger on the shutter release does not speed up the time - it just ignores you until you let go and press the release again. By comparison the cheap Toshiba (which, looking the card code up on the web, has a write speed of 3Mb/s versus the Extreme III's 20Mb/s, or 133x) produced times around 5.5 secs. So my practical times are much less than the quoted times for RAW shooting, but for most of my likely uses OK. And for faster times it is worth having a faster card, although the gains are not huge. I think that some of the difference may be in the time the camera takes to focus between shots. Using manual focus the Sandisk times reduced to around 2.5 secs and the Toshiba to 5 secs. So to get quick RAW write times use a fast card and manual focus - auto focus eats up much of the fast card's advantage. But for most shots I will continue to use auto focus. See my update for continuous shooting times.

  • While not blisteringly fast the auto focus has been good enough for me to use in both low'ish light static and slow'ish wildlife photography.

  • There has been some criticism of the shutter lag in manual mode, but I have not used it in that mode and shutter lag has certainly not been a problem for me.

  • I took around a hundred photos the other day and the battery level indicator was still indicating a full battery.

  • The RAW file sizes vary quite considerably – I have seen files from 11Mb up to 19Mb - in all cases much bigger than the RAW files from my Canon 30D, which range from 7Mb to 11Mb, reflecting the difference between the 8.2 mega pixel and 12.2 mega pixel sensors in the two cameras.

  • Around 115 images fit on a 2Gb SD card – I turned off the parallel jpeg recording as I never use them and they just take up more space on the card.

  • I don’t much like the neck strap supplied with the camera as I prefer to keep the camera out of the way in a pocket most of the time, so I bought an Op/Tech quick release wrist strap which I am happy with.

  • I looked at buying a protective pouch for the G9 and decided on the Lowepro D-Pods 30, but the 7dayshop have been out of stock for the month or more since I ordered it; in the meanwhile I found an old HP calculator case in a drawer and it fits fine so I have been using that.

And why, oh why does Canon bother to supply a memory card at all if they are only going to include a tiddly 32Mb SD card – enough for about two RAW photos!

Read more...

Monday 11 February 2008

Why did I choose the Canon G9 compact digital camera?


Canon G9

In this blog I will briefly lay out why I chose the Canon G9 over the hundreds of other compact digital cameras on the market.


Why did I buy the G9?

In the era of film cameras I had an Olympus XA which I carried around a lot and used as a sort of film sketchpad. I often ended using only it when on holiday or travelling. A year or so ago I sold off all my film cameras, but could not bring myself to part with the XA; which with its practical sliding clam shell design is still sitting in a drawer waiting to be used. The XA enabled me to take high quality photos pretty much anywhere without the bulk of a SLR around my neck. In the digital era I wanted a camera that I could carry around with me fairly unobtrusively which would produce good enough quality image files for me to be able to produce A3 prints from them – to me this pretty much means a camera able to produce RAW files, along with low noise images and a good lens.

By making the RAW option a key requirement I very quickly reduced the field to the Canon G9, Ricoh GX-100, Ricoh GRD and Leica D-Lux 3. I soon reduced this to the G9 & GX-100 as I really felt the zoom was useful and that the long RAW write times for the GRD (reported to be around 13 secs) made it unusable in RAW mode and ruled out the GRD (needless to say there is now a Ricoh GRD II with a few improvements, mainly in its RAW writing speed, but I still think that I would want the flexibility of the zoom). I liked the D-Lux 3 but felt that it did not have the control I was looking for, as well as being the most expensive of them all.


Canon G9 vs Ricoh GX-100
I read several reviews both on-line (see my blog on photographic information resources) and and handled both the cameras.

Since I am a Canon user (I have a couple of Canon DSLRs and have had a Canon G3 and still have an Ixos) I knew my way around the Canon which counts for quite lot.

Also I could use Canon flashguns and accessories on the G9 which would make it much more flexible for me to use. On the other hand the GX-100 got pretty good reviews and is a lighter neater package to carry around and has a user interface designed for keen photographers. They both have a RAW option supported by Lightroom; image stabilisation; use SD storage cards and have easily available, cheap spare batteries. The table below lists the parameters I thought were most important to me.


Olympus XA
Canon G9
Ricoh GX-100
35mm equivalent zoom range
35
35 - 210
24 - 72
Max aperture
f2.8
f2.8 - 4.8
f2.5 - 4.4
Weight - g (exc card and batteries)
225
320
220
Dimensions
102 x 65 x 40
106 x 72 x 43
112 x 58 x 25
RAW write times
Wind on time 1 - 2 secs
2 - 3 secs
6 secs
Pixel count - million
35mm film
12.1
10.01
Battery life - shots per charge
1,000s
240
380

My decision making process went something like this:
  • Having tried out both of them the GX-100 was definitely the more portable, but the G9 was much less bulky than I remember the G3 being and was good enough to be pocketable.
  • The G9 has a bit less image noise than the GX-100.
  • I’m not really a wide angle fiend, so the extra long end reach of the G9 over the GX-100 (210 vs 72mm) would be very useful in every day use. The 35 mm wide end of the G9 would be OK.
  • The G9 has an optical viewfinder (not a great one but OK if the screen is not viewable), but the GX-100 doesn’t, although it can take external finders if desired (which I don’t at this stage).
  • I like the flexizone auto focus on the G9 – I can’t see anything like it on the GX-100.
  • I really like the ISO selection dial on the G9 – much easier to change than using a menu system or the button & dial system on my DSLRs.
  • The G9 has a more user friendly way of displaying histograms – it seems to be a bit awkward to get them up on the GX-100.
  • The pixel count was pretty irrelevant – the images from both seemed to print up OK.
  • Battery life was fine – I don’t tend to take hundreds of shots a day with compact cameras and I always carry spare batteries anyway.
  • The RAW writing speed of the GX-100 was an eternity; the G9 was OK (but still not wonderfully quick).
  • I can use my existing Canon external flashes with the G9 – understandably, but unfortunately, not with the GX-100.
  • The GX-100 was a bit more expensive than the G9 – as of Feb ‘08 £350 vs £320 at Warehouse Express.
  • The G9 is likely to sell more and have more accessories developed and made for it, along with more free information on things like Lightroom Develop module settings on the web in due course.

The result was that the Canon G9 won by a short head, but I would like a GX-100, or more likely the next generation when it comes out, for its extra portability and I would be tempted if I saw one at a very good price.

While I like the reach of the G9 it is not always necessary as my long experience with the XA proved, so if Ricoh brought out a GRD II with the equivalent of a 35 or 40mm lens, instead of its current fixed 28mm equivalent, then I would be tempted by that too.

If there was a Ricoh GX-100 with fast RAW write times and lower noise in an XA clamshell – now, that really would be difficult to resist.

Read more...

Friday 8 February 2008

Sources of photographic information

I read the traditional photographic magazines – in my case Amateur Photographer, Professional Photographer and Outdoor Photography (although it is about to be dropped as I find I don’t get much content from it any more).

The web is of course a huge information resource, but I’m quite busy so I don’t have time to visit many web sites regularly. I find myself returning again and again to a few photographic sites for news, views and reviews; so I thought it might be helpful to list them with my reasons, along with a few eNewsletters I subscribe to. Being a Canon user most of the sites I visit tend to have a Canon user bias, but by no means exclusively.


Web sites

Luminous Landscape, published and mostly authored by Michael Reichmann, is the photographers’ web site that I visit most often. As well as day-to-day news items of major importance the Toronto based photographer uses his decades of professional photographic experience to write practical reviews of cameras, lenses, software, printers and much more besides. He also does think pieces, tutorials on technical and aesthetic issues and hosts many such pieces from external authors. He also publishes a video journal and video tutorials. If I could only access one web site on photography (and all its links) this would be the one.


Digital Photography Review (DPR), set up in 1998 by Phil Askey, who as well as being the founder, is also editor, author, programmer and webmaster, is an all encompassing photographic news webs site and is regarded by many as the definitive reviewer of digital cameras. The reviews offer complete specifications, usage reports, image quality comparisons with typical competitors and a gallery of sample photos (typically 20+) usually of London scenes.

Reid Reviews is a subscription only web site, costing $32.95 (Feb 2008 price). Sean Reid is a pro photographer (so is his wife) and he writes reviews and technical thought pieces based mostly around his love of B&W photography. Most of his work is around digital photography, but he does encompass film in his rangefinder articles. Most of his reviews are around small sensor cameras, rangefinders, lenses and a small range of DSLRs that he thinks he or his wife will find useful in their work. The articles tend to be long and informative, but this is where my one real irritation with the site comes in. The articles are only available in flash enabled windows, with no download or print facility. Since I read most of this sort of thing on train journeys and in quiet corners not being able to easily print them out is a real pain. The only way I have found so far is to individually print a screen dump of each scrolled down page in turn…

Northlight Images
is a site run by Leicester based pro photographer Keith Cooper. The site has a useful select range of reviews and tutorials on cameras, printers and the sort of software and hardware that a photographer might use. Also a B&W enthusiast.

The-Digital-Picture.com is a comprehensive Canon DSLR lens, camera and equipment review site covering practically every Canon lens and DSLR along with a few lenses from independent makers Sigma and Tamron.

Petteri's Pontifications is an interesting site run by Petteri Sulonen of reviews, how to articles, lessons and essays. Conveniently he offers them up in downloadable pdf format as well for off screen reading. While new additions to the site are quite rare they are usually well worth the wait.

Computer –Darkroom
is run by Ian Lyons, a keen and active Northern Ireland based “amateur” photographer. As the name suggests the site mostly covers software related photographic issues, such as Lightroom, Photoshop and colour management. He is a Mac user, which is a shame for me as a PC user, but most of what he writes is useful across both platforms.

eNewsletters
Florida based Arthur (Art) Morris is a prolific bird photographer and author who trades under the names “Birds as Art”. He has a web site, but I subscribe to his eNewsletter which routinely sends me breathtakingly beautiful bird and wildlife photographs, which also talking about technique and locations.

Tim Grey’s Digital Darkroom Questions (DDQ) eNewsletter comes out several times a week. He is an author and photographer focusing on digital workflow around PC based software (he is/was at one time a Microsoft employee). Each DDQ is a solution to a readers technical question which builds up quite a library of tips.

DPR sends out a routine update of news and reviews, all of which are linked to the website, and is useful to keep upto date of the market in general.
Read more...

Monday 4 February 2008

Labels contd..

OK, so the "Adobe Lightroom" label is now showing in the list, but the counter is wrong. Hitting the "Adobe Lightroom" label either in the list or at the end of a post still brings up all of the Lightroom posts. All the labels seem to be affected like this on and off now.

Read more...
Not all the labels are showing up...

I have labeled all my posts, but as far as I can see in various forums Blogger has a long term problem with labels coming and going. The "Adobe Lightroom" label is not showing up in the label list - it did a couple of days ago but has now gone missing. Hitting the "Adobe Lightroom" label link below a Lightroom post, however, does bring up the whole lot.


Read more...
Adding photos to blogs

Adding photos to blogs is pretty straight forward, but I did learn a few extras to make the final post look the way I wanted it to.


The Blogger help file gives you the basics, but I found that I wanted to insert four photos into the text and the basic method simply put them at the top of the post. A quick search brought up more help which essentially pointed out that the pictures can be dragged and dropped. I found that cutting and pasting was better as the edit window in Blogger is too small to work in and does not auto scroll when dragging and dropping. All I had to do then was delete the extra blank lines from the top of the post that the upload had created.

When I had done that I found that although I had specified "small" in the layout options they were all slightly different sizes, which made the preview of the post look awful. So I went back to the original thumbnail sized photos and resized them in Photoshop to the same size - I chose 100 x 100 pixels and they now look sensible to my eyes.
Read more...

Sunday 3 February 2008

Epson 4800 inkjet printer nozzle clogs - a new strategy?

The more I think about it and talk to other people the more I become convinced that the problem that I and so many others suffer from is not actually nozzle clogging - rather it is air being drawn into the print head stopping any ink in the relevant ink feed line arriving at the print head.


This would explain why it is not just a few nozzles that drop out but all of them for a whole colour dropping out suddenly. Also, perhaps why the blocks seem to move around from colour to colour and it seems as if it is more likely when coming to the end of a cartridge (although well before the printer starts telling me that it is low).

I have some recent evidence for this. I was getting persistent loss of the Light Magenta colour and the cartridge (a 220ml one) was the first of the current set to need changing. Since putting in a new one I have not experienced any loss of LM; now I am losing Cyan and Light Black consistently, and they have recently been joined by Yellow as well - all of these are running low, but far from empty. I seem to remember that the bigger brothers of the 4800, the 7800 & 9800, have pressurised cartridges and don't seem to suffer from this problem much.

Anyway - a new strategy?

A chap called Pete Walsh has blogged about his 4800 clogging problems and has tried out a more aggressive strategy. Instead of molly coddling the printer he is leaving it untouched for weeks at a time; batching up his prints to print in bursts. His early experience is that it is no worse that trying to print every day and may be better.

So I'm going to puddle soak the print head and turn it off until I really have quite a few prints to do. For those that don't know what a puddle soak is I shall collect what I know about it and post it in a blog soon.
Read more...