Showing posts with label Epson 4800 printer. Show all posts

Sunday, 19 April 2009

Update on keeping my Epson 4800 printer clog free

I have not written anything for about my clogging battle with my Epson 4800 inkjet printer for several months because there has not been much to report, but after a pretty clog free period since Christmas 2008 I thought it was time to give an update…


Essentially I turned my printer off for a couple of months through November and December 2008, but as the New Year approached I wanted to print again. I did not expect it to work straight away as the reason for turning it off in early November was that nozzle clogs had appeared after a period of not running Harvey Head Cleaner regularly due to pressure of work etc.

Sure enough several colours were missing and I ran through the gamut of clog recovery techniques, but was not getting too far quickly enough so I took a deep breath and ran a Power Clean cycle – the first time I ever have as I have always been advised to avoid them if at all possible. I then immediately ran a second Power Clean cycle quite by accident – I meant to tell it to run a nozzle check and hit the wrong button on the printer’s control panel…I desperately tried to stop it by turning off the printer, rebooting the computer etc but nothing deterred it; it just simply carried on from where it had got to in its cycle. I was not at all happy as the two cycles used 308ml of ink between them…

When I did eventually run a nozzle check all was OK except that the maintenance tank now needed changing (which I did using the technique I posted earlier – [here]) and the Light Magenta (LM) was completely missing. I ran a couple of prints and still it was missing, but the cartridge was nearly empty so I put in afresh one, ran a single cleaning cycle and all was perfect – not a single line missing in any of the nozzle check patterns.

Since then all has pretty much been sweetness and light!

Since the New year I have been religiously following my clog free method of printing a nozzle check once a day using Harvey Head Cleaner; print a full spectrum print either via Autoprint or a real photo at least every third day; all the while keeping the printer sealed in a all encompassing cover with a damp sponge inside the paper tray to keep the humidity inside the printer above 40% - for most of this year it has hovered around the 45% mark. Full details of my anti clogging regime can be found – [here].

I have had a single bout of colour channel loss – this was the Photo Black (PK) channel. Essentially running daily auto nozzle checks I had not noticed that there had been a paper jam and nothing had printed for a few days; this combined with the sponge drying out leading to lower humidity caused the problem. The paper had not fed because the tray holding the sponge had slipped down into the paper tray impeding the paper loading mechanism – to stop that happening again I put in a blob of Blu Tack (
which is easily removable if need be) into the compartment to stop the tray sliding down.

A couple of weeks later PK disappeared again and this time the printer monitor was indicating that PK was running low, so I changed it. It immediately came back and there has been no problem again.

During all this time the printer was taking it upon itself to run its “auto something or other” cycle every week or so – each time using up about 9.5ml of ink; all to no purpose as far as I can see – see [here] for my previous observations and frustrations on this bit of the 4800’s story.

Conclusions

The power cleaning cycle seems to have cleared out the system admirably. This followed by my anti-clogging regime has kept the system working fine except when the regimen went wrong and when a cartridge had nearly run out. Which does rather reinforce my observations over the last couple of years that the most likely colour to give a problem is the one with the lowest ink levels in its cartridge – making me think that there is still something about ink levels and cartridge pressure to sort out…
Read more...

Monday, 2 February 2009

Clearing a stalled printer queue / spooler

Every now and again - actually it is every day or two now - when I print to my Epson 4800 via Windows XP the jobs just sit in the printer status queue nearly complete, but nothing ever actually prints. What to do?


This problem only seems to happen with my Epson 4800 printing via a USB port. My networked B&W laser printer has never done it.

I don't get any error messages - it simply sits there doing nothing much. Every subsequent print job joins the queue, but nothing can actually get anything printing.

One solution that often works is to simply reboot the computer, but this does not always work and is, in any case, a pain. If it clears, then all the queued print jobs print one after another, including all the multiple copies I have sent thinking that I must have forgotten to press the print button...

The easiest way I have found to clear the non-printing file is the following:
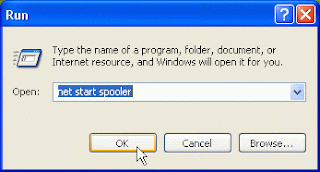
  1. Go to the DOS command line (via "Run") and type:
    Net stop spooler (see screen shot below)


  2. Navigate your way to the following location:
    For windows XP: Windows\System32\Spool\Printers
    For Windows 2000: Winnt\System32\Spool\Printers

  3. Delete the files in the Printers folder

  4. Go back to the DOS command line and type:
    Net start spooler (see screen shot below)


All should now be well.

I have not found any other way of clearing this problem. Deleting it via the printer status queue or from the printer does not work as you have to clear the spooler itself and neither of these two actions does.

If you do not stop the spooler, clear it and then restart it it will just keep on trying until you reboot, and then it does not always work.

To speed things up I have made a shortcut to the spooler folder on my desktop so that it is easy to find.


Read more...

Saturday, 13 December 2008

My photographic Santa wish list for 2008/09

What would I like Santa to bring me this year – photographically speaking?

Three things really:


1 ) A printer equivalent to my Epson 4800 Pro that simply works when I ask it too – even if I leave it unused for weeks at a time. Is that too much to ask for?

I don’t want extra image quality, more colours etc – I am quite happy with what my 4800 produces – I just would like it to work on demand; not when its temperament allows it to.

I don’t care who it comes from; Epson, Canon or HP… perhaps even Sony, Kodak or Fuji. Whoever…

2 ) I have been waiting for an update to the Canon 5D for a year or more – what I had in mind turns out to really be a Nikon D700. So the 5D MkII has 21mp and video, whereas what I really wanted as an up to date 5D with 12mp (or perhaps a few more, but 12 seems fine for what I want to do) with improved noise or dynamic range capture, plus weather sealing, better autofocus, anti-dust systems, etc etc and a competitive price.

I also don’t really want to have to upgrade my computer to take the huge files that will result from the MkII when I mostly print at A4 & A3, going up to A2, and stitch together into large panoramics… If it weren’t for my substantial investment in lenses and systems accessories, like flashguns, I would switch to a Nikon D700 and a D300 today.

3 )
Which brings me onto my third wish – software that is supported for more than a year or so. Last Christmas I tested out Lightroom; liked it and bought it. I moved pretty much all my workflow into Lightroom. Now Adobe have released Lightroom 2 and guess what?

If I want to use it as a RAW converter for any of the recent camera launches (such as the Canon 5D MkII, the Canon G10 or Panasonic G1) then I will have to spend £100 to upgrade to Lightroom 2 whether I like it or not. In fact Adobe’s web site is currently saying that Lightroom 2 will not support these until sometime in December. If I wanted to use Adobe Camera Raw instead (which does support them, but only the version compatible with CS4; not CS3) I will have to upgrade to Photoshop CS4, although I am quite happy in every other way with CS3 for the time being.

So, Santa, if you are listening – are these wishes really too unreasonable or difficult to deliver?
Read more...

Sunday, 26 October 2008

Turning off my Epson 4800 printer for a month or more…

If you have read many of my posts in this blog you will realise that I have had lots of problems with nozzle clogging on my Epson 4800. Recently I realised that I was not going to be able to pursue my normal strategy to reduce nozzle clogging for a month or more, so I decided to try a different one based on my recent observations and experience. This post is about what I did and what happened.


To keep my 4800 happy and readily available for printing I normally follow a strategy of using Harvey Head Cleaner to print a nozzle check daily, along with printing a full spectrum print every three days through MIS Autoprint and keeping the printer humid by using a sponge full of water in the paper tray and a printer cover to keep the humidity in.

Recently, however, I have found that while this works very well the automated “something or other” (this posting gives more about my thoughts on this) that the printer does about once a week is quite likely to knock out various colour channels and that there is nothing I can do to stop it. Turning off all the auto nozzle checks and cleaning options has no effect. Some people have called this a “priming” function – but whatever it is it seems to do more harm than good and uses up a lot of ink.

About 6 weeks ago I realised that I was not going to be able to use the printer much at all nor be able to service the normal anti-clogging routine. So what to do?

I have become convinced that the key to a happy printer is humidity and avoiding the priming (or “something or other”) routines if possible. So I decided to turn off the printer and molly coddle it in a different way.

This I what I did:
  • I filled the sponge in the paper tray with water
  • I did a puddle soak to make the print head as humid as possible
  • I put in an additional water pot inside the printer cover as near the print head as possible
  • I wrapped the printer cover as tightly as possible to keep the humidity in
  • I reset all the Oregon weather station's humidity max & min readings - I use this to monitor the humidity inside the printer
Before bedding the printer down it was running perfectly with a perfect nozzle check.

I left the printer like this for a bit over a month (my records say it was 37 days). During that time I did nothing more than to refill the water sponges and about mid way through I set up another puddle soak.

Last Saturday I needed to do a biggish batch of printing so I woke it up.

How was it?
When I turned it on it did its “auto something or other” (which used 9.5ml of ink) before running the nozzle check I requested. Of the eight ink channels 5 were still perfect and the Light Black, Light Magenta and Light Cyan were completely missing – I can’t say I was surprised.

I ran a single nozzle clean and all three came back perfectly. The nozzle clean used 4.6ml on ink. I was pretty happy and relieved with this result!

So after 37 days of no use one single low intensity nozzle cleaning cycle restored the printer to a perfect nozzle check.

During that time the humidity inside the printer was mostly in the range 50-55% and according to the Oregon weather station the minimum in that time was 46% and the maximum was 67%. The reading from the paper tray was 53% min & 72% max, and from the room itself the range was 39% min & 63% max.

So I am more convinced than ever that humidity is the key to a happy nozzle clog free printer.

Why?
These printers seem to run OK for 12 to 18 months and then start experiencing these problems. This makes some people say that humidity can not be an issue as why would it suddenly change?

I do not know, but I can make some informed speculations.

I suspect that it is all to do with contact or wetting angles (go here for some background to wetting and contact angles); essentially the ease with which a liquid wets the surface it is sitting on or in contact with. Because the main problem I (and many others) experience is sudden whole ink channel loss it implies that it is not really about clogging – more likely the ink simply separates from the print head, which could easily be caused if the wetting angle is humidity sensitive. This sudden ink channel loss could also be due to an air bubble in the line, but personally I have never seen one of them.

If, however, the ink no longer wetted the surface of the nozzles/print head any slight loss of pressure might cause it to detach from the nozzle/print head, which would cause all the nozzles for that specific ink channel to stop working all at the same time.

Why might this start happening after 12-18 months?

I can think of a couple of reasons:
    a) The capping station seal around the print head may deteriorate a bit causing the atmosphere inside the capping station to dry out. This might cause ink separation if it is humidity critical.

    b) There may be a coating on the print head that reduces the wetting angle. If that wears due to ink flow going through the head, or due to any other form of use, then the coating might simply stop working causing the wetting angle to increase; making the whole system sensitive to low humidity.

One final thought: All of this is obviously quite challenging if you live/work in a desert…
Read more...

Friday, 5 September 2008

The Mystery of my Epson 4800's auto cleaning…

For some time, since I have been keeping the humidity high in the region of the print head and running Harvey Head Cleaner daily (I have reduced it from twice daily to once with no ill effect) with an MIS Autoprint every three days, I have only really had one problem with my 4800 – every now and then (about once a week) the printer does “something or other” which looks and sounds like a cleaning cycle. Sometimes a whole ink channel or two are missing after this, but the nozzle check says that no more ink than usual has been used up since the last one. So what is happening?


Since I have turned off both auto nozzle checking & cleaning on the printer’s control panel it ought not to be running cleaning cycles without my asking it to.

For some time, however, I have suspected that, since this “auto something or other” looks and sounds like a cleaning cycle, it probably is. I have noticed anomalously high ink usage every now and again on nozzle check printouts and wondered if there was a connection.

This morning it did its “auto something or other” before printing out the nozzle check requested by Harvey Head Cleaner. Yesterday the nozzle check was perfect, but after this “auto something or other” cycle this morning both Light Magenta & Cyan inks were completely missing, but the nozzle check said that only 0.2ml had been used – the normal amount for a nozzle check. I immediately ran another nozzle check, without doing anything else, and guess what – the printer thought that it had used another 10.4ml of ink since the last one, which is about right for a cleaning cycle, but much too much for sitting around doing nothing for a minute!

I have noticed this before and I am now convinced that it is running auto cleaning cycles about once a week despite my having told it not to and that it only reports the ink usage in the nozzle check printout after the one immediately after it does the cleaning cycle.

For some reason these cleaning cycles often mess up a printer that was working perfectly – although I do find that a single cleaning cycle usually restores the ink.

Can anyone cast any light on this?
Read more...

Sunday, 24 August 2008

Upgrading Epson 4800 printer driver from v5.55 to v6.50 – think before you do it!

Recently I was trying to work out why my Epson 4800 printer was not printing on A3 and roll paper properly. As a part of the process I installed Epson’s latest printer driver v6.50. I quickly discovered that I would really rather not have done so.


For a couple of months I have been living with the fact that whenever I printed on A3 paper the printer would leave a 14mm or 20mm margin at the top or left of the page, whatever it had actually been asked to print. Since this was happening using both Lightroom and Qimage to print I determined that it was the printer or driver, not the printing applications themselves. Printing using roll paper was also not working properly – it was not starting to print in the right place and not cutting at all. Printing using A4, however, seemed to be OK…

I decided to fix the problems and did the usual things to fix these types of problems – reinstall the driver, and if that does not cure it, then the firmware.

First I downloaded the latest printer driver from Epson v6.50 (dated the 7th March, 2008), replacing v5.55 which was the one I had been using. I did not see any harm in this, but I was wrong (more on this below). This did not cure the eccentric printing, however, so I downloaded the firmware (the same version as the one I had been using) and installed that via Epson’s LFP Remote Panel. Initially LFP would not recognize the printer’s existence (although it was printing OK), but after a few cycles of re-booting the computer and the printer it accepted that it was really there. After updating the printer started printing accurately on the page where requested.

But…
Printer driver v6.50, however, was a pain. Basically for two reasons.

Firstly all my paper and set-up specific settings carefully saved in both Qimage and Lightroom were lost. Both remembered the ICC profile settings (happily), but both lost all the other settings; such as media, paper handling and quality settings. So I had to go back through all the combinations and reinstall them, and since I had not exactly copied all of them down as they were stored in the applications and backed up I had not thought it necessary, this was a time consuming and frustrating process.

Secondly it has changed the layout and operation of the various panels so I had to relearn all of them and I can not find any documentation from Epson about what the changes are.
Below are screenshots from the Main, Page Layout and Utility panels - double click on them is you want to see them full size.


There is an extra panel, to the right hand side in the screenshots above, showing the Current Settings which can be turned on or off as desired.

They seem to cover the majority of the previous functions in much the same way, but annoyingly different, so setting up quality for a particular paper is a bit hit & miss.

There are a few interesting enhancements – the main one I have noticed is that the custom paper settings are replicated on the Media Type dropdown (see screenshot) below, rather than hidden in the custom settings panel.


The printing status screen (see screenshot below) has been re-worked to include cartridge codes (but they use Epson's old ones, not the new ones - e.g. the LLK cartridge options are listed as T5649 & T5659 , not T6059 & T6069 for the 110ml & 220ml versions respectively that Epson currently uses)


Conclusion
If you use pre-sets or saved printing settings in applications such as Lightroom and Qimage think very carefully before upgrading, unless you really want some of the enhancements in v6.5 (whatever they are). If you do, then carefully record what they are before the installation or you may lose them as I did.
Read more...

Saturday, 2 August 2008

Inside an Epson 4800 220ml inkjet cartridge

Have you ever wondered what the inside of an Epson 4800 220ml inkjet cartridge looks like? Here I have a look at a used cartridge and muse on why Epson does not like re-use…


It was easy to open up one of these cartridges. I just slit the paper label around the shut line with a scalpel and prised the top off with a couple of wide screwdrivers. The whole lot is simply clipped together with twelve securing tabs, which you can see in the photo.

The result is shown in the photo below (and it was only while I was adjusting it in Lightroom that I noticed the letter heading “The Shame of Litter” in the newsprint…)


Inside is an aluminised plastic bladder with a valve (see close up photo of it below) for the ink to be drawn out into the printer. It slips out quite easily, being held in place by the neck of the valve. There is no connection between the ink container and the cartridge so there is no physical connection with the cartridge’s chip.


This lack of connection means that it would be pretty easy for Epson to re-use the cartridges by simply putting in a new ink bladder and resetting the chip. It would also be pretty easy for Epson to supply re-fills for users to put in themselves, but that would mean that Epson would have to sanction or sell a chip re-setter, which Epson seem dead set against. Epson’s recent aggressive defence of their intellectual property trying to put a stop to third party ink and cartridge suppliers indicates that this is far from their thoughts.

I am very happy to re-use the maintenance tank (see this link for my instructions on how I do that), but refilling a used bladder seems to be too much of a risk to me.

Epson seem pretty set against doing anything “green” that would challenge their current business model of selling a reasonably priced printer and making their money on the ink – of course that might upset us, the users, if we had to pay for Epson’s profit in the printer purchase price – we might not like the numbers that came out – but not re-using something that seems eminently designed to be re-used seems perverse in the current sustainability climate.
Read more...

Monday, 14 July 2008

Epson Stylus pro 4800 inkjet printer error codes

Recently I had a "Service Req." message come up on my 4800. There have also been a few questions on Forums about what various error messages mean, so I thought I would post a listing that I have for the Epson 4800. This is not an official Epson listing, but it appears to be accurate in the few cases that I have had to use it


Firstly please excuse the lack of formating of the listings below, but it would take me too long to put it into pristine formatted text and it would never arrive - I think anyone looking for the info should be able to find it here.

There are two types of error codes. Those indicating a maintenance issue that can usually be sorted out by resetting a counter or checking something is still OK after its nominal end of life. The second set are service errors that may need a technician to fix them, although many of them seem to respond to a certain amount of informed and sensible "fiddling" about; in some the descriptions indicate the action that should be taken to resolve the problem.

Error Codes (Maintenance)

0002 Carriage Motor / Ink Tube end of life (Clear Carriage Motor Counter)

0004 Nozzle check error

0008 RTC error (Real Time Clock) (Check the Battery and reset the Date and Time)

0010 Multi Sensor Error

0020 Print Head life counter (Reset the Head counter)

0040 Cleaner Unit end of life (Clear the Cleaner counter)

0080 Date is not set (Set the date and time (RTC))

0100 RTC Battery low (Replace the battery, and reset the RTC)

0200 Paper feed roller life (over 75,000 sheets) (Reset the ASF counter)


Error Codes (Service)

00000088 RTC (Real Time Clock) data is corrupted

00000101 Carriage Motor life (Reset Carriage Motor Counter, check for leaky ink tubes)

00000103 RTC (Real Time Clock) battery is defective

00000105 Print Head end of life (Inspect print head and reset head counter)

00010000 Paper Feed Motor encoder check error (Check Sensor and Timing Disk)

00010001 Paper Feed Motor out of step

00010002 Paper Feed Motor overcurrent (Check for mechanical binding of the feed rollers / motor)

00010003 Paper Feed Motor in-position time-out

00010004 Carriage Motor encoder check error (Check sensor and Timing Disk)

00010005 Carriage Motor out of step

00010006 Carriage Motor overcurrent (Check for mechanical binding, If not replace motor)

00010007 Carriage Motor in-position time-out

00010008 Servo interrupt watchdog time-out

00010009 System interrupt watchdog time-out

0001000A Carriage home position error (Check Sensor and mechanical components)

0001000C Platen Gap home position error (Check Sensor and mechanical components)

0001000F Carriage Motor PWM output faulty

00010010 Paper Feed Motor PWM output faulty

0001001B Head driver (TG) temperature error

0001001D Carriage servo parameter error

0001001E Paper feed servo parameter error

00010020 CSIC read / write error

00010022 Ink type error

00010023 RTC (Real Time Clock) (Reset RTC)

00010025 CSIC ROM communication error

00010026 RTC (Real Time Clock) communication error

00010028 Head error

00010029 Unidentified NMI

0001002A Carriage ASIC ECU error

0001002B Paper feed ASIC ECU error

0001002D Cleaning Unit end of life

0001002F 360 DPI writing time out error

00010030 Multi Sensor failure (1. Check sensor, 2. calibrate sensor, 3. replace sensor)

00010031 ASF (Auto Sheet Feeder) home position error (Check Sensor and mechanical components)

00010032 ASF (Auto Sheet Feeder) Drive Switch error (Check Sensor and mechanical components)

00010033 Exit Roller home position error (Check Sensor and mechanical components)

00010034 Eject Roller lifted (Customer Safety Sensor on the eject roller)

00010035 Pump Home Position Error (Check Sensor and mechanical components)

00010036 Type B 1394 (Firewire) board installation (Remove Firewire Card / not allowed)

00010037 Print Head thermistor error

00010038 Head Driver thermistor error

00010039 PG adjustment value NVRAM error

0001003A PG adjustment value NVRAM error

0001003B Carriage Lock / Cutter Error

0001003C Carriage Lock / Cutter Error

0001003D Carriage Lock / Cutter Error

00020000 NVRAM error

00020002 SDRAM error

00020003 BOOT program SUM error

00020009 Flash memory SUM error

0002000A Program load error

0002000B Internal memory shortage error

0002000C Review error

100000E0 CPU address error (load misalignment)

10000100 CPU address error (storage misalignment)

10000180 CPU reserve command code exception error

100001A0 CPU slot illegal command exception error

100001C0 AC disruption (AC Power) (Unplug and wait 30 sec., then plug back in)

100005C0 CPU DMA address error

0003xxxxx –

0Dxxxxxxx CPU error


Read more...

Thursday, 10 July 2008

Epson 4800 Error message - Service req. 100001C0

I was printing quite happily on my Epson 4800 one evening recently, but the next morning the automated nozzle check sent by Harvey Head Cleaner did not print and there were a couple of flashing red LEDs and the printer’s LCD display was saying “Service req. 100001C0”. What to do?


I was about to set off for the day job so I just had to leave it flashing away as I had no idea what to do, but fear the worst...

I did a quick web search that evening and found very little, but a couple of posts seemed to think that turning off the printer was the solution.

I had a look at the Espon Field repair guide that I have and found the following in the error codes section:
100001C0

AC disruption (AC Power) (Unplug and wait 30 sec., then plug back in)

I have the printer plugged into a
power surge protector block so there should not have been any problems and no other equipment was saying that there had been a power outage, but...

So I turned off the printer and left it for a day while I got on with the day job again. When I turned on the printer there was a lot of whirring while it went through its “auto something or other” routine (see previous postings for my thoughts on this) which I watched with a lot of trepidation as this often converts a perfect nozzle check into one with one of more colours completely missing.

Eventually it told me to press pause and then went into it’s “Ready” mode.

I ran a nozzle check and it came out perfectly, so all was well again.
Read more...

Sunday, 29 June 2008

Does Printer Jockey’s channel flushing function clear nozzle clogs?

When I reviewed Printer Jockey recently (here is the original posting) I found that it did not recover total ink channel loss on my Epson 4800 inkjet printer, but I did not know whether the idea that single channel flushing might be able to solve the odd nozzle going missing would work or not. After a couple of months of trying it out here are my conclusions.


Originally I found that even running selected channel flushing several times at its full intensity it did not cure the complete loss of single or multiple ink channels that I have experienced. I was not sure, however, whether channel flushing would be able to restore the odd clogged nozzle without having to resort to a full cleaning cycle. It has to be said that I was really hopeful that it would as this would potentially save quite a bit of ink.

In the last couple of months I have had a few instances of the odd line of the nozzle check going missing and each time I have tried to use Printer Jockey’s selected channel flushing mode to clear it. Sadly it has had no effect in the all the cases I have tried it on – around half a dozen. In each case a small number of lines (1 to 4) in the nozzle check were missing and I tried to flush the affected colour on its own. I have tried different combinations of channel flushing in several different intensities and repeatedly, but to no avail.

Unlike the experience I had with completely lost ink channels (where no ink was used at all during channel flushes of the affected channels) channel flushing with just the odd clogged nozzle does certainly print the selected channel/s and plenty of ink comes out on the page, but this does not clear the clogs.

In each case a single running of the standard cleaning cycle cleared the problem.

Conclusion
So my conclusion is that, sadly, Printer Jockey’s channel flushing mode does not clear nozzle clogs at all. I am disappointed as I really hoped it would work…
Read more...

Thursday, 26 June 2008

Is humidity the key to avoiding nozzle clogging on my Epson 4800?

Recent experience has told me that 40% humidity is the bottom end of acceptable to keep my 4800 running relatively nozzle clog free - I try to keep my 4800 at 50%, along with a routine of printing a little often - see this posting for details.

I recently had to go away without leaving the computer on for 10 days so I could not use my normal regimen – so what happened?


Because I could not follow my tried and almost trusted regimen of printing a little often along with keeping the humidity at around 50% I had to come up with an alternative to try to keep my printer clog free.

I puddle soaked the print head to make sure that the print head in its capping station was humid/wet; I added a pot of water inside the printer cover to the usual wet sponge in the paper tray and really wrapped up the printer in its cover, including wrapping it under the paper tray, and turned off the printer.

When I came back the humidity inside the machine was reading 72% (according to the max/min function on the weather station I use, 73% was the maximum that it reached in the 10 days I was away), with 73% in the paper tray - the room reading was around 50%.

When I turned on the printer it ran an auto cleaning cycle (I have called this an "auto something or other" before, but this time I watched the print head move around and the following nozzle check showed that it had used 9.6ml of ink since I turned it off, so I am pretty certain that it is auto cleaning, despite this function being turned off via the LCD panel...). This would normally cause a whole ink channel or two, or three, or four… to drop out, but the following nozzle check was perfect and I then ran a batch of 30 A4 prints without a hitch.

During this the fan inside the printer reduced the humidity to 43% so I put the water pot back inside the print cover to raise the humidity to 50% again as quickly as possible... leaving myself a note to remind me to take the pot out before turning on my computer or Harvey Head Cleaner would initiate a nozzle check automatically with nasty and expensive results.

Strangely the printer also ran an auto clean before the auto nozzle check first thing the following morning – why? The printer had been recently used the nozzle check was perfect etc. Luckily the following nozzle check was also perfect.

Anyone who has looked at the rest of my blog postings will see that I have had lots of problems with nozzle clogging on my 4800 and this episode just makes me think even more that humidity is the key, along with a really all enveloping cover and printing a little and often.
Read more...

Wednesday, 11 June 2008

Two different types of Costco / Kirkland Signature Professional Glossy Inkjet Photo Paper tested

For some time I have used Costco’s own brand Kirkland Signature Professional Glossy Inkjet Photo Paper as one of my draft/proofing (before committing ink to an expensive paper) and contact printing papers and for prints for friends & family with my Epson 4800, and before that on my Canon 9000S. I have been very happy with it, but noticed recently that the box had changed and whereas all the paper I had used before was made in Switzerland, the latest batch was made in the USA. So are they the same? If not, what’s the difference?


According to the gossip on the web Costco sell several papers under their Kirkland label, with the paper made in Switzerland being rumoured to be made by Ilford and the USA made paper being made by Kodak. There are also some stories about it being made by Epson as well.

For several years I have bought A4 Kirkland paper in the UK mostly via eBay as I do not have a Costco account and until recently it always came in boxes containing 125 sheets and was made in Switzerland - below is a scan of the box top. Initially the paper was rated at 260gsm (69lbs), but this changed to 255gsm (68 lbs), although both were 10 mil thick and had the same product code: 77755 (circled in the image below). Since the rumours had it being made by Ilford and that it was the same as Ilford’s Smooth Gloss Paper I did try it with Ilford’s SGP ICC profiles – the results were OK, but I decided to get a bespoke profile made; which unsurprisingly was better still. The two different weights of paper seemed to look identical (or so I thought – see below) so presumably used the same paper substrate and ink receiving layer coating.


The most recent batch (May 2008) came in a 150 sheet card wallet rather than a box, and said that it was made in the USA, and although the same weight and thickness, it had a different product code: 80623 - below is a scan of the front of the wallet, with various key clues to its difference circled I red.


So before using it in anger I put it through my normal paper test process (If you want to know how I test papers I wrote about it in an earlier posting here) to see which if any of these papers it behaves like.

The Comparison
First off I was quite confused for some time in this test as my perceptions changed each time I looked at the prints, until I realised that the Swiss made Kirkland papers I was using were different – some from the 260gsm box and some from a 255gsm box. I thought that they were interchangeable until I realised that the 260gsm paper was whiter on the coated side than the 255gsm paper; or was it the other way around?

I compared sheets
in Northern morning light from the Swiss (the whiter one was actually used) and US made batches of Kirkland papers with a sheet of Epson Premium Gloss, and Ilford Smooth Gloss and Omnijet papers (I have never used any Kodak paper so do not have any to hand to compare with).

Looking at the coated sides shows that the Ilford Omnijet is the most cream coloured, with the Swiss Kirkland the whitest, with the other two looking extremely similar; but slight variations of light shifted my perceptions. The less white Swiss Kirkland looked much the same as the US Kirkland and the Epson.

Looking at the back of the papers, however, showed up significant differences (besides having Epson printed all over the back of the Epson paper). The USA made paper was whiter than the other four, and the Ilford Smooth Gloss looked whiter than the Swiss made Kirkland, which looked much the same as the Ilford Omnijet; the Epson was the most cream coloured and had a more glazed look to it and was smoother. The Epson and US Kirkland had the most fibrous looking backs in certain lights.

Since the USA made paper was rumoured to be made by Kodak I looked for a generic profile to try and the only one I could find was for their Professional papers (the same profile seems to cover both gloss & lustre papers) @
http://www.kodak.com/global/en/professional/member/photoPrinters/ICCProfiles.jhtml

I made the following test prints through Qimage:
  • The Swiss made paper with its bespoke profile
  • The USA made paper with exactly the same settings as the Swiss paper (profile, printer driver settings, rendering intent, black point compensation etc).
  • The USA made paper with the Kodak Pro profile with all the settings as per Kodak’s instructions; most notably with black point compensation (BPC) turned OFF.
  • The USA made paper with the Kodak Pro profile with all the settings as per Kodak’s instructions; but with BPC turned ON (because I do quite a lot of printing from Lightroom 1.4 and, as far as I can see, there is no way of turning BPC on or off in Lightroom).
  • The USA made paper with standard Epson Premium Glossy Photo Paper (PGPP) settings, using the Pro4800 PGPP profile – in case it is actually made by Epson.
I let the prints dry for 24 hours and then examined them.

In the Northerly morning light the most striking difference is between the B&W prints made with the Kodak profiles and the rest. Both the Kodak prints have a distinctly less neutral look to their B&W renditions, looking much warmer - on the yellow side. The other three look pretty similar with neutral B&Ws. With its whiter base the Swiss Kirkland looks cooler with there being very little to choose between the bespoke Swiss Kirkland and canned Epson profiles on the US Kirkland paper. The bespoke Swiss Kirkland profile probably makes the closest rendition of B&W images on the US paper to the Swiss paper, but the Epson profile is pretty close.

In the colour images things are a bit different.
The main difference is between the Swiss made Kirkland with the bespoke profile and the rest. The blues are more solid and skin tones are better, but the differences are pretty subtle. The Prints made with the Kodak profile look a bit brighter and thinner than the others. The mountain range image (in the multi-image test print I use) looks brighter with slightly less dense shadows, but skin tones look a bit washed out and greens look yellower.

Viewed in isolation they all look pretty acceptable, and friends and family were quite happy with prints from all of these combinations and even viewed side-by-side no one picked one over another consistently.

Even looking at the colour bars at the bottom of the test image nothing was clear – I had to look pretty carefully and stare and shuffle strips around to see any difference. Changing the light made much more difference than the profiles.

I could not see any effect of turning the BPC on and off with the Kodak profiles, so printing through Lightroom should be fine if I chose to use this profile.

I might have been able to see some numeric differences between the profiles’ actions if I had looked at the per channel ink usage information that the Epson LFP Remote Panel utility produces, but by the time I had thought of that the data was overwritten by subsequent prints. Perhaps another time, but I do not plan to redo the prints just to gather this data.

Conclusions

As is often the case B&W images show differences in printers, papers and profiles better than colour. The Kodak profiles clearly produce a warmer, slightly sepia look, while the others produce a more neutral, cooler image.

So assuming that colour rendition is not absolutely critical for contact printing or friends & family prints then the US Made Kirkland paper looks pretty good with a range of profiles – I’ll probably get a bespoke one made in due course just to be sure. In the meanwhile I’ll use the bespoke profile made for the Swiss made Kirkland as it is easier just to treat all the Kirkland papers the same to avoid confusion.

Unless the real difference in B&W rendition is deliberate then I do not think that this batch of US made Kirkland paper is made my Kodak, or the profile I used (which is the only one I could find on Kodak’s web site) is for a completely different paper altogether.

In any case I am quite happy to continue to buy Costco’s Kirkland paper for non-critical prints whatever the source is.
Read more...

Thursday, 5 June 2008

Testing inkjet papers to use with an Epson 4800

This posting is about how I test new inkjet papers for use on my Epson 4800 inkjet printer; in future postings I will go into what papers I currently use for my for B&W and colour printing. Since I only use gloss paper, partly because that is what people seem to like and partly to avoid having to switch between the Matt and Photo ink cartridges with all the ink loss that that incurs, I can only share my experience of printing on gloss papers. I also include sources for several printer test images available on the web.


I bought the Epson 4800 so that I would be able to print images onto all sizes from A4 up to 17” width roll paper. I want to be able to print B&W prints as well as colour and I have three basic print modes; Exhibition, draft/proofing and friends & family prints. The criteria for paper choice clearly vary considerably from Exhibition prints needing excellent quality and longevity, through draft/proofing prints needing to represent what the final exhibition print will look like as cheaply as possible, to friends & family prints looking about right first time at a sensible cost.

I have never been one to blindly use the papers that the manufacturers sell as they are almost never either the best quality or the best priced solution. So when I got the 4800 I got hold of samples of all the likely candidates available in the UK, along with any ICC profiles that were available to use with them. As new papers have come out that look interesting I have tried them out as well.

I am not going to go into technical aspects of paper properties such as Dmax etc as I do not have the test equipment nor do I really understand what the technical results mean! I am most interested in how the prints look – there are plenty of technical paper tests around the web and published in magazines. I tend to have a look at them before trying a new paper just to see what professional testers think of them.

I test a paper by printing out known test images and comparing them in the light that they are most likely to be viewed in with a library of competitor papers prints that I have created and keep stored out of the light.

Over the years I have accumulated several printer test files that I use to evaluate new papers. These represent a wide variety of images on one sheet of paper, for both B&W and colour images. I have also collected some specialist B&W images to use. If I like the test prints I then use some of my own “keepers” to finally decide whether I want to invest in a new paper or not.

There are quite a few printer test files available on-line and I have listed some below:

  • Multi image B&W and Colour from Neil Barstow
    http://www.colourmanagement.net/downloads.html

  • B&W multi image and tone gradient file from Northlight Images
    http://www.northlight-images.co.uk/article_pages/black_and_white_test.html

  • Both a multi image B&W and Colour file and a B&W and toned images file from Marrutt
    http://www.marrutt.com/print.php

  • A B&W Tonal range printer test chart and a multi image colour file from Tim Grey
    http://www.timgrey.com/books/ccdownloads.htm

  • Three multi image B&W and Colour files from Imageplace
    http://www.imageplace.co.uk/testfiles/downloads.html

  • Multi image B&W and Colour from Digital Dog
    http://www.digitaldog.net/tips/

  • Three multi image B&W and Colour files from InkJet Art
    http://www.inkjetart.com/custom/


  • The printouts that I find give me the most information are the first two: the multi image B&W and Colour file from Neil Barstow and the B&W file from Northlight Images (both shown below). I also use the B&W tonal range file from Tim Grey to check likely shadow and highlight detail properties for a paper.


    Over the last two years I have tested dozens of gloss and semi-gloss/satin papers from manufacturers such as Permajet, Lyson, Fotospeed, Tetenal, Ilford, Harman, Epson, HP, Da Vinci, Olmec and Fuji as well a own label products from Costco (Kirkland), MX2 and 7dayshop etc etc, with prices ranging from 7p per A4 sheet to £1. You can pay a lot more, but I tend to research the cheapest source for papers (nearly always on-line) before trying a paper and I nearly always find widely varying pricing.

    I always leave the prints to dry for at least 24 hours to make sure that they are fully dry - I have noticed that some papers seem to have a magenta tint at first which disappears on drying and some also look "fuzzy" before drying.
    Read more...

    Wednesday, 28 May 2008

    Epson 4800 nozzle clogging solved - well, nearly…

    About six weeks ago I was despairing that my Epson 4800 inkjet printer would ever be reliable again and that it would forever more be clogging/losing ink channels.

    This may be premature and stupid, but thanks to the advice from lots of people (an example of mass collaboration?), mostly on the Yahoo 4000/4800 forum, I think that I have pretty much resolved the problem (now that is a really stupid thing to say…) – here’s how.


    If you want to know the sort of frustration I have had with this printer over the last six months then clicking the “Nozzle Clogging” label will show you, most specifically – this posting.

    In a previous posting I said that I was going to try someone else’s solution – here are the details. At the time I was not that confident that it would work simply because I had tried the “print often” approach to try to keep the printer happy; and it had not worked for long. Anyway I tried it and it initially did work, but after about a week the printer went back to its bad old ways and I went through a particularly traumatic weekend trying to coax it back into health, which I managed very early on the Monday morning, just in time to go to my day job. Being a bit sceptical that the new regime would work I did not use a cover because I could not find one, although I did use a wet sponge inside the printer cover; but I had been trying that for sometime anyway.

    I decided to redouble my efforts.

    That was six weeks ago – since then I have tried a few more things, learnt quite a lot, but most importantly I have only suffered from 5 clogs/ink channel losses, all involving the LM ink and twice the LK as well. In nearly all the cases this happened after an "auto something or other" happened - it sounded awfully like an automated cleaning cycle, but I have turned that function off, so I am completely in the dark as to what is actually happening when this happens and why.

    In the first four cases only one simple nozzle clean brought back the nozzle check to perfect, with no repeated clean/rest/puddle clean cycles – the fifth, and most recent, took a full set of clean/rest/puddle clean cycles to clear, but I think I know why...

    This is what I think is the reason for the worst case of clogging happening – Initially I bought a cheap interim solution (see cover posting here) and then bought a bespoke cover for the 4800 in anti-static vinyl on eBay. I used the cheap one for a couple of weeks and when the bespoke one arrived I put it on. I had stopped monitoring the humidity inside the printer by then. I restarted it when I had the problem and was very surprised to see that the humidity inside the printer head had dropped to about 40% – clearly, given my recent experience, this is on the borderline.

    The bespoke cover fits better, but is not as long, leaving a gap around the bottom of the printer; does not have an apron to wrap around the under the paper tray (which is actually the transparent zip around top of the cheap storage bag/cover I tried – see photo below) and has a big gap at the back to allow access to the roll paper cover etc. All this means that there are plenty of gaps for the humidity to escape from the machine with the proper cover; much less so with the cheap interim one. I have now reverted to the cheap one and the humidity has climbed back to 50+% again. Leaving the under wrapper undone causes the humidity at the print head to reduce by 5-10% points (e.g. 55% to 48% humidity) – I guess, because humid air is heavier than dryer air, it simply falls out the bottom of the printer…


    So effectively the printer has been available to print whenever I wanted it to except for one day.

    So what have I done?

    Below is the recipe for what currently works for me.

    The recipe comes in three parts:
    1. General set up and printer configuration
    2. Printer exercise routine
    3. Materials and techniques to have to hand

    1. General set up and printer configuration

    First – USE A COVER… an all enveloping cover, for the reasons described above – see photo below with the apron tucked under the paper tray.


    I believe that this was the single most important thing I did. The cover is not to keep the printer clean, although that is not a bad idea in itself, but to keep the humidity inside the printer up. In a previous post I reported on what I found it did for the humidity, but essentially I found that combined with a wet sponge it keeps the humidity inside the printer at about 50%. I believe that keeping the humidity up is the key to a happy (not-clogging much) printer.

    Place a wet sponge
    in a tray in the paper tray – see photo below – the aim is to provide a source of humidity inside the printer. I find that I need to refresh the sponge about once a week.


    Be careful not to put too deep a tray in the paper tray. The paper lifting mechanism lifts across the whole paper tray width and if the sponge tray is too deep it will be pushed into the rod (arrowed in the photo above) and cause miss-feeds.

    I also now
    permanently monitor the humidity inside the cover by placing a wireless remote sensor out of the way of the print head carriage to the far left of the printing area - see photo below. This sensor tends to read about 10% points below the sensor near the sponge in the paper tray (e.g. paper tray humidity reads 60%, inside the cover it reads 50%). If you do this be careful not to impede the print head movement at all, or you will hear a nasty and probably expensive crunching sound!


    Turn off the auto nozzle check and cleaning function on the printer – this only seems to cause clogs. See my earlier posting about why and how to do this.

    Turn off the auto paper size checking function – See my earlier posting about why and how to do this, but suffice to say that you will be using plain paper in the printer as part of the print “little and often” routine. I have found that this tends to cause the printer to stall as its sensitivity to correct paper size seems to be greater than the size tolerance on plain paper.


    2. Printer exercise routine

    Fill the paper tray with plain paper – I have found 100gsm paper to feed more reliably than normal cheap 80gsm copier paper.

    Download and install the free utility MIS Autoprint (see here for instructions on how) and choose a purge file that exercises all the ink channels (here is why). Also make sure that you have “Print Preview” turned off in the printer set up, as that will stall the process as well. In my set up this uses about 0.6ml of ink a time, or 1.2ml a week.

    Buy a copy of Harvey Head Cleaner
    – unless you are willing and able to print nozzle checks manually every morning and evening. Harvey makes sure that, by running a small amount of ink through all the ink channels by printing a nozzle check, you exercise the whole print head regularly. I have set Harvey to print twice a day at 7.00am and 7.00pm; I have also set it to run if I turn the computer on within 24 hours of the last scheduled run time – circled in red in the screen shot below. This makes sure that you automatically run a nozzle check even if you turn your computer on after the scheduled time.


    The printer reports using 0.1-0.2ml of ink per nozzle check, although this seems high compared with 0.6ml for a full page of colour for the Autoprint output. In any case it uses around 2ml of ink a week, which is about the equivalent of 1-2 A4 prints, or 1/50th of the ink to clear a bad clogging problem.

    The combined Autoprint and Harvey ink usage over a year would be around 180ml of ink if you religiously stuck to the regime, although even over a month I have only really managed to do 90% of it. This equates to a couple of major cleaning bouts – only you can tell whether the time and frustration vs. routine ink wastage equation works for you.

    I am pretty sure that I can reduce the actual number of nozzle checks and Autoprints, but don’t want to tempt fate just yet. As you can see in the screen shot above you can also tell Harvey to "Skip check if printer used within xx hours".

    For me the reduction in frustration and the increased availability of the printer to print when I want it to are well worth the effort, even if it is something that Epson should be ashamed of…

    (If you think that this is wasteful of paper I put the nozzle check paper back into the paper tray so that I get 4 checks per sheet…).


    3. Materials and techniques to have to hand

    Learn how to do a “Puddle Clean”my method is posted here.

    Become aware of the head cleaning protocols that have built up as “lore” for Epson printers. This effectively amounts to:
    • Do not use Auto nozzle check – it often just moves the problem around
    • Only run two consecutive nozzle cleans before running a full page print of some sort
    • It is often wise to let the printer rest for an hour or so if a couple of nozzle cleaning cycles and full page print have not cleared the problem
    • For major clogging/ink channel losses use puddle cleaning

    Buy some “Fixyourownprinter” head cleaning solution – I have found it is very effective in clearing clogs; more so than distilled water.

    Useful things to have at hand are:
    • A small torch/flashlight
    • A 20ml syringe with plastic extension (Kwill filling tube)
    • Distilled water
    • Lint free wipes – Pec Pads, the same ones I use for sensor cleaning on my DSLRs - I use these wrapped around a stick instead of cotton buds which might leave strands of cotton around to upset the print head etc
    • A sense of humour
    • …and one final requirement: patience!

    So if I have one piece of advice it is – KEEP THE HUMIDITY UP AT AROUND 50% – all the rest helps but does not do enough if the humidity drops significantly below 40%.

    Now all I have to work out is what the "auto something or other" is and how to stop it and why the LM channel is always the first one affected – any ideas?

    Good luck – please let me know if you have any suggestions, refinements or comments to make.

    Just one more thing - I have no commercial connection with any of the companies producing any of the products or services mentioned in this blog, other than as a happy customer.
    Read more...

    Sunday, 11 May 2008

    MIS Autoprint purge file update…

    In a recent posting I suggested changing the purge file used with MIS Autoprint from the MIS 8 ink file to a multi patch file. I said I would post any evidence that I got that it was worthwhile or not to make the change when I had it – here it is.


    Recently the LK & LM ink channels dropped out on my 4800. So I ran the MIS 8 channel purge file and the combined 936 patch file through Autoprint manually to see whether it was worth changing the purge file.

    Firstly – the MIS 8 image file printed out exactly (to my eye at least) as it had with only LM missing. So it looks as it the LK is not doing much either.

    Below are scans of the combined 936 patch file. The first image is with all nozzles firing perfectly. The second is the same file printed, onto the same paper with the same printer settings, with both LM & LK missing (confirmed by nozzle checks before and after the prints were made).


    As you can see there is quite a lot of difference between the two, mostly in the columns from “K” onwards. It is also clear that the M ink is being used, which it was not in the 8 ink file.

    So my conclusion is that it was worth making the change.
    Read more...

    Thursday, 8 May 2008

    Changing the purge image file I use with MIS Autoprint

    In a previous posting I have gone through my experience with setting up and running MIS Autoprint. I have recently changed the purge pattern I use – this posting tells why I felt I needed to and what I changed it to.


    In my previous posting I have explained what MIS Autoprint does and how it fits into the nozzle clogging avoidance scheme for my Epson 4800 inkjet printer.

    The whole point of using Autoprint it so “exercise” all the printer’s ink channels more thoroughly than just printing frequent nozzle checks alone manages.

    I thought I was doing this by using the 8 channel purge file supplied by MIS, but recently I found a printout of it printed with the LM channel completely missing, as confirmed by the automated, via Harvey Head Cleaner, nozzle checks printed out in the morning before and an hour after the purge file automatically printed.

    Below is a scan of what the 8 channel purge print looks like when all nozzles are running perfectly:


    Below is a scan of what it looked like with the LM channel completely missing (but the M channel was perfect):


    The M & LM ink blocks have tuned blue with no sign of M in either, and the blacks (K, LK & LLK) have taken on a bit of a green’ish tint; the Y, C & LC look normal. This tells me that whatever is going on the purge print is not faithfully using all the ink channels as I thought it was – which rather misses the point of the whole exercise. It is possible that the paper setting affects what inks the 4800 uses, but I don’t have any way of checking that without losing a channel again – which I have not intention of doing deliberately. Currently I use copier paper in the printer for these maintenance prints with the media type setting set to "Plain paper" in the pinter settings.

    So now I have swapped the MIS 8 channel purge file – if you want to know how to do this then look at an earlier blog posting here – for one I made up myself (see below). This is derived from a couple of colour patch files from Permajet used for creating ICC profiles of their papers; each set having 936 patches. While I have no proof that they are any better
    at exercising all the ink channels than the simpler 8 channel purge file from MIS, it seems logical to think that it has a better chance.


    If/when an ink channel goes missing I will check out the results and post them.

    I have done that now and here are the results
    Read more...

    Sunday, 4 May 2008

    Turning off auto paper size check on an Epson 4800 Pro inkjet printer

    I find that the Epson 4800 is very sensitive to paper size variations. This post tells you how to turn it off, and why you might want to.


    Why would you want to turn off auto paper size checking off?
    On the face of it having the printer automatically check that you have loaded the right sized paper every time you print sounds a really helpful idea.

    In reality, however, I print a lot of nozzle checks via Harvey Head Cleaner and purge prints via MIS Autoprint to try to keep my printer nozzles clear. I use a stack of copier paper for this and I often find that the odd sheet brings up the “Wrong paper size” warning message, although I can not ever remember the nozzle check failing because of it – the printer does not seem to check for paper size when doing nozzle checks. I also quite often get this problem in a print run using A4 or letter photographic paper. Since this is inconvenient, or in the case of automatic timed printing to reduce nozzle clogs completely counter productive, and since I can not remember every trying to print on the wrong paper size I turn off the auto paper check function.

    The risk of course is that the printer will print on the wrong sized paper. If the paper is larger than needed it is just a bit of a waste, but if it is smaller you risk having it print all over the platen – which is, at best, messy.

    You could of course just turn it off when you are running in automatic mode and need to be sure it will print each time.

    The choice is yours.

    How?
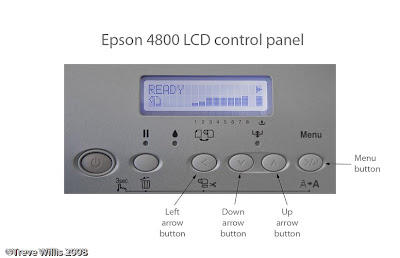
    The picture below shows the LCD printer display and the various buttons mentioned in the instructions below.
    You can turn off the auto paper size checking function by following the button pressing sequence detailed below in the LCD control panel on the printer:
    1. With the display saying “Ready”, press the “Menu” button twice – the screen will display “Printer setup” then “ Platen Gap” on the second line of the display

    2. Press the “down arrow” button five times – the screen will display “PPR SIZE CHK”

    3. Press the “menu” button once - you should see “PPR SIZE CHK, *On”

    4. Press the “down arrow” button once - you should see the word “off” on the second line of the screen

    5. Press the “menu” button once – an asterisk should appear next to the word “*off”

    6. Press the “left arrow” button three times to bring you back to the “Ready” screen
    To turn it back on just follow the sequence again, swopping “on” for “off”.
    Read more...