Showing posts with label Inkjet nozzle clogging. Show all posts

Sunday, 19 April 2009

Update on keeping my Epson 4800 printer clog free

I have not written anything for about my clogging battle with my Epson 4800 inkjet printer for several months because there has not been much to report, but after a pretty clog free period since Christmas 2008 I thought it was time to give an update…


Essentially I turned my printer off for a couple of months through November and December 2008, but as the New Year approached I wanted to print again. I did not expect it to work straight away as the reason for turning it off in early November was that nozzle clogs had appeared after a period of not running Harvey Head Cleaner regularly due to pressure of work etc.

Sure enough several colours were missing and I ran through the gamut of clog recovery techniques, but was not getting too far quickly enough so I took a deep breath and ran a Power Clean cycle – the first time I ever have as I have always been advised to avoid them if at all possible. I then immediately ran a second Power Clean cycle quite by accident – I meant to tell it to run a nozzle check and hit the wrong button on the printer’s control panel…I desperately tried to stop it by turning off the printer, rebooting the computer etc but nothing deterred it; it just simply carried on from where it had got to in its cycle. I was not at all happy as the two cycles used 308ml of ink between them…

When I did eventually run a nozzle check all was OK except that the maintenance tank now needed changing (which I did using the technique I posted earlier – [here]) and the Light Magenta (LM) was completely missing. I ran a couple of prints and still it was missing, but the cartridge was nearly empty so I put in afresh one, ran a single cleaning cycle and all was perfect – not a single line missing in any of the nozzle check patterns.

Since then all has pretty much been sweetness and light!

Since the New year I have been religiously following my clog free method of printing a nozzle check once a day using Harvey Head Cleaner; print a full spectrum print either via Autoprint or a real photo at least every third day; all the while keeping the printer sealed in a all encompassing cover with a damp sponge inside the paper tray to keep the humidity inside the printer above 40% - for most of this year it has hovered around the 45% mark. Full details of my anti clogging regime can be found – [here].

I have had a single bout of colour channel loss – this was the Photo Black (PK) channel. Essentially running daily auto nozzle checks I had not noticed that there had been a paper jam and nothing had printed for a few days; this combined with the sponge drying out leading to lower humidity caused the problem. The paper had not fed because the tray holding the sponge had slipped down into the paper tray impeding the paper loading mechanism – to stop that happening again I put in a blob of Blu Tack (
which is easily removable if need be) into the compartment to stop the tray sliding down.

A couple of weeks later PK disappeared again and this time the printer monitor was indicating that PK was running low, so I changed it. It immediately came back and there has been no problem again.

During all this time the printer was taking it upon itself to run its “auto something or other” cycle every week or so – each time using up about 9.5ml of ink; all to no purpose as far as I can see – see [here] for my previous observations and frustrations on this bit of the 4800’s story.

Conclusions

The power cleaning cycle seems to have cleared out the system admirably. This followed by my anti-clogging regime has kept the system working fine except when the regimen went wrong and when a cartridge had nearly run out. Which does rather reinforce my observations over the last couple of years that the most likely colour to give a problem is the one with the lowest ink levels in its cartridge – making me think that there is still something about ink levels and cartridge pressure to sort out…
Read more...

Sunday, 26 October 2008

Turning off my Epson 4800 printer for a month or more…

If you have read many of my posts in this blog you will realise that I have had lots of problems with nozzle clogging on my Epson 4800. Recently I realised that I was not going to be able to pursue my normal strategy to reduce nozzle clogging for a month or more, so I decided to try a different one based on my recent observations and experience. This post is about what I did and what happened.


To keep my 4800 happy and readily available for printing I normally follow a strategy of using Harvey Head Cleaner to print a nozzle check daily, along with printing a full spectrum print every three days through MIS Autoprint and keeping the printer humid by using a sponge full of water in the paper tray and a printer cover to keep the humidity in.

Recently, however, I have found that while this works very well the automated “something or other” (this posting gives more about my thoughts on this) that the printer does about once a week is quite likely to knock out various colour channels and that there is nothing I can do to stop it. Turning off all the auto nozzle checks and cleaning options has no effect. Some people have called this a “priming” function – but whatever it is it seems to do more harm than good and uses up a lot of ink.

About 6 weeks ago I realised that I was not going to be able to use the printer much at all nor be able to service the normal anti-clogging routine. So what to do?

I have become convinced that the key to a happy printer is humidity and avoiding the priming (or “something or other”) routines if possible. So I decided to turn off the printer and molly coddle it in a different way.

This I what I did:
  • I filled the sponge in the paper tray with water
  • I did a puddle soak to make the print head as humid as possible
  • I put in an additional water pot inside the printer cover as near the print head as possible
  • I wrapped the printer cover as tightly as possible to keep the humidity in
  • I reset all the Oregon weather station's humidity max & min readings - I use this to monitor the humidity inside the printer
Before bedding the printer down it was running perfectly with a perfect nozzle check.

I left the printer like this for a bit over a month (my records say it was 37 days). During that time I did nothing more than to refill the water sponges and about mid way through I set up another puddle soak.

Last Saturday I needed to do a biggish batch of printing so I woke it up.

How was it?
When I turned it on it did its “auto something or other” (which used 9.5ml of ink) before running the nozzle check I requested. Of the eight ink channels 5 were still perfect and the Light Black, Light Magenta and Light Cyan were completely missing – I can’t say I was surprised.

I ran a single nozzle clean and all three came back perfectly. The nozzle clean used 4.6ml on ink. I was pretty happy and relieved with this result!

So after 37 days of no use one single low intensity nozzle cleaning cycle restored the printer to a perfect nozzle check.

During that time the humidity inside the printer was mostly in the range 50-55% and according to the Oregon weather station the minimum in that time was 46% and the maximum was 67%. The reading from the paper tray was 53% min & 72% max, and from the room itself the range was 39% min & 63% max.

So I am more convinced than ever that humidity is the key to a happy nozzle clog free printer.

Why?
These printers seem to run OK for 12 to 18 months and then start experiencing these problems. This makes some people say that humidity can not be an issue as why would it suddenly change?

I do not know, but I can make some informed speculations.

I suspect that it is all to do with contact or wetting angles (go here for some background to wetting and contact angles); essentially the ease with which a liquid wets the surface it is sitting on or in contact with. Because the main problem I (and many others) experience is sudden whole ink channel loss it implies that it is not really about clogging – more likely the ink simply separates from the print head, which could easily be caused if the wetting angle is humidity sensitive. This sudden ink channel loss could also be due to an air bubble in the line, but personally I have never seen one of them.

If, however, the ink no longer wetted the surface of the nozzles/print head any slight loss of pressure might cause it to detach from the nozzle/print head, which would cause all the nozzles for that specific ink channel to stop working all at the same time.

Why might this start happening after 12-18 months?

I can think of a couple of reasons:
    a) The capping station seal around the print head may deteriorate a bit causing the atmosphere inside the capping station to dry out. This might cause ink separation if it is humidity critical.

    b) There may be a coating on the print head that reduces the wetting angle. If that wears due to ink flow going through the head, or due to any other form of use, then the coating might simply stop working causing the wetting angle to increase; making the whole system sensitive to low humidity.

One final thought: All of this is obviously quite challenging if you live/work in a desert…
Read more...
Friday, 5 September 2008

The Mystery of my Epson 4800's auto cleaning…

For some time, since I have been keeping the humidity high in the region of the print head and running Harvey Head Cleaner daily (I have reduced it from twice daily to once with no ill effect) with an MIS Autoprint every three days, I have only really had one problem with my 4800 – every now and then (about once a week) the printer does “something or other” which looks and sounds like a cleaning cycle. Sometimes a whole ink channel or two are missing after this, but the nozzle check says that no more ink than usual has been used up since the last one. So what is happening?


Since I have turned off both auto nozzle checking & cleaning on the printer’s control panel it ought not to be running cleaning cycles without my asking it to.

For some time, however, I have suspected that, since this “auto something or other” looks and sounds like a cleaning cycle, it probably is. I have noticed anomalously high ink usage every now and again on nozzle check printouts and wondered if there was a connection.

This morning it did its “auto something or other” before printing out the nozzle check requested by Harvey Head Cleaner. Yesterday the nozzle check was perfect, but after this “auto something or other” cycle this morning both Light Magenta & Cyan inks were completely missing, but the nozzle check said that only 0.2ml had been used – the normal amount for a nozzle check. I immediately ran another nozzle check, without doing anything else, and guess what – the printer thought that it had used another 10.4ml of ink since the last one, which is about right for a cleaning cycle, but much too much for sitting around doing nothing for a minute!

I have noticed this before and I am now convinced that it is running auto cleaning cycles about once a week despite my having told it not to and that it only reports the ink usage in the nozzle check printout after the one immediately after it does the cleaning cycle.

For some reason these cleaning cycles often mess up a printer that was working perfectly – although I do find that a single cleaning cycle usually restores the ink.

Can anyone cast any light on this?
Read more...

Sunday, 29 June 2008

Does Printer Jockey’s channel flushing function clear nozzle clogs?

When I reviewed Printer Jockey recently (here is the original posting) I found that it did not recover total ink channel loss on my Epson 4800 inkjet printer, but I did not know whether the idea that single channel flushing might be able to solve the odd nozzle going missing would work or not. After a couple of months of trying it out here are my conclusions.


Originally I found that even running selected channel flushing several times at its full intensity it did not cure the complete loss of single or multiple ink channels that I have experienced. I was not sure, however, whether channel flushing would be able to restore the odd clogged nozzle without having to resort to a full cleaning cycle. It has to be said that I was really hopeful that it would as this would potentially save quite a bit of ink.

In the last couple of months I have had a few instances of the odd line of the nozzle check going missing and each time I have tried to use Printer Jockey’s selected channel flushing mode to clear it. Sadly it has had no effect in the all the cases I have tried it on – around half a dozen. In each case a small number of lines (1 to 4) in the nozzle check were missing and I tried to flush the affected colour on its own. I have tried different combinations of channel flushing in several different intensities and repeatedly, but to no avail.

Unlike the experience I had with completely lost ink channels (where no ink was used at all during channel flushes of the affected channels) channel flushing with just the odd clogged nozzle does certainly print the selected channel/s and plenty of ink comes out on the page, but this does not clear the clogs.

In each case a single running of the standard cleaning cycle cleared the problem.

Conclusion
So my conclusion is that, sadly, Printer Jockey’s channel flushing mode does not clear nozzle clogs at all. I am disappointed as I really hoped it would work…
Read more...
Thursday, 26 June 2008

Is humidity the key to avoiding nozzle clogging on my Epson 4800?

Recent experience has told me that 40% humidity is the bottom end of acceptable to keep my 4800 running relatively nozzle clog free - I try to keep my 4800 at 50%, along with a routine of printing a little often - see this posting for details.

I recently had to go away without leaving the computer on for 10 days so I could not use my normal regimen – so what happened?


Because I could not follow my tried and almost trusted regimen of printing a little often along with keeping the humidity at around 50% I had to come up with an alternative to try to keep my printer clog free.

I puddle soaked the print head to make sure that the print head in its capping station was humid/wet; I added a pot of water inside the printer cover to the usual wet sponge in the paper tray and really wrapped up the printer in its cover, including wrapping it under the paper tray, and turned off the printer.

When I came back the humidity inside the machine was reading 72% (according to the max/min function on the weather station I use, 73% was the maximum that it reached in the 10 days I was away), with 73% in the paper tray - the room reading was around 50%.

When I turned on the printer it ran an auto cleaning cycle (I have called this an "auto something or other" before, but this time I watched the print head move around and the following nozzle check showed that it had used 9.6ml of ink since I turned it off, so I am pretty certain that it is auto cleaning, despite this function being turned off via the LCD panel...). This would normally cause a whole ink channel or two, or three, or four… to drop out, but the following nozzle check was perfect and I then ran a batch of 30 A4 prints without a hitch.

During this the fan inside the printer reduced the humidity to 43% so I put the water pot back inside the print cover to raise the humidity to 50% again as quickly as possible... leaving myself a note to remind me to take the pot out before turning on my computer or Harvey Head Cleaner would initiate a nozzle check automatically with nasty and expensive results.

Strangely the printer also ran an auto clean before the auto nozzle check first thing the following morning – why? The printer had been recently used the nozzle check was perfect etc. Luckily the following nozzle check was also perfect.

Anyone who has looked at the rest of my blog postings will see that I have had lots of problems with nozzle clogging on my 4800 and this episode just makes me think even more that humidity is the key, along with a really all enveloping cover and printing a little and often.
Read more...

Wednesday, 28 May 2008

Epson 4800 nozzle clogging solved - well, nearly…

About six weeks ago I was despairing that my Epson 4800 inkjet printer would ever be reliable again and that it would forever more be clogging/losing ink channels.

This may be premature and stupid, but thanks to the advice from lots of people (an example of mass collaboration?), mostly on the Yahoo 4000/4800 forum, I think that I have pretty much resolved the problem (now that is a really stupid thing to say…) – here’s how.


If you want to know the sort of frustration I have had with this printer over the last six months then clicking the “Nozzle Clogging” label will show you, most specifically – this posting.

In a previous posting I said that I was going to try someone else’s solution – here are the details. At the time I was not that confident that it would work simply because I had tried the “print often” approach to try to keep the printer happy; and it had not worked for long. Anyway I tried it and it initially did work, but after about a week the printer went back to its bad old ways and I went through a particularly traumatic weekend trying to coax it back into health, which I managed very early on the Monday morning, just in time to go to my day job. Being a bit sceptical that the new regime would work I did not use a cover because I could not find one, although I did use a wet sponge inside the printer cover; but I had been trying that for sometime anyway.

I decided to redouble my efforts.

That was six weeks ago – since then I have tried a few more things, learnt quite a lot, but most importantly I have only suffered from 5 clogs/ink channel losses, all involving the LM ink and twice the LK as well. In nearly all the cases this happened after an "auto something or other" happened - it sounded awfully like an automated cleaning cycle, but I have turned that function off, so I am completely in the dark as to what is actually happening when this happens and why.

In the first four cases only one simple nozzle clean brought back the nozzle check to perfect, with no repeated clean/rest/puddle clean cycles – the fifth, and most recent, took a full set of clean/rest/puddle clean cycles to clear, but I think I know why...

This is what I think is the reason for the worst case of clogging happening – Initially I bought a cheap interim solution (see cover posting here) and then bought a bespoke cover for the 4800 in anti-static vinyl on eBay. I used the cheap one for a couple of weeks and when the bespoke one arrived I put it on. I had stopped monitoring the humidity inside the printer by then. I restarted it when I had the problem and was very surprised to see that the humidity inside the printer head had dropped to about 40% – clearly, given my recent experience, this is on the borderline.

The bespoke cover fits better, but is not as long, leaving a gap around the bottom of the printer; does not have an apron to wrap around the under the paper tray (which is actually the transparent zip around top of the cheap storage bag/cover I tried – see photo below) and has a big gap at the back to allow access to the roll paper cover etc. All this means that there are plenty of gaps for the humidity to escape from the machine with the proper cover; much less so with the cheap interim one. I have now reverted to the cheap one and the humidity has climbed back to 50+% again. Leaving the under wrapper undone causes the humidity at the print head to reduce by 5-10% points (e.g. 55% to 48% humidity) – I guess, because humid air is heavier than dryer air, it simply falls out the bottom of the printer…


So effectively the printer has been available to print whenever I wanted it to except for one day.

So what have I done?

Below is the recipe for what currently works for me.

The recipe comes in three parts:
  1. General set up and printer configuration
  2. Printer exercise routine
  3. Materials and techniques to have to hand

1. General set up and printer configuration

First – USE A COVER… an all enveloping cover, for the reasons described above – see photo below with the apron tucked under the paper tray.


I believe that this was the single most important thing I did. The cover is not to keep the printer clean, although that is not a bad idea in itself, but to keep the humidity inside the printer up. In a previous post I reported on what I found it did for the humidity, but essentially I found that combined with a wet sponge it keeps the humidity inside the printer at about 50%. I believe that keeping the humidity up is the key to a happy (not-clogging much) printer.

Place a wet sponge
in a tray in the paper tray – see photo below – the aim is to provide a source of humidity inside the printer. I find that I need to refresh the sponge about once a week.


Be careful not to put too deep a tray in the paper tray. The paper lifting mechanism lifts across the whole paper tray width and if the sponge tray is too deep it will be pushed into the rod (arrowed in the photo above) and cause miss-feeds.

I also now
permanently monitor the humidity inside the cover by placing a wireless remote sensor out of the way of the print head carriage to the far left of the printing area - see photo below. This sensor tends to read about 10% points below the sensor near the sponge in the paper tray (e.g. paper tray humidity reads 60%, inside the cover it reads 50%). If you do this be careful not to impede the print head movement at all, or you will hear a nasty and probably expensive crunching sound!


Turn off the auto nozzle check and cleaning function on the printer – this only seems to cause clogs. See my earlier posting about why and how to do this.

Turn off the auto paper size checking function – See my earlier posting about why and how to do this, but suffice to say that you will be using plain paper in the printer as part of the print “little and often” routine. I have found that this tends to cause the printer to stall as its sensitivity to correct paper size seems to be greater than the size tolerance on plain paper.


2. Printer exercise routine

Fill the paper tray with plain paper – I have found 100gsm paper to feed more reliably than normal cheap 80gsm copier paper.

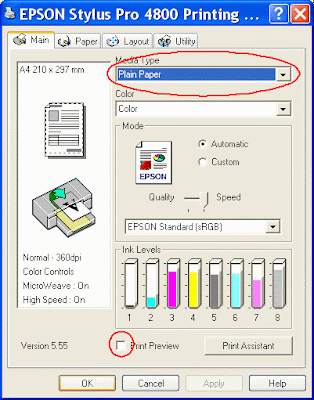
Download and install the free utility MIS Autoprint (see here for instructions on how) and choose a purge file that exercises all the ink channels (here is why). Also make sure that you have “Print Preview” turned off in the printer set up, as that will stall the process as well. In my set up this uses about 0.6ml of ink a time, or 1.2ml a week.

Buy a copy of Harvey Head Cleaner
– unless you are willing and able to print nozzle checks manually every morning and evening. Harvey makes sure that, by running a small amount of ink through all the ink channels by printing a nozzle check, you exercise the whole print head regularly. I have set Harvey to print twice a day at 7.00am and 7.00pm; I have also set it to run if I turn the computer on within 24 hours of the last scheduled run time – circled in red in the screen shot below. This makes sure that you automatically run a nozzle check even if you turn your computer on after the scheduled time.


The printer reports using 0.1-0.2ml of ink per nozzle check, although this seems high compared with 0.6ml for a full page of colour for the Autoprint output. In any case it uses around 2ml of ink a week, which is about the equivalent of 1-2 A4 prints, or 1/50th of the ink to clear a bad clogging problem.

The combined Autoprint and Harvey ink usage over a year would be around 180ml of ink if you religiously stuck to the regime, although even over a month I have only really managed to do 90% of it. This equates to a couple of major cleaning bouts – only you can tell whether the time and frustration vs. routine ink wastage equation works for you.

I am pretty sure that I can reduce the actual number of nozzle checks and Autoprints, but don’t want to tempt fate just yet. As you can see in the screen shot above you can also tell Harvey to "Skip check if printer used within xx hours".

For me the reduction in frustration and the increased availability of the printer to print when I want it to are well worth the effort, even if it is something that Epson should be ashamed of…

(If you think that this is wasteful of paper I put the nozzle check paper back into the paper tray so that I get 4 checks per sheet…).


3. Materials and techniques to have to hand

Learn how to do a “Puddle Clean”my method is posted here.

Become aware of the head cleaning protocols that have built up as “lore” for Epson printers. This effectively amounts to:
  • Do not use Auto nozzle check – it often just moves the problem around
  • Only run two consecutive nozzle cleans before running a full page print of some sort
  • It is often wise to let the printer rest for an hour or so if a couple of nozzle cleaning cycles and full page print have not cleared the problem
  • For major clogging/ink channel losses use puddle cleaning

Buy some “Fixyourownprinter” head cleaning solution – I have found it is very effective in clearing clogs; more so than distilled water.

Useful things to have at hand are:
  • A small torch/flashlight
  • A 20ml syringe with plastic extension (Kwill filling tube)
  • Distilled water
  • Lint free wipes – Pec Pads, the same ones I use for sensor cleaning on my DSLRs - I use these wrapped around a stick instead of cotton buds which might leave strands of cotton around to upset the print head etc
  • A sense of humour
  • …and one final requirement: patience!

So if I have one piece of advice it is – KEEP THE HUMIDITY UP AT AROUND 50% – all the rest helps but does not do enough if the humidity drops significantly below 40%.

Now all I have to work out is what the "auto something or other" is and how to stop it and why the LM channel is always the first one affected – any ideas?

Good luck – please let me know if you have any suggestions, refinements or comments to make.

Just one more thing - I have no commercial connection with any of the companies producing any of the products or services mentioned in this blog, other than as a happy customer.
Read more...

Sunday, 11 May 2008

MIS Autoprint purge file update…

In a recent posting I suggested changing the purge file used with MIS Autoprint from the MIS 8 ink file to a multi patch file. I said I would post any evidence that I got that it was worthwhile or not to make the change when I had it – here it is.


Recently the LK & LM ink channels dropped out on my 4800. So I ran the MIS 8 channel purge file and the combined 936 patch file through Autoprint manually to see whether it was worth changing the purge file.

Firstly – the MIS 8 image file printed out exactly (to my eye at least) as it had with only LM missing. So it looks as it the LK is not doing much either.

Below are scans of the combined 936 patch file. The first image is with all nozzles firing perfectly. The second is the same file printed, onto the same paper with the same printer settings, with both LM & LK missing (confirmed by nozzle checks before and after the prints were made).


As you can see there is quite a lot of difference between the two, mostly in the columns from “K” onwards. It is also clear that the M ink is being used, which it was not in the 8 ink file.

So my conclusion is that it was worth making the change.
Read more...

Thursday, 8 May 2008

Changing the purge image file I use with MIS Autoprint

In a previous posting I have gone through my experience with setting up and running MIS Autoprint. I have recently changed the purge pattern I use – this posting tells why I felt I needed to and what I changed it to.


In my previous posting I have explained what MIS Autoprint does and how it fits into the nozzle clogging avoidance scheme for my Epson 4800 inkjet printer.

The whole point of using Autoprint it so “exercise” all the printer’s ink channels more thoroughly than just printing frequent nozzle checks alone manages.

I thought I was doing this by using the 8 channel purge file supplied by MIS, but recently I found a printout of it printed with the LM channel completely missing, as confirmed by the automated, via Harvey Head Cleaner, nozzle checks printed out in the morning before and an hour after the purge file automatically printed.

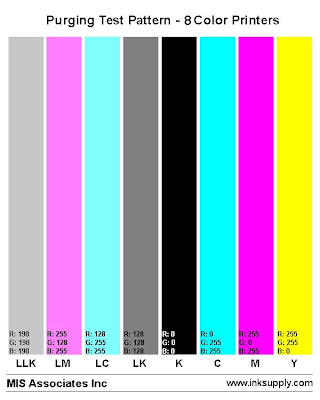
Below is a scan of what the 8 channel purge print looks like when all nozzles are running perfectly:


Below is a scan of what it looked like with the LM channel completely missing (but the M channel was perfect):


The M & LM ink blocks have tuned blue with no sign of M in either, and the blacks (K, LK & LLK) have taken on a bit of a green’ish tint; the Y, C & LC look normal. This tells me that whatever is going on the purge print is not faithfully using all the ink channels as I thought it was – which rather misses the point of the whole exercise. It is possible that the paper setting affects what inks the 4800 uses, but I don’t have any way of checking that without losing a channel again – which I have not intention of doing deliberately. Currently I use copier paper in the printer for these maintenance prints with the media type setting set to "Plain paper" in the pinter settings.

So now I have swapped the MIS 8 channel purge file – if you want to know how to do this then look at an earlier blog posting here – for one I made up myself (see below). This is derived from a couple of colour patch files from Permajet used for creating ICC profiles of their papers; each set having 936 patches. While I have no proof that they are any better
at exercising all the ink channels than the simpler 8 channel purge file from MIS, it seems logical to think that it has a better chance.


If/when an ink channel goes missing I will check out the results and post them.

I have done that now and here are the results
Read more...

Tuesday, 29 April 2008

Review of Printer Jockey v1.2.0 software as a nozzle clogging combating utility for Epson printers

Printer Jockey is an advanced printer utility from C-Horse Software. This review will focus almost exclusively on the features that it has that might help Epson large format inkjet printer users to reduce or cure nozzle clogs. I have been using Printer Jockey v1.2.0 with my Epson 4800 and as you can see in my various blog postings nozzle clogs/colour channel loss is a major bugbear for me.


Printer Jockey is a Windows based printing utility that adds functionality to the standard printer drivers. The main target market for the utility appears to be direct-to-garment manufacturers and apparel decorators – full details of what features are on offer are listed on the Printer Jockey website. A basic version of the software is available to download free of charge from the site.

Before I review the software a short reprise of what the problem is I am trying to combat. The Epson 4800 print head has 180 separate nozzles for each of its eight ink channels; 1,440 in total, delivering variable ink droplet sizes down to 3.5 picoliters. I am not trying to clear the odd clogged nozzle as I do not suffer from that much. What I,
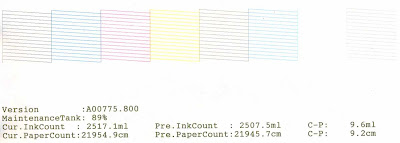
and many other Epson 4000 & 4800 Pro users, repeatedly suffer from is the complete loss of a whole colour channel - all 180 nozzles turning off at the same time, resulting in a nozzle check like that shown below, where the whole LM ink channel is missing.


Even more frustrating is the fact that these channel outages seem to be able to move around the print head, meaning that when one channel is cleared another drops out.

I was drawn to the Printer Jockey utility to try to combat this problem, specifically for its ability to flush selected nozzles and to print timed colour patterns. The free version of Printer Jockey does not have either of these two features enabled, so the full version is needed, which costs $99 for three activations (e.g. to run on three separate computers). The activation procedure is a bit convoluted, but it gets you there in the end. It comes with a pdf User’s Manual and there are tutorials on YouTube – even so I found that I had to email Tech Support at Printer Jockey to find out how things work; so they are neither very intuitive nor fully covered in the manual. Fortunately Tech Support, in the from of Fred Padilla, was extremely helpful and quick to answer questions – a real treat compared with many Tech Support functions I have come across.

The Channel Flush (and alignment grid) feature is supported on the following Epson printers:
  • Epson Stylus Pro 4000
  • Epson Stylus Pro 4800
  • Epson Stylus Pro 4880
  • Epson Stylus Pro 7800
  • Epson Stylus Pro 7880
  • Epson Stylus Pro 9800
  • Epson Stylus Pro 9880
  • Epson Stylus Pro 11880
  • Epson Stylus Photo 1400
  • Epson Stylus Photo R1800
  • Epson Stylus Photo R2400
  • Epson Stylus Photo 2200
  • Epson Stylus Photo 2100
  • Epson Stylus Photo 1280/1290 - soon
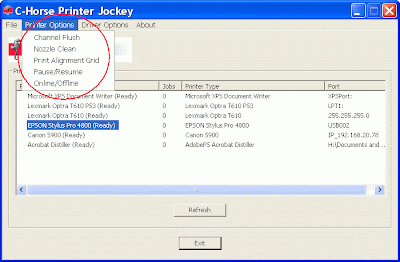
On running Printer Jockey you are presented with a list of the printers available on your system – the nozzle manipulation features I was most interested in are in the “Printer Options” tab (see screenshot below).


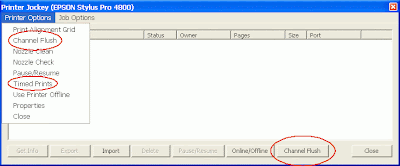
Not all of them, however, are there. To access features like timed printing and running a nozzle check (after a nozzle clean for instance) you have to double click the relevant printer and select “Printer Options” in the new window that pops up. Here is the full suite of options available - the screenshot below shows the options available for my Epson 4800.


The options of interest for nozzle clogging are “Channel Flush” and “Timed Prints”, with the necessary evils of “Nozzle Clean” and “Nozzle Check” available if they are needed – these latter two options replicate those available in Epson’s printer utility, although they simply do the action with none of the various options or fancy progress graphics that Epson offers. The “Print Alignment Grid” option is designed to help direct-to-garment printers who use two separate printers and want to match the output from both printers as closely as possible.


What is Channel Flushing and how do you use it?
Channel flushing is achieved simply by printing blocks of colour from the selected nozzle or nozzles.

The option is accessed by either selecting it from the drop down “Printer Options” menu on the main screen (after selecting the appropriate printer), or from the second “Printer Options” drop down menu on the screen that comes up when up you double-click the desired printer, or the direct button on the same screen – circled in red in the screenshot above.

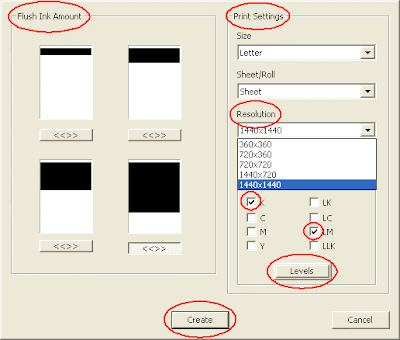
The Channel Flush options screen pops up, shown in the screenshot below.


This allows you to choose which channels you want to flush, set the paper size and source, and use three different methods for determining how much ink you wish to flush each time.

First select the paper size and source you are using. The options include the standard US and European paper sizes that you are likely to use and offers the option of sheet or roll feed.

Then select the “Ink Channels” you wish to flush- it can be a single one, all of them or a selection of any of them. In the screenshot above the K and LM channels are selected (circled in red).

The three ways for varying the amount of ink flushed are:
  • Option 1 is the “Flush Ink Amount” option (circled in red above). This lets you decide how big a block of colour you want to print, although all the options are full page width; in four steps up to most of a page.
  • Option 2 uses the print “Resolution” to vary the inking – low resolution (360 x 360 min – 1440 x 1440 max). The higher the resolution the more ink is used.
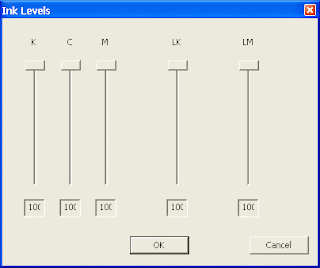
  • Option 3 is a separate option to set the individual ink channels’ levels. This is accessed by clicking the “Levels” button (circled in red above). Sliders for the channels selected earlier appear in a separate screen. The screen shot below shows the screen that appears when K, C, M, LK & LM channels are selected. The slider allows you to choose levels from 100% (the default amount) down to zero, in increments (or decrements) of 1%.


Then simply press the “Create” button and the utility creates the relevant flushing programme and sends it to the printer.

The output has all the selected colour channels printed one on top of the other – so unless you select only one channel the output will not help diagnose whether some channels are printing, although if it changes as the print progresses some colour change might show up.

Personally I found this disappointing as I hoped to be able to use it for more than simple ink flushing. I gather from Tech Support that this could be changed reasonably easily – personally I would like to see the option of either superimposed or separate channel printing.

Does individual colour channel flushing resolve nozzle clogs/colour channel loss?

For me this is the key question and my raison d’être for trying Printer Jockey – to try to keep ink usage as low as possible when having to run the inevitable nozzle cleaning cycles that clogs etc require.

Sadly… no
, in my experience it does not. Specifically if a whole ink channel "disappears" ink channel flushing will not bring in back.

Three times I have lost a complete single colour channel (LM in all three cases) in the couple of weeks that I have been trying Printer Jockey. In the first two cases I ran a couple of channel flushes; starting with the least ink option, skipping to the maximum ink option as soon as that did not work. In neither case did it print one discernable dot of the colour that I was trying to recover. The third time I simply went to the maximum and tried five times without any ink showing up on the paper at all. In all three cases a single conventional nozzle clean cleared the problem, which is unusual in itself as recently it has usually taken more to do the job. This is probably due to my new daily printer “exercise” routine of printing little and often, and keeping the humidity up; it is just possible that the single failed channel flushes helped, but I can not really see how.

Ink channel flushing and nozzle cleaning are clearly not the same thing. Using ink channel flushing to clear out the odd blocked nozzle may well work, but I have not experienced that (yet) so can not comment. [After a couple of months I have now tested this and my conclusions can be found in this posting].


What are Timed Prints and how do you use them?
Timed printing is a way of sending small jobs to your printer at pre-determined times; mostly to keep them exercised.

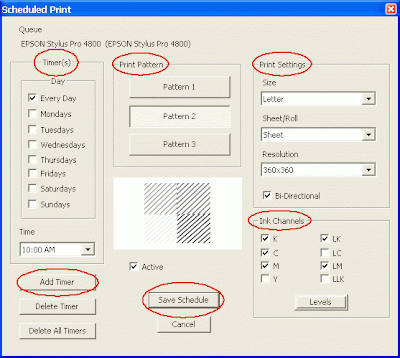
You access the “Timed Prints” option by double clicking on the printer you want to print from on the main programme screen; then select “Timed Prints” from the “Printer Options” drop down menu. The “Scheduled Print” screen (see below) appears.


On the right hand side you have the same set of Ink Channels, paper size and source options available as in the Channel Flushing screen, which you set up in the same way.

On the left hand side are the timer options – which are pretty self explanatory. You select the frequency from the list of “Day” options and the time of each scheduled print via the “Add Timer” button. To add in further timed prints just click on “Add Timer” and repeat the process.

Down the middle are a set of three “Print Pattern” options controlling what the actual timed print will produce, with a preview of what they will look like in the box below.

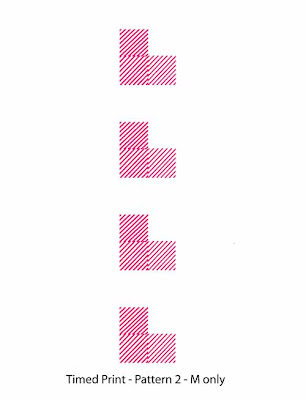
These various options essentially use differing amounts of ink. The image below shows the printout using Pattern 2 with just the Magenta ink channel selected. The print appears down the middle of the page with the pattern repeating four times on a US Letter sized sheet of paper.


When the timers are set, press “Save Schedule” which returns you to the main screen. Here you will now see a clock face to the left of the printer which will run the timed prints – see screen shot below.


You are now ready to go, but…

Printer Jockey does not create a task to run in Window’s “Scheduled Tasks” utility (which is what Harvey Head Cleaner and MIS Autoprint do) – instead it runs the schedule from within Printer Jockey itself and it does not seem to store them. This means that if you exit Printer Jockey and re-enter it the Timed Prints schedule disappears and you have to re-enter the data.

In other words – if you want to use Printer Jockey to run timed printing tasks you will need to leave your computer on all the time with Printer Jockey active.

This was a surprise to me – and I turn my computer off at nights or when I am out during the day (not withstanding my regime of printing nozzle checks morning and evening and some images every two or three days) to try to reduce my carbon footprint, so this does not really work for me.


Overall conclusion

I was really hoping that this interesting utility would help with the nozzle clogging challenges that Epson printer users face, but viewing Printer Jockey purely as a utility to help resolve or reduce the incidence of nozzle clogging/colour channel loss my conclusion is that it does not help, and at $99 it is not something I would suggest buying.

The ink channel flushing does not clear nozzle clogs/colour channel loss and the timed prints option is flawed as it does not remember the schedule and requires the computer to be left on at all times with Printer Jockey running. This does not suit me and MIS Autoprint can be made to do everything I really need, although it does not actually print from each specific ink channel – and it’s free.

I really like the option to be able to print specific nozzles in separate colour blocks – ideally I would like to be able to replicate the solid colour blocks that Epson’s auto nozzle check prints without the cleaning etc that accompanies it within a Windows Task Schedule.

I suspect that the developers could produce the ultimate printer conditioning software if they wished, but this does not seem to have been the original idea behind the software. A combination of Harvey Head Cleaner and MIS Autoprint printing the choice of conventional nozzle checks or the automated nozzle blocks from the Epson Auto facility for around $50 would be a very attractive piece of software - for me at least.

Even better would be an implementation in the printer's Firmware that did this without having to have the PC on all the time to run the routines externally. Epson's firmware based auto nozzle check and cleaning functions only make matters works in my experience so I have them turned off.

Of course Epson should not have produced a printer that needed this level of molly coddling, but that is a different story.

I stress that for those looking to use the other printing utility options that Printer Jockey offers I have no opinion to give as I do not need them and have not tried them.
Read more...

Sunday, 27 April 2008

Turning off auto nozzle check and cleaning on an Epson 4800 Pro inkjet printer

I have frequently found that the auto nozzle checking and cleaning cycles that my Epson 4800 inkjet printer carries out at random times usually causes more problems than it could ever solve. I have found that turning them off helps. This posting explains why you might want to turn them off in more detail and how to do it.


Why would you want to turn them off?
On the face of it having the printer regularly check the quality of the output by doing a nozzle check and automatically cleaning the print head if need be sounds a really helpful and quality enhancing idea.

In reality, however, I and many other Epson 4000 and 4800 printer owners, have found that the printer often does “something or other” that looks and sounds just like a nozzle cleaning cycle without being asked to do anything – e.g. an automatic nozzle check and clean. The problem is that this often seems to happen when there is nothing wrong with the output before the action; but after it whole colour channels are often (I am tempted to say usually) missing, which require the usual palaver of cleaning and nozzle check cycles to get back to where we were before the auto “something or other” happened. This is both expensive in time (it can take hours or days) and money, in wasted ink.

In effect these auto actions seem to cause nozzle clogging/loss of colour channels, not reduce them. I have found that in
my experience turning off these two functions is a good idea.

If you too suffer from continuous nozzle clogging/loss of colour channels then this may be a small contributor to reducing your problems.

How?
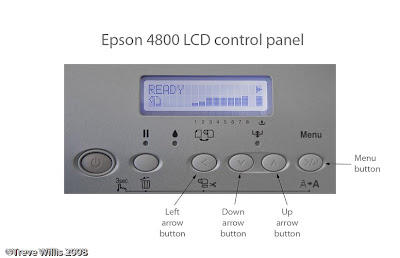
The picture below shows the LCD printer display and the various buttons mentioned in the instructions below.
You can turn off both the auto nozzle checking and cleaning functions by following the button pressing sequence
detailed below in the LCD control panel on the printer:
  1. With the display saying “Ready”, press the “Menu” button twice – the screen will display “Printer setup” then “ Platen Gap” on the second line of the display

  2. Press the “up arrow” button three times – the screen will display “Auto Cleaning”

  3. Press the “menu” button once - you should see Auto Cleaning, *On

  4. Press the “down arrow” button once - you should see the word “off” on the second line of the screen

  5. Press the “menu” button once – an asterisk should appear next to the word “*off”

  6. Press the “left arrow” button once – the screen will display “Printer setup, Auto Cleaning”

  7. Press the “up arrow” button once – the screen will display “Auto NZL CK”

  8. Press menu once – you should see “Auto NZL CK, *On”

  9. Press the down arrow once - you should see the word “off” on the second line of the screen

  10. Press the menu button once – an asterisk should appear next to the word “*off

  11. Press the “left arrow” button three times to bring you back to the “Ready” screen

This turns off the two auto actions, although in my experience it does not completely stop the printer from running the occasional auto
something or other cycle – it does, however, seem to reduce the frequency of them. Read more...

Wednesday, 23 April 2008

Setting up and trouble shooting MIS Autoprint 2.0

Some inkjet printers are very prone to nozzle clogging and my Epson 4800 is certainly one of them. Frequent printing is often recommended as part of a package of solutions to try to avoid the problem. For those who do not need to print frequently this is a nuisance, but for those unable to do so because they are away etc this is a real problem. MIS Associates have very generously made their Autoprint utility freely available to help solve the problem.

I have tried to use the utility a couple of times and come across annoying little problems which stopped me using it, but given my clogging problems I thought it was about time I got it to work. Since I have now got it working and found solutions to several small issues along the way, this post is aimed at sharing what I have found out.


Initially the utility was only available for PCs but it is now available for various versions of the Mac operating system. My experiences reported here are all with Autoprint v2.0 on a PC running Windows XP SP2.

MIS Autoprint is available to download from MIS, free of charge.

It is simple to install – simply unzip the downloaded files, click on the Autoprint application file and follow the instructions; which, if you follow the defaults, will put the application in a folder called “MIS Autoprint” in your main “Program Files” directory and place a shortcut on your desktop. In the folder, along with the application file and instructions, are the jpeg files that it will use for automatic printing.

Autoprint uses the Microsoft Task Scheduler to print a jpeg file at a time interval that you select. Autoprint is not password protected, but it needs the authorisation of the User ID’s password to run. It will not run unless Windows is set up with a password protected User ID with administration privileges.

If you do not have a password protected PC then you can add a password to your User ID by going to the “User Accounts” control panel and setting one. If you do not want to set one for your main User ID then there is a workaround on the MIS Forum involving setting up a dummy password protected User ID, but I simply password protected my main User ID, which was probably a good thing to do anyway.

To set up an Autoprint task schedule and run a test print simply click the Autoprint desktop icon and follow the instructions – they are very clear and should not cause any problems, unless…

I run an Epson 4800 Pro inkjet printer and it is an 8 ink printer – The largest (most colours) option that came with the original download was a 7 ink option. Since the aim is to regularly exercise all the ink channels an 8 channel option seemed sensible.

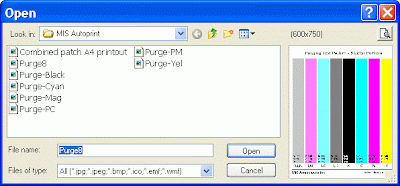
Autoprint will, in fact, offer you the choice of printing any jpeg file that is in the same directory as the application file. MIS also offer a stand alone range of additional files to use (from here) which includes an 8 colour file. I simply dropped this into the MIS Autoprint folder, along with a jpeg version of a colour patch printing file I use for paper calibration (See screenshot below).

Click on the images to see them full size


And hey presto, these are now available options in Autoprint (See screenshot below).


The 8 channel ink print looks like the image below:


I don’t see any limit to the number of image files that Autoprint will offer so long as they are jpegs (it also appears to support
.bmp, .ico, .emf & .wmf file formats, but I have not tried any of these and it did not work with tiff files I tried) and in the right folder (but I have not tried that many). The images supplied with Autoprint are sized to fill a US letter sized (8.5” x 11”) sheet of paper – I find that they work fine with A4 as well. I do not see any reason why you should not use a favourite photo if you prefer, so long as you are happy that it uses the full range of inks and it is sized correctly.

If you want to save some ink by printing smaller blocks of colour you can modify one of the files to make it smaller and use it instead.

Autoprint allows you to set the interval between prints (in days – 1-14 days in the dropdown menu, but it will allow you to enter more days if you wish, although I am not sure whether it actually works then, nor why you would want to go beyond 14 days…) and the exact time of day.

If you want to set up several schedules for more printers, or for the same printer but at different intervals or using different images (I have not tried this, but I can not see why it would not work) then there are instructions in the readme file to do this:
"The task that is created by the GUI can be edited to allow for more advanced schedules. However if you rename the task, then Autoprint will not find it and simply create another one.

This could be used for people with more than one printer. Basically the procedure here is to create a task with Autoprint, test it and then rename it. Then start Autoprint again and create another task for the next printer, test it and then rename it. This procedure can be repeated for any number of times to create multiple schedules."
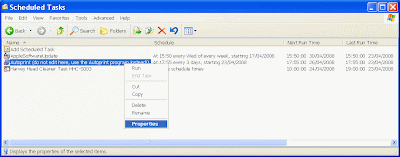
You can edit the task name in the “Scheduled Tasks” control panel (see screenshot below) by right clicking on the task name, then “Rename”; you can also see details of the scheduled task(s) etc in the control panel (where you can also see that I use Harvey Head Cleaner).


Nearly done:
One last problem I had was that Autoprint now worked fine, but every time it wanted to print it opened the Epson Print Preview pane first and asked for permission to print – which meant that it did not print unless I said OK, rather missing the point of the whole exercise!

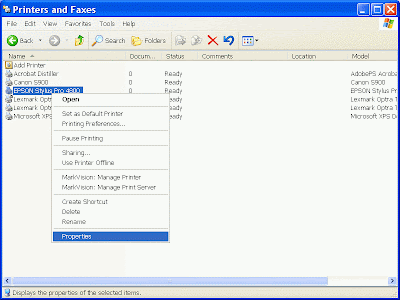
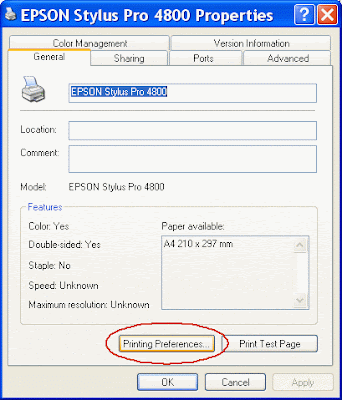
To solve this I went to the “Printers and Faxes” control panel; right-clicked the Epson 4800, and selected “Properties” (see screenshot below).


In the "General" tab, select the “Printing Preferences…” tab (circled in red in the screenshot below)


Then untick the “Print Preview” box (circled in red in the screenshot below). Since I shall be printing these images on plain copier paper I also selected “Plain paper” as the media type (circled in red in the screenshot below).


If you subsequently tick the "Print Preview" box in another application you may find that it stays ticked interrupting the next Autoprint - this happened to me when I printed something in Lightroom and ticked the "Print Preview" box; the next time Autoprint ran I found the purge pattern on screen awaiting my return for approval to print...

Now it all works fine!

When setting up a scheduled print I suggest you do run a test print at the end of the process as it will show up any likely problems, such as size, print previews etc. If it does not print anything it probably will not print on schedule either so it is best to sort it out at this stage.

Clearly this utility will only work if both your printer and computer are turned on when the scheduled task is due to run. In the default set up Task Scheduler will wake the computer up to run the task if it is asleep but unlike Harvey Head Cleaner it will not run the task next time the computer is turned on if it was turned off at the scheduled time for the task - or at least if there is a setting to tell it to do this I have not found it.


I have found that the 4800 is very sensitive to paper size - I often get the "Wrong paper size" warning message when using a stack of copier paper - on some sheets but not others.... Anyway this is not at all good news if you are running automated prints via Autoprint as it simply stops any printing until you clear the warning. So I simply turn it off as I can not remember actually trying to print on the wrong sized paper.

If you do not know how to do this I have posted instructions here.

I also find that plain 80gsm copier paper is prone to miss-feeding so I try to use thicker paper, such as 100gm, to avoid this problem. Again a miss-feed completely messes up the automatic process.
Read more...

Monday, 21 April 2008

Cover for Epson 4000 / 4800 Pro inkjet printer & humidity readings

One of the most common suggestions for reducing the incidence of nozzle clogs on Epson 4000 & 4800 inkjet printers is to increase the humidity inside the printer by putting a water soaked sponge in the paper tray and to put an impermeable cover over the top to keep the moisture in. This post is about finding a suitable cover and the humidity results using one gives.


Various people use polythene or bespoke covers. I could not find a suitable piece of clean polythene and in the UK I could not find any suitable bespoke covers anywhere - not even from Epson, so went looking for an alternative.

I did find one available on the US eBay site so I ordered one, but keen to try to solve my interminable clogging problems I wanted to find something to use now.

I looked around at general printer covers from the likes of Fellowes, but none were anywhere near large enough - the 4800 needs a cover about 850 x 850 x 400mm; much bigger than anything on offer.

I looked at other covers like BBQ covers, but none were remotely like the right dimensions. Eventually I came upon an underbed vinyl storage bag that looked nearly big enough - from Argos, in the UK. If anyone is interested the bag comes in a set of "2 Jumbo Vinyl Storage Bags", Argos' code: 875 0967, costing £3.99 for the pair.

In practice a single bag fits the printer almost perfectly (see photos below) even with 220ml cartridges fitted (or a mix of 220 & 110ml in my case).


I measured the humidity and temperature in the printer head area and outside the printer for the day before putting on the cover and for 2 days afterwards, using an Oregon Scientific Weatherstation with a couple of remote sensors. The temperatures were the same inside and out, but the humidity differed as shown in the the table below.


Humidity outside printer - % Humidity inside printer - %
With sponge but no cover 39 - 40 43 - 44
With Sponge and cover 39 - 40 50 - 53


Clearly even without the cover the humidity is higher in the printer due to the water soaked sponge and putting on the cover takes it significantly higher again. Whether these figures actually make a difference only time will tell.

As you can see in the extract below from the User Guide for the 4800, Epson recommend keeping the humidity in various ranges depending on what you want to optimise.


It looks as if a humidity around 40% is at the low end of good and 45-50% is a good range to aim for - so I am happy that my results put my current set up in the right range.

Generally people who report on nozzle clogging problems reckon that the higher the humidity the less the problem - but I have not seen any mention of a practical upper limit. Around 50% would seem a good target to me.

In any case at £2 a time the covers from Argos are a bargain and look better than polythene or bin liners.
Read more...

Saturday, 19 April 2008

Epson 4800 saga - 6 days on....

Having cleared my printer to a perfect nozzle check early on Monday morning I implemented a new active routine: using Harvey Head Cleaner morning and evening to automatically print a nozzle check, a wet sponge in the paper tray (no cover yet as I can't find a suitable anti-static vinyl cover or bit of polythene big enough and no one, not even Epson, sell a cover for the 4xxx series printers in the UK) and occasional printing most evenings. So on Saturday morning, six days on how is it going?


Well, all through the week I have had perfect nozzle checks and enjoyed being able to print on demand. Come Saturday morning the auto nozzle check print showed the LM channel about 40% missing - this despite it printing both prints and nozzle check fine last night.

Trying not to despair I thought I would run the lowest level (according to the Epson manual) KK0 nozzle cleaning cycle from the LCD display on the printer (see my SSCL posting for more info on this). I then ran a nozzle check to confirm that the nozzles were clear and now I find that it is worse - nearly all the LM is missing, and to add insult to injury it has used up 14.1ml of ink, more than the 4-9ml range that cleaning via the printer utility normally uses. Below are the nozzle checks from yesterday through to this morning after the clean.


On top of that when I tried to run a nozzle check from the utility after the cleaning cycle the utility refused saying that the maintenance tank was full, while telling me that there was 87% left. Also that all the ink cartridges were empty... turning it off and on again solved that problem.

In disgust I have set the head to puddle soak in distilled water...

Also it has prompted me to look for a cover again - I have just found someone on eBay in the USA who sells them, so I have ordered one.

Read more...

Wednesday, 16 April 2008

Someone else’s strategy for keeping their Epson Pro printer happy

Coming down off the ceiling of despair caused by my recent trials I find that on the Yahoo 4000/4800/4880 forum someone posted a solution to keeping their Epson 4000 printing after being near to scrapping it due to continued nozzle blockages. This is their strategy plus some printing utilities that might help as well.


From ragnar22751:
Anyway, here is what has worked for me (for the last 3 weeks anyway)

1. The printer is left on

2. It's dust cover is draped loosely over it with a wet sponge in a dish placed on the left side of the paper tray. (I didn't think that liquids were a good idea as the printer would splash things around from the motion of the printer) Add water to the sponge as needed.

3. The Harvey Head Cleaner program runs a nozzle check twice daily.

4. The MIS autoprint utility is set to print the 8 color purge file every third day.

Of course it goes without saying that the printer is stuffed with standard laser print paper and not expensive ink jet art paper. I found that the nozzle checks alone were not enough to keep things clear although it did improve greatly when the printer was covered and the damp sponge was introduced.

Now that Harvey Head Cleaner works on my PC I shall give this a try – HCC’s current price is $39.99, with a free 7 day trial on request if you want to try it before buying.

The MIS Autoprint utility mentioned is another automatic printer utility (free this time) – this prints a bigger ink purge file, but I have not found their 8 ink purge - the largest option I can find is a 7 ink option. I don't use MIS Autoprint as on a Windows XP system it will not run unless Windows is set up with a user ID and password, although there is a workaround for this.

MIS offer a selection of purge files, including an 8 ink file, but I have not found that it isolates nozzles, so I simply use a colour patch file for inkjet paper calibration as a general purge file to exercise my printer when needed.

On the same forum another program called “Printer Jockey” has been recommended. This is a $99 utility that seems to do what HHC does as well as allow for individual ink channels to be cleaned, which, if it works, would really help save ink & money. I may have a look at it and decide which way to go, but at $99 with no trial period I think that I need some convincing that it really does work.

In my experience just printing blocks of colour when the nozzles are blocked does not do help clear the nozzles; that is what it looks as if Printer Jockey does - it does not say that it runs a cleaning cycle just for one channel. The YouTube tutorial seems to indicate that channel flushing is just printing through a particular colour's nozzles rather than cleaning. Anyone know any different?
Read more...

Tuesday, 15 April 2008

Epson 4800 printer nozzle clogging – new strategy report no 2

Some time ago I reported on a new strategy of not molly coddling my printer to see if it behaved any worse, or even better. Last time the report was indeterminate. I recently left the printer unused for about four weeks and this is my report on what happened when I turned it back on to use…


Before I go any further I shall use abbreviations for the colours in this posting, so in case there is some ambiguity here are the abbreviations I shall be using:

Colour Abbreviation
Photo black PK
Cyan C
Magenta M
Yellow Y
Light black LK
Light cyan LC
Light magenta LM
Light, light black LLK


I wanted to make a load of prints so I turned the printer on on Friday evening and ran a nozzle check. Not surprisingly it was not very good (see below for a scan of the nozzle check – I apologise now for the quality of the images, but as you will see I was not exactly full of patience by the time I came to put this posting together!). Since the LLK channel was missing when I turned it off I was actually quite happy with the initial check (why should I be happy with it not being perfect? Well, that is what I have come to expect from this printer…)

Click on the images to see them full size


The exact details of what I did to resuscitate the printer are in the spreadsheet extract below (although I may have missed the odd nozzle check) and the sequence ink usage can be followed by looking at the ml count in the 6th column from the left.


A narrative description of the bare details in the spreadsheet goes as follows, with a representative series of the resulting nozzle checks (not all of them as that would be truly tedious):

I then ran a few printing exercises to help the printer limber up and test out Harvey Head Cleaner. Nothing much changed so I set it to puddle soak in distilled water overnight.

Saturday morning - The first nozzle check (See below) after the puddle soak showed some improvement, but not much.


I then spent Saturday doing Saturday things - After one nozzle clean I was really encouraged with all the colours except some M looking fine (see below). I then set it to puddle soak again overnight in distilled water.


Sunday morning and hopefully the chance to do some printing. I naively thought that one more cleaning cycle would sort out the M and it did – just that the C channel went missing! (See below)


At this point I had to change the LLK cartridge as the printer refused to run a cleaning cycle as it had hit the 5% full limit. Then one cleaning cycle later I was truly horrified to see that while some of the C had come back, PK, M, LC, LM & LLK had all disappeared completely. A much worse state than after leaving it untouched for four weeks. (See below).


A further cleaning cycle brought back all but M and C (see below).


Since I could think of better ways to spend a Sunday than tending the printer I set it to run an auto nozzle check & clean programme. I have not used this cycle for a long time as it often seems to make things worse, but I wanted to see what happened. After 5 cycles the printer gave up trying; it had improved things slightly, but a bit of LM and LLK, and most of M was still missing. The image below shows the results and also shows the problem that cleaning these printers often shows – the random loss or moving around of problem colours. In the third cycle the LM & LLK have suddenly decided to disappear…


Slightly better after a further cleaning cycle – see below, which also shows that the auto sequence used up 25.9ml of ink.


Then it all got worse again – some M came back, but all of LLK, nearly all of LM and some C went missing again…


A couple of cycles later all the colour channels were back except M was still missing about 30% (See below).


It was getting late so I decided to run an overnight puddle soak using Fixyourownprinter head cleaning solution. Then very early on Monday morning just before work one further cleaning cycle and the M was back; but LM went missing… howls could be heard around the house… (See below).


One more cleaning cycle and Eureka – every one of them was perfect (See below)


Just in time to leave it and go off to work… what a productive weekend.

This is quite a representative example of what it can take to get a printer back if the colours go missing. It took 96.3ml of ink, 10% of the maintenance tank capacity, at least 14 cleaning cycles (including the 6 done in the auto check), 21 nozzle checks (probably more), 8 purge prints, 3 puddle soaks and nearly three days to bring it back to perfect nozzle checks.

One good piece of news is that by updating the firmware and drivers for the 4800 the actual amount of ink used per cleaning cycle was probably 25% less than before and I can see no evidence that the smaller ink volume makes the cycles less effective – a small, but helpful, comfort

So, no I don’t think that treating it rough by leaving it alone is the solution, but this was not much worse than I have experienced even when molly coddling the machine.

So what next?

Having wrestled with constant clogging and colour channel loss with my Epson 4800 for 6 months I must admit to being quite dispirited and disillusioned now, although a wave of euphoria usually accompanies a perfect nozzle check, especially after a saga like this.

I have pretty much tried everything that I and the Yahoo forum can think of to keep my printer healthy, but to no avail really. I have tried babying it, treating it rough (not literally, just not trying to use it every day).

I am a keen amateur photographer who wants to make large prints and a variety of smaller ones on demand – I bought a pro printer because I believed that it would produce prints of consistent quality without any fuss. For the first 18 months the 4800 did this with only occasional problems, but in October 2007 the yips really set in.

I have now come to dread trying to make prints and I find it is ruining my enjoyment of photography as a whole. The last episode found me checking on a Friday night what the condition of the printer was and of course finding that there were problems. By Sunday evening I had not managed to clear the problems and I had not managed to print one single photo, but used up hours of time, 96ml of ink and not a little good humour. I finally managed to clear it very early on Monday morning in time to go to my day job. How infuriating is that?

Surely a pro spec printer ought to be better than this – it ought not to rely on voodoo and magic to get it working. If I bought a pro spec camera I would not expect it to sulk if I did not use if for a few days; I expect my car to work if I go away on holiday for a couple of weeks; I expect my lawnmower to work after a Winter in the garage – and surprise, surprise they all do. In fact I can’t think of anything else I have that is so unreliable. Even Windows, for all its problems, works most of the time. I know that the inkjet is a marvel of technology, but so are all these other systems – is inkjet technology really so much on a knife edge?

If they can only really be used by pros who use them all day every day then I really wish Epson would make that clear and price their pro printers accordingly – if the 4800 had been £5,000 instead of £1,500 I definitely would not have bought it.

Do Epson engineers ever look at this sort of user reprot and wonder how they can improve our experience?

I’ll keep trying because I can’t afford not to and because I don’t believe that there is a more reliable solution from HP or Canon – pardon me if I’m cynical.

So the saga will continue…
Read more...