This posting compares my experience with photo image printing through both Lightroom (v1.3.1) and Qimage Pro (v 2008.205). I have been using Lightroom for 3 months and Qimage for 2½ years. Since Qimage is only available for the PC this review will only cover PC related experience.
Much has been written about Adobe’s Lightroom since its launch around a year ago so I will not give any further background to that – there are plenty of sources and I have listed some in an earlier posting.
Qimage is a much less well known fully ICC colour managed workflow PC based printing application, although it does more than just printing - full details may be found on Qimage’s website. Over the years that I have used Qimage I have essentially used it as my primary image printing software, having got frustrated with Photoshop’s printing interface, and not used its other features much at all – so this review will concentrate solely on image printing.
Essentially Qimage optimises the printer’s own driver, thus replicating many of the advantages of Raster Image Processing (RIP) software, but at a fraction of the price in a package that will work with any printer, unlike RIPs which are printer dependent. Since it uses the printer’s driver it is limited by that – for instance the driver for my Epson 4800 Pro inkjet printer insists on having a 14mm margin at the bottom of every sheet printed; Qimage can not do anything about that.
For me the main attraction of Qimage is that with its built-in sophisticated image resampling and sharpening algorithms it enables me to very easily print an image at any size I like from A2 down to passport photo size without having to do anything to the original image file – the software does all that is needed and it is extremely easy and quick to use. I can simply create on optimised TIFF or JPEG file from a RAW capture and use Qimage to print it at any size my printer can manage. Clearly it can not create miracles – it will not produce high quality A2 prints from a 100k file, but it will do the best possible job of any software that I can afford. I have made A2 prints good enough to hang on the wall from my Canon 10D’s (6.3 megapixel) and 30D’s (8.2 megapixel) RAW files. Qimage also allows me complete control of what size and where I print images on the page or roll.
Qimage comes in three versions; Lite, Pro and Studio at $34.95, $49.95 and $89.95 respectively, and all versions come with free unlimited lifetime upgrades. You can also upgrade to a higher version at any time. There is also a 30 day free demo version available from the website.
While Qimage claims to be Vista compliant this review will only cover Qimage Pro using Windows XP SP2.
In this review I shall pick out particular features and areas that I routinely use, and compare them in Qimage and Lightroom – it is thus not a complete review, and in some cases my observations may be tainted by ignorance, but after years and months of use and a good deal of research, reading and (I would like to feel that it has been intelligent) trial and error I feel that any ignorance is likely to be as much due to lack of usability, poor documentation or simply poor implementation as my stupidity.
Since my main reason for using Qimage in the first place was to be able to easily make quality prints of images at any size I choose that is where I will start.
Print Quality
I have printed identical colour and B&W images on my Epson 4800 Pro inkjet printer through both applications at all sizes up to A3+ on a range of gloss papers using bespoke profiles, generic profiles and built in printer profiles.
This first thing to say is that since both packages are fully ICC colour managed there is no difference I can see in colour rendition in any cases.
At print sizes below A4 no one has noticed any significant difference between the output from the two packages. At A4 and above, however, there is a clearly discernible quality advantage in Qimage printed output over that from Lightroom, with the advantage becoming larger as the print size increases. The images look sharper and in photos taken with my Canon G9 where there is more image noise discernible in flat areas of colour, such as blue skies, from prints via Lightroom; from Qimage the noise is smoother and less pronounced. While not hugely different at typical viewing distances Qimage definitely has the edge in my experience.
Printing specific sizes
Being able to quickly make a print of a photo at any desired size without having to go into Photoshop (or any other application such as Genuine Fractals) to re-size it and print it off is a major time and tedium saver. Both Lightroom and Qimage offer this feature, but Qimage’s implementation of it is more precise and less prone to error than Lightroom’s.
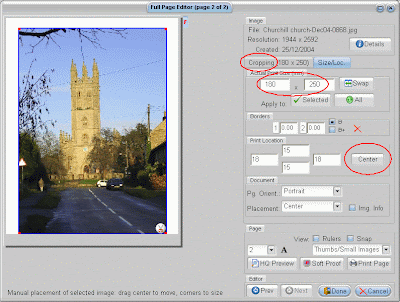
In Qimage you simply choose the image dimensions you want, either from presets or through a custom dialogue, see the screenshot below – in this case I have set 180 x 250mm, which shows up in the dimensions box circled in the screenshot. This is exactly what I get when I print it. Since to produce the print at that size Qimage needs to crop to left and/or right you can set it to do it automatically or fine tune it using the crop tab (circled on the screenshot). Also to centre the print in the page you can just hit the “Center” button (circled on the screenshot) and it sets it to as near the centre of the page as it can.

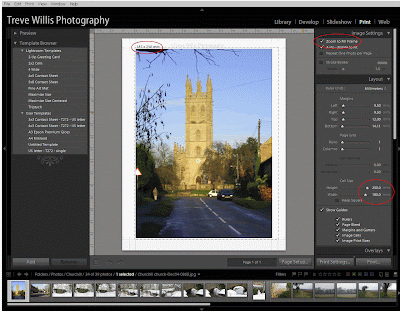
In Lightroom if there is a preset with what you want already set up then it is pretty quick, but if you want to make a print outside of a preset size then you do it by setting the cell size. In the screenshot you can see that I have set a cell size of 180 x 250mm (circled in the screenshot), but what I actually get is 180 x 240mm or with “zoom to fill frame” ticked it tells me I am going to get 187 x 250mm (circled in the screenshot). This caused me no end of angst while I tried lots of things to get it to say 180 x 250mm, until I just printed it to see what I got and found that it actually printed 180 x 250mm – all quite confusing and, although OK’ish in the end, it did not inspire confidence. I think that the displayed sizes are actually the size of the uncropped image – so in the case above I think that it may be telling me that the uncropped image is 187mm wide, but I have not found this documented anywhere (if it is in the Lightroom help system then I have not had the patience to find it yet).

To centre the image on the paper you have to set the margins manually, which is not nearly as convenient as Qimage. If Lightroom needs to crop the image to produce the dimensions then you can move the image in the guides to optimise the image, which is quicker to do in Lightroom than Qimage.
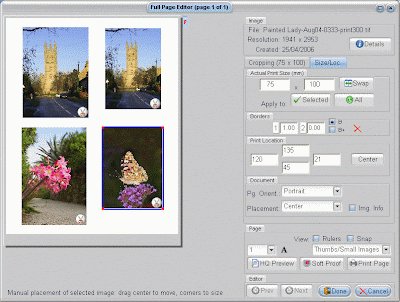
If you want to print several images all of different dimensions on a single sheet then it is only possible in Qimage. The screenshot below shows four images, each with exact and different dimensions, set out on the screen as they will print. In Lightroom all the prints have to be the same size.

So, although both packages produce the print of the right dimensions in the end I find it easier to do in Qimage, and if you want variable exact sizes on a single page this is only possible in Qimage.
Contact printing
I often want to print contact sheets (either to paper or pdf files) to make selections of which images to work on and, I since I nearly always shoot in RAW capture mode, I normally want to make contact prints direct from RAW files. I can not do this in Qimage Pro (although the Studio version may be able to as it deals with RAW files) so I have always done this in my file browser, which is Breezebrowser Pro. This, however, limits me to printing the as captured images. Lightroom does print contact sheets – I have found it really easy to do this, and it is especially helpful that it will allow me to make some basic adjustments, crops etc to the files and add the needed image information to each one before printing. This is quick to do in Lightroom’s workflow and makes a much better starting point to make decisions on which images to optimise. I really like this and Lightroom wins this function hands down.
Layout flexibility
As already discussed Qimage is more flexible in layout than Lightroom; but it is more flexible still. You can drag images around the page manually, automatically disperse them around the page, evenly or compacted, although all the pages in a print run have to be managed the same way. If you ask it to, Qimage will sort through the images in the print queue, re-ordering and rotating them to minimise paper usage. Lightroom does not offer anything like this.
Presets and History
Saving common jobs etc is a real time saver and both Lightroom and Qimage offer the feature, called “Presets” in Lightroom and “Save” and “Recall” in Qimage. Saving printer settings is also a huge time and paper saver – once you have optimised printer settings, such as ICC profiles, printer driver and page settings etc it is much easier to recall them and switch between page sizes and papers than having to enter all the details each time as you have to do with Photoshop. I would really be lost without this feature in a printing application.
I find that Lightroom’s implementation of its version is easier to use than Qimage’s, but Qimage offers more options to save; most interesting to me is the ability to save whole jobs – including printer settings and the files to be printed – which can be recalled at any time. I find this really useful for repeating jobs or setting up jobs to be printed at some future date. You can set up print jobs off line and then print them when convenient. This is especially useful to me as I have an ongoing battle with my Epson 4800 (see my Epson 4800 blog postings) to keep it working and it is much better to batch up photos to print than do them piecemeal. Lightroom does not offer the ability to save any file information in Presets, so you will have to select the files to be printed under a Preset action every time you use it.
Lightroom does not offer a history state of print jobs, but Qimage does. It has an automated job log feature which can be set to hold the last 100 jobs, all or none of them – I set mine to keep all jobs. Again I find this very useful when wanting to reprint a particular job or recall what settings I used for a specific print.
Both applications save these “remembered” settings in separate discrete files so they can be backed up, and in theory exchanged, although I have only seen evidence of a preset exchange community appearing in Lightroom; and this is predominantly for non-printing effects such as B&W conversions etc.
So here Qimage beats Lightroom on nearly all fronts, although Lightroom’s user interface is easier to use.
Price
Comparing price is not easy as Lightroom is much more than a print module – so call it evens here. But Qimage is always being updated, as I am sure Lightroom will be, but Qimage upgrades will always be free, whereas I suspect that Adobe will come back for more at regular intervals.
General comments
- Lightroom does not seem to have the option for recording whether Black Point Compensation (BPC) is set or not. While this has not been a problem I nearly always turn it on in Photoshop and Qimage, and am a bit puzzled by its lack in Lightroom.
- Lightroom has a file size limit of 10,000 pixels on a edge. I have seven files that exceed this limit, mostly panoramas and so not only can I not add them to the Lightroom database I can not print them either. Although Photoshop has no problem with them Qimage is really the only option for me and it quite happily prints panoramas of around 400 mm wide x 1200 mm long on roll paper.
- As I have already mentioned Lightroom will print directly from RAW files whereas Qimage Pro will not. I find this very useful for every day printing; it saves a lot of time and space not having to convert to TIFFs or JPEGs for many of the files I print.
- Both applications provide the ability to add file information, cropping marks and text to prints. Simply ticking the appropriate tick box to add the required feature works similarly in both, although Qimage does offer many more options for all these functions. Lightroom has its specific implementation of its “Identity Plate” – which puts a pre-prepared (but users can edit it) photographer’s ID or © notice anywhere in the printable area (including on the image) or on each image on the page. This is usefully editable with size, opacity, colour and angle (although only ±90° & 180°) and the position can be dragged around the page manually unless you are rendering it on each image, in which case it always goes in the middle of each image. You can do the same with Qimage via its “Add floating text” function. This is much more flexible than Lightroom with any angle, font, size, colour or position you are likely to want available. This can be used to add multiple text entries on the page, all different. You will, however, have to add in the text separately for every image printed and there is no option to print an identity plate on every image (although this feature may be hidden in Qimage’s associative filters etc, and despite looking for it I have not been able to find out definitively whether this is an option or not). In Lightroom you can also add custom text in the “Photo info” option, but this always prints at the bottom of the image and is pretty limited in what it can do.
Qimage offers much more flexibility for ultimate control of these additions to the printed image, but it is finicky to do and Lightroom’s user interface is much easier to use. So the choice here is ease of use versus power. They both have their place and I use both as needed. - Which brings me onto the user interface and features. I really like the ease with which you can reconfigure the on-screen display at a keystroke in Lightroom, bringing up and hiding menus and options with speed and ease. Qimage uses a less sophisticated user interface. All the panels show all the time, although they can be dragged to difference sizes – In most applications I use keyboard shortcuts quite a lot, but not in Qimage. There are very few keyboard short cuts in Qimage for the features I use most, so they generally have to be accessed via drop down menus, and/or buttons or right-clicks on the mouse. I find that most of the keyboard short cuts are for things I do not use very often so I never remember them. It all seems to take longer to do in Qimage, although in nearly all cases the feature set each action offers is more complete than Lightroom’s. In my mind there is no doubt that Lightroom’s user interface is much more intuitive than Qimage’s and hence easier to learn and quicker to navigate around in use. So for ease of use Lightroom wins out; for features available Qimage wins.
- Lightroom works in the background, whereas Qimage does not – so when a print job is running in Qimage you will have to wait or go and do something else – you can browse images, but not do anything with them until the job is finished. I have not, however, found this to be too much of a problem as it is usually reasonably quick in rendering the print files and sending them to the printer.
- Both applications offer border printing, but Qimages’s is more flexible and I find easier to use. Lightroom allows you to set the border colour and width, but the width is set in points (pt) and I think in “mm”. Qimage offers the option to set one or two borders, either inside the print dimensions you have set or outside of them; they can both be different colours and are set in mm – all-in-all a more flexible implementation than Lightroom.
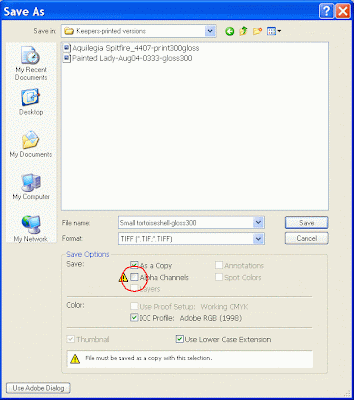
- As already mentioned I can only meaningfully view TIFFs or JPEGs in Qimage Pro – not RAWs. Qimage also will not work with TIFFs with Alpha channels (e.g. channel copies made in Photoshop) saved with the file. To be able to view and print these you will have to untick the “Alpha Channels” box in Photoshop’s save dialogue box, circled in the screenshot below.
- It is much easier to select files to print in Lightroom – this is not surprising as this is what Lightroom is all about – finding and working with image files. In Qimage you have to navigate to the individual files and add them to the queue; with Lightroom you can use any of the methods to find the files you want and add them to the print queue by selecting them.
- Both applications have cropping options, but I have found Lightroom’s much more intuitive and powerful to use; it also allows image straightening to improve horizons etc within the develop module, which Qimage does not. So, for creative cropping, Lightroom wins this round of the contest.
- Several times I have sent emails to Qimage’s Tech Support (Qimage’s developers DDI software to be exact) – each time I have received a reply within a day or two, which across time zones (I am in the UK, DDI tech support I presume is in the US somewhere) is pretty good and much better than most enquires I have made to other application providers’ Tech Support teams. I each case they have also solved my problem (such as the alpha channel problem).
- Learning resources for both packages: Qimage offer reasonably full tutorial support to learn Qimage; there is also a forum to help users and various reviews around the web, but undoubtedly Lightroom has much more of a user community support base. There are dozens of forums dedicated to it and books written about it, all sorts of power users offering their ideas etc etc, but without DDI’s good Tech support it would often have been nearly impossible for me to solve some issues. While Adobe does not offer the level of service that Qimage offers there is so much “out there” that finding solutions should be relatively efficient and there is a growing Preset community growing. I also understand that further enhancements such as Pixel Genius’ PhotoKit Sharpener package may be available to use in Lightroom as some sort of plug-in in the not too distant future.

Conclusions
So will I keep on using Qimage? Simply – Yes.
When I want to make the best possible print for display etc I will print through Qimage; especially anything above A3. For everyday ease of use Lightroom wins out, but Qimage ultimately has the more powerful feature set and produces the better results.
Lightroom has certainly replaced Breezebrowser Pro as my route for producing contact prints and I will use it for small or non-critical prints and proofing. If I want to make optimum use of paper, print panoramas, print out lots of differing exactly sized images or add in more text on the printed page than Lightroom allows I shall use Qimage.
Hopefully both will continue to improve and I look forward to the options that will become available - perhaps even a Qimage plug-in for Lightroom someday?
Read more...


7 comments:
I am not a professonal photographer/printer but have a question. Have you ever used Picasa to do prints with? I use it for almost all my print jobs and seems to my eye to work quite well. My wife scrapbooks the prints and she is quite pleased with the results.
Jim
Epson 4000 running Media Street Inks for the last three years.
Hi,
Thanks for this post, I had been recomended Qimage but was not sure if it would cause me more problems but after reading your post ill give it a go.
I have to say I rarley print from lightroom, I optomise prints in photoshop for printing which takes me about an hour on each image
Hi
I'm afraid that I don't have any experience with printing from Picasa.
Treve
Hello:
Good review. Almost 2 years ago I moved from a PC to a Mac laptop and frankly my only concern was that Mike hasn't made a Mac version of Qimage. I've used Lightroom as well as CS2 (now 3) to print and now use Apples Aperture to manage most of the workflow for my images. I run a windows partition on my hard drive now through VM Ware and the only program on the partition is Qimage. Foe me it's just that good. I can see also that Qimage has capabilities beyond my level of computer sophistication (minimal).
Charles
Question: Will Qimage Studio read te RAW files with Lightroom adjustments applied?
Qimage is much better for printing, I agree. The only issue I have is the workflow complexity.
I am a heavy Photoshop user-- but I use to Lightroom for high volume processing. Qimage Pro doesn't read RAWs so... To print in Qimage, I need to process in Lightroom, export to PS, save as PSD, then Qimage will read.
Nice tutorial I love to explore new graphic design softwares good to know about Qimage.
Daily Satta Result gali satta result,disawar satta result,Faridabad satta result,satta king,Gaziabad satta result,black satta,satta bajar,satta bazar,satta company result,Leak satta no and more.
Visit here- dailysatta-result.live
Post a Comment