I have frequently found that the auto nozzle checking and cleaning cycles that my Epson 4800 inkjet printer carries out at random times usually causes more problems than it could ever solve. I have found that turning them off helps. This posting explains why you might want to turn them off in more detail and how to do it.
Why would you want to turn them off?
On the face of it having the printer regularly check the quality of the output by doing a nozzle check and automatically cleaning the print head if need be sounds a really helpful and quality enhancing idea.
In reality, however, I and many other Epson 4000 and 4800 printer owners, have found that the printer often does “something or other” that looks and sounds just like a nozzle cleaning cycle without being asked to do anything – e.g. an automatic nozzle check and clean. The problem is that this often seems to happen when there is nothing wrong with the output before the action; but after it whole colour channels are often (I am tempted to say usually) missing, which require the usual palaver of cleaning and nozzle check cycles to get back to where we were before the auto “something or other” happened. This is both expensive in time (it can take hours or days) and money, in wasted ink.
In effect these auto actions seem to cause nozzle clogging/loss of colour channels, not reduce them. I have found that in my experience turning off these two functions is a good idea.
If you too suffer from continuous nozzle clogging/loss of colour channels then this may be a small contributor to reducing your problems.
How?
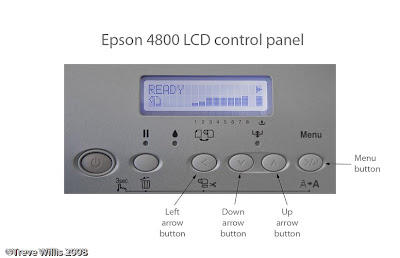
The picture below shows the LCD printer display and the various buttons mentioned in the instructions below.

You can turn off both the auto nozzle checking and cleaning functions by following the button pressing sequence detailed below in the LCD control panel on the printer:
- With the display saying “Ready”, press the “Menu” button twice – the screen will display “Printer setup” then “ Platen Gap” on the second line of the display
- Press the “up arrow” button three times – the screen will display “Auto Cleaning”
- Press the “menu” button once - you should see “Auto Cleaning, *On”
- Press the “down arrow” button once - you should see the word “off” on the second line of the screen
- Press the “menu” button once – an asterisk should appear next to the word “*off”
- Press the “left arrow” button once – the screen will display “Printer setup, Auto Cleaning”
- Press the “up arrow” button once – the screen will display “Auto NZL CK”
- Press menu once – you should see “Auto NZL CK, *On”
- Press the down arrow once - you should see the word “off” on the second line of the screen
- Press the menu button once – an asterisk should appear next to the word “*off”
- Press the “left arrow” button three times to bring you back to the “Ready” screen
This turns off the two auto actions, although in my experience it does not completely stop the printer from running the occasional auto “something or other” cycle – it does, however, seem to reduce the frequency of them. Read more...


3 comments:
Thx for the tip! This thing was driving me nuts and flushing ink all over the time.
Many, many thanks. This was drivinbg me crazy, and my inks were running low.
I was switching to refillable cartridges and the auto nozzle check and clean were corrupting the chips. This works and I have been able to fully purge my Epson 4000. Thank you for posting this! Saved me a heap of stress. I only wish I searched this earlier!
Post a Comment