Some inkjet printers are very prone to nozzle clogging and my Epson 4800 is certainly one of them. Frequent printing is often recommended as part of a package of solutions to try to avoid the problem. For those who do not need to print frequently this is a nuisance, but for those unable to do so because they are away etc this is a real problem. MIS Associates have very generously made their Autoprint utility freely available to help solve the problem.
I have tried to use the utility a couple of times and come across annoying little problems which stopped me using it, but given my clogging problems I thought it was about time I got it to work. Since I have now got it working and found solutions to several small issues along the way, this post is aimed at sharing what I have found out.
Initially the utility was only available for PCs but it is now available for various versions of the Mac operating system. My experiences reported here are all with Autoprint v2.0 on a PC running Windows XP SP2.
MIS Autoprint is available to download from MIS, free of charge.
It is simple to install – simply unzip the downloaded files, click on the Autoprint application file and follow the instructions; which, if you follow the defaults, will put the application in a folder called “MIS Autoprint” in your main “Program Files” directory and place a shortcut on your desktop. In the folder, along with the application file and instructions, are the jpeg files that it will use for automatic printing.
Autoprint uses the Microsoft Task Scheduler to print a jpeg file at a time interval that you select. Autoprint is not password protected, but it needs the authorisation of the User ID’s password to run. It will not run unless Windows is set up with a password protected User ID with administration privileges.
If you do not have a password protected PC then you can add a password to your User ID by going to the “User Accounts” control panel and setting one. If you do not want to set one for your main User ID then there is a workaround on the MIS Forum involving setting up a dummy password protected User ID, but I simply password protected my main User ID, which was probably a good thing to do anyway.
To set up an Autoprint task schedule and run a test print simply click the Autoprint desktop icon and follow the instructions – they are very clear and should not cause any problems, unless…
I run an Epson 4800 Pro inkjet printer and it is an 8 ink printer – The largest (most colours) option that came with the original download was a 7 ink option. Since the aim is to regularly exercise all the ink channels an 8 channel option seemed sensible.
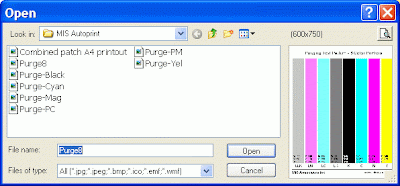
Autoprint will, in fact, offer you the choice of printing any jpeg file that is in the same directory as the application file. MIS also offer a stand alone range of additional files to use (from here) which includes an 8 colour file. I simply dropped this into the MIS Autoprint folder, along with a jpeg version of a colour patch printing file I use for paper calibration (See screenshot below).

And hey presto, these are now available options in Autoprint (See screenshot below).
The 8 channel ink print looks like the image below:
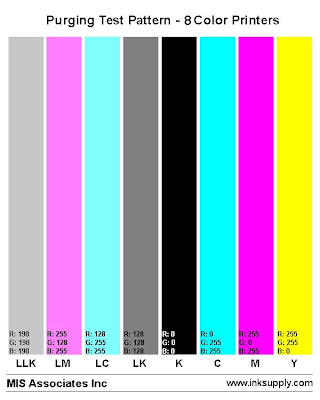
I don’t see any limit to the number of image files that Autoprint will offer so long as they are jpegs (it also appears to support .bmp, .ico, .emf & .wmf file formats, but I have not tried any of these and it did not work with tiff files I tried) and in the right folder (but I have not tried that many). The images supplied with Autoprint are sized to fill a US letter sized (8.5” x 11”) sheet of paper – I find that they work fine with A4 as well. I do not see any reason why you should not use a favourite photo if you prefer, so long as you are happy that it uses the full range of inks and it is sized correctly.
If you want to save some ink by printing smaller blocks of colour you can modify one of the files to make it smaller and use it instead.
Autoprint allows you to set the interval between prints (in days – 1-14 days in the dropdown menu, but it will allow you to enter more days if you wish, although I am not sure whether it actually works then, nor why you would want to go beyond 14 days…) and the exact time of day.
If you want to set up several schedules for more printers, or for the same printer but at different intervals or using different images (I have not tried this, but I can not see why it would not work) then there are instructions in the readme file to do this:
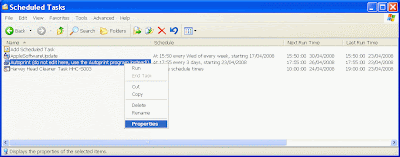
"The task that is created by the GUI can be edited to allow for more advanced schedules. However if you rename the task, then Autoprint will not find it and simply create another one.You can edit the task name in the “Scheduled Tasks” control panel (see screenshot below) by right clicking on the task name, then “Rename”; you can also see details of the scheduled task(s) etc in the control panel (where you can also see that I use Harvey Head Cleaner).
This could be used for people with more than one printer. Basically the procedure here is to create a task with Autoprint, test it and then rename it. Then start Autoprint again and create another task for the next printer, test it and then rename it. This procedure can be repeated for any number of times to create multiple schedules."
Nearly done:
One last problem I had was that Autoprint now worked fine, but every time it wanted to print it opened the Epson Print Preview pane first and asked for permission to print – which meant that it did not print unless I said OK, rather missing the point of the whole exercise!
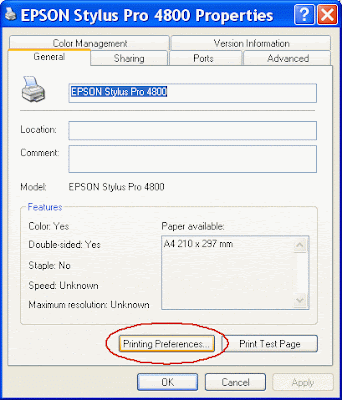
To solve this I went to the “Printers and Faxes” control panel; right-clicked the Epson 4800, and selected “Properties” (see screenshot below).
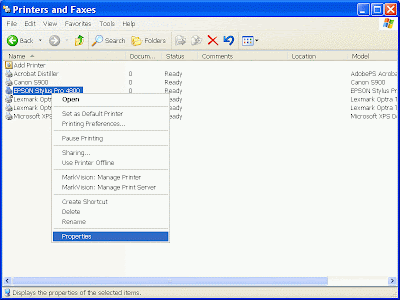
In the "General" tab, select the “Printing Preferences…” tab (circled in red in the screenshot below)
Then untick the “Print Preview” box (circled in red in the screenshot below). Since I shall be printing these images on plain copier paper I also selected “Plain paper” as the media type (circled in red in the screenshot below).
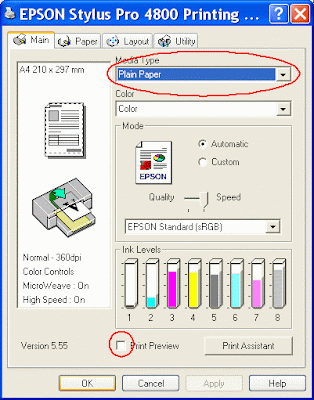
If you subsequently tick the "Print Preview" box in another application you may find that it stays ticked interrupting the next Autoprint - this happened to me when I printed something in Lightroom and ticked the "Print Preview" box; the next time Autoprint ran I found the purge pattern on screen awaiting my return for approval to print...
Now it all works fine!
When setting up a scheduled print I suggest you do run a test print at the end of the process as it will show up any likely problems, such as size, print previews etc. If it does not print anything it probably will not print on schedule either so it is best to sort it out at this stage.
Clearly this utility will only work if both your printer and computer are turned on when the scheduled task is due to run. In the default set up Task Scheduler will wake the computer up to run the task if it is asleep but unlike Harvey Head Cleaner it will not run the task next time the computer is turned on if it was turned off at the scheduled time for the task - or at least if there is a setting to tell it to do this I have not found it.
I have found that the 4800 is very sensitive to paper size - I often get the "Wrong paper size" warning message when using a stack of copier paper - on some sheets but not others.... Anyway this is not at all good news if you are running automated prints via Autoprint as it simply stops any printing until you clear the warning. So I simply turn it off as I can not remember actually trying to print on the wrong sized paper.
If you do not know how to do this I have posted instructions here.
I also find that plain 80gsm copier paper is prone to miss-feeding so I try to use thicker paper, such as 100gm, to avoid this problem. Again a miss-feed completely messes up the automatic process. Read more...


2 comments:
Thanks for this; I've now got my Epson R1800 spitting out a tiny 8-color print each night; I think I'm going to move down to weekly though. I've had no clogging issues since starting this up. Great little tutorial and summary of potential gotchas.
thanks for sharing, great tutorial for the beginner. Folder printing Boxes
Post a Comment