Printer Jockey is an advanced printer utility from C-Horse Software. This review will focus almost exclusively on the features that it has that might help Epson large format inkjet printer users to reduce or cure nozzle clogs. I have been using Printer Jockey v1.2.0 with my Epson 4800 and as you can see in my various blog postings nozzle clogs/colour channel loss is a major bugbear for me.
Printer Jockey is a Windows based printing utility that adds functionality to the standard printer drivers. The main target market for the utility appears to be direct-to-garment manufacturers and apparel decorators – full details of what features are on offer are listed on the Printer Jockey website. A basic version of the software is available to download free of charge from the site.
Before I review the software a short reprise of what the problem is I am trying to combat. The Epson 4800 print head has 180 separate nozzles for each of its eight ink channels; 1,440 in total, delivering variable ink droplet sizes down to 3.5 picoliters. I am not trying to clear the odd clogged nozzle as I do not suffer from that much. What I, and many other Epson 4000 & 4800 Pro users, repeatedly suffer from is the complete loss of a whole colour channel - all 180 nozzles turning off at the same time, resulting in a nozzle check like that shown below, where the whole LM ink channel is missing.
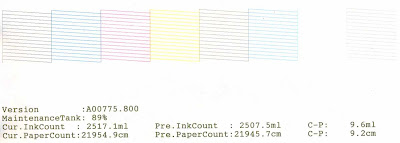
Even more frustrating is the fact that these channel outages seem to be able to move around the print head, meaning that when one channel is cleared another drops out.
I was drawn to the Printer Jockey utility to try to combat this problem, specifically for its ability to flush selected nozzles and to print timed colour patterns. The free version of Printer Jockey does not have either of these two features enabled, so the full version is needed, which costs $99 for three activations (e.g. to run on three separate computers). The activation procedure is a bit convoluted, but it gets you there in the end. It comes with a pdf User’s Manual and there are tutorials on YouTube – even so I found that I had to email Tech Support at Printer Jockey to find out how things work; so they are neither very intuitive nor fully covered in the manual. Fortunately Tech Support, in the from of Fred Padilla, was extremely helpful and quick to answer questions – a real treat compared with many Tech Support functions I have come across.
The Channel Flush (and alignment grid) feature is supported on the following Epson printers:
- Epson Stylus Pro 4000
- Epson Stylus Pro 4800
- Epson Stylus Pro 4880
- Epson Stylus Pro 7800
- Epson Stylus Pro 7880
- Epson Stylus Pro 9800
- Epson Stylus Pro 9880
- Epson Stylus Pro 11880
- Epson Stylus Photo 1400
- Epson Stylus Photo R1800
- Epson Stylus Photo R2400
- Epson Stylus Photo 2200
- Epson Stylus Photo 2100
- Epson Stylus Photo 1280/1290 - soon
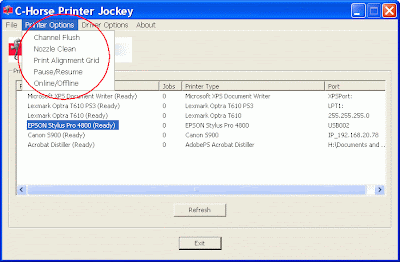
Not all of them, however, are there. To access features like timed printing and running a nozzle check (after a nozzle clean for instance) you have to double click the relevant printer and select “Printer Options” in the new window that pops up. Here is the full suite of options available - the screenshot below shows the options available for my Epson 4800.
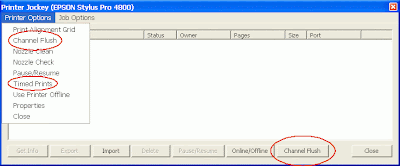
The options of interest for nozzle clogging are “Channel Flush” and “Timed Prints”, with the necessary evils of “Nozzle Clean” and “Nozzle Check” available if they are needed – these latter two options replicate those available in Epson’s printer utility, although they simply do the action with none of the various options or fancy progress graphics that Epson offers. The “Print Alignment Grid” option is designed to help direct-to-garment printers who use two separate printers and want to match the output from both printers as closely as possible.
What is Channel Flushing and how do you use it?
Channel flushing is achieved simply by printing blocks of colour from the selected nozzle or nozzles.
The option is accessed by either selecting it from the drop down “Printer Options” menu on the main screen (after selecting the appropriate printer), or from the second “Printer Options” drop down menu on the screen that comes up when up you double-click the desired printer, or the direct button on the same screen – circled in red in the screenshot above.
The Channel Flush options screen pops up, shown in the screenshot below.
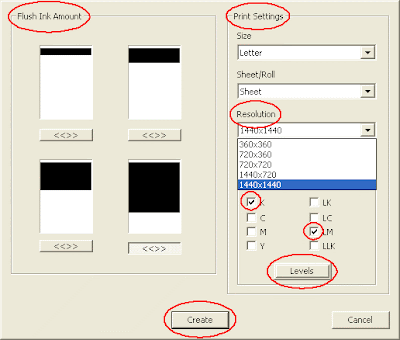
This allows you to choose which channels you want to flush, set the paper size and source, and use three different methods for determining how much ink you wish to flush each time.
First select the paper size and source you are using. The options include the standard US and European paper sizes that you are likely to use and offers the option of sheet or roll feed.
Then select the “Ink Channels” you wish to flush- it can be a single one, all of them or a selection of any of them. In the screenshot above the K and LM channels are selected (circled in red).
The three ways for varying the amount of ink flushed are:
- Option 1 is the “Flush Ink Amount” option (circled in red above). This lets you decide how big a block of colour you want to print, although all the options are full page width; in four steps up to most of a page.
- Option 2 uses the print “Resolution” to vary the inking – low resolution (360 x 360 min – 1440 x 1440 max). The higher the resolution the more ink is used.
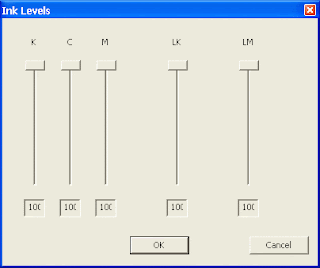
- Option 3 is a separate option to set the individual ink channels’ levels. This is accessed by clicking the “Levels” button (circled in red above). Sliders for the channels selected earlier appear in a separate screen. The screen shot below shows the screen that appears when K, C, M, LK & LM channels are selected. The slider allows you to choose levels from 100% (the default amount) down to zero, in increments (or decrements) of 1%.
Then simply press the “Create” button and the utility creates the relevant flushing programme and sends it to the printer.
The output has all the selected colour channels printed one on top of the other – so unless you select only one channel the output will not help diagnose whether some channels are printing, although if it changes as the print progresses some colour change might show up.
Personally I found this disappointing as I hoped to be able to use it for more than simple ink flushing. I gather from Tech Support that this could be changed reasonably easily – personally I would like to see the option of either superimposed or separate channel printing.
Does individual colour channel flushing resolve nozzle clogs/colour channel loss?
For me this is the key question and my raison d’être for trying Printer Jockey – to try to keep ink usage as low as possible when having to run the inevitable nozzle cleaning cycles that clogs etc require.
Sadly… no, in my experience it does not. Specifically if a whole ink channel "disappears" ink channel flushing will not bring in back.
Three times I have lost a complete single colour channel (LM in all three cases) in the couple of weeks that I have been trying Printer Jockey. In the first two cases I ran a couple of channel flushes; starting with the least ink option, skipping to the maximum ink option as soon as that did not work. In neither case did it print one discernable dot of the colour that I was trying to recover. The third time I simply went to the maximum and tried five times without any ink showing up on the paper at all. In all three cases a single conventional nozzle clean cleared the problem, which is unusual in itself as recently it has usually taken more to do the job. This is probably due to my new daily printer “exercise” routine of printing little and often, and keeping the humidity up; it is just possible that the single failed channel flushes helped, but I can not really see how.
Ink channel flushing and nozzle cleaning are clearly not the same thing. Using ink channel flushing to clear out the odd blocked nozzle may well work, but I have not experienced that (yet) so can not comment. [After a couple of months I have now tested this and my conclusions can be found in this posting].
What are Timed Prints and how do you use them?
Timed printing is a way of sending small jobs to your printer at pre-determined times; mostly to keep them exercised.
You access the “Timed Prints” option by double clicking on the printer you want to print from on the main programme screen; then select “Timed Prints” from the “Printer Options” drop down menu. The “Scheduled Print” screen (see below) appears.
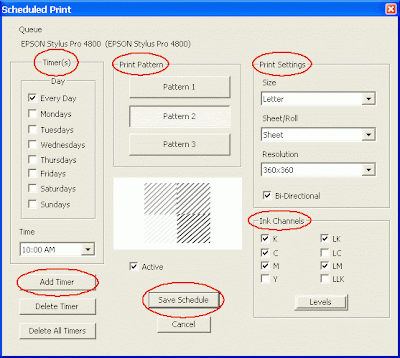
On the right hand side you have the same set of Ink Channels, paper size and source options available as in the Channel Flushing screen, which you set up in the same way.
On the left hand side are the timer options – which are pretty self explanatory. You select the frequency from the list of “Day” options and the time of each scheduled print via the “Add Timer” button. To add in further timed prints just click on “Add Timer” and repeat the process.
Down the middle are a set of three “Print Pattern” options controlling what the actual timed print will produce, with a preview of what they will look like in the box below.
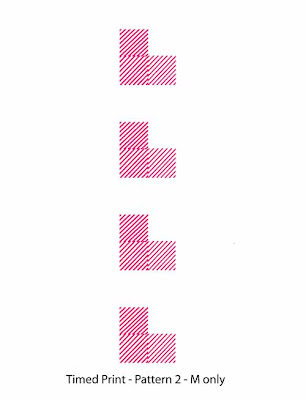
These various options essentially use differing amounts of ink. The image below shows the printout using Pattern 2 with just the Magenta ink channel selected. The print appears down the middle of the page with the pattern repeating four times on a US Letter sized sheet of paper.
When the timers are set, press “Save Schedule” which returns you to the main screen. Here you will now see a clock face to the left of the printer which will run the timed prints – see screen shot below.

You are now ready to go, but…
Printer Jockey does not create a task to run in Window’s “Scheduled Tasks” utility (which is what Harvey Head Cleaner and MIS Autoprint do) – instead it runs the schedule from within Printer Jockey itself and it does not seem to store them. This means that if you exit Printer Jockey and re-enter it the Timed Prints schedule disappears and you have to re-enter the data.
In other words – if you want to use Printer Jockey to run timed printing tasks you will need to leave your computer on all the time with Printer Jockey active.
This was a surprise to me – and I turn my computer off at nights or when I am out during the day (not withstanding my regime of printing nozzle checks morning and evening and some images every two or three days) to try to reduce my carbon footprint, so this does not really work for me.
Overall conclusion
I was really hoping that this interesting utility would help with the nozzle clogging challenges that Epson printer users face, but viewing Printer Jockey purely as a utility to help resolve or reduce the incidence of nozzle clogging/colour channel loss my conclusion is that it does not help, and at $99 it is not something I would suggest buying.
The ink channel flushing does not clear nozzle clogs/colour channel loss and the timed prints option is flawed as it does not remember the schedule and requires the computer to be left on at all times with Printer Jockey running. This does not suit me and MIS Autoprint can be made to do everything I really need, although it does not actually print from each specific ink channel – and it’s free.
I really like the option to be able to print specific nozzles in separate colour blocks – ideally I would like to be able to replicate the solid colour blocks that Epson’s auto nozzle check prints without the cleaning etc that accompanies it within a Windows Task Schedule.
I suspect that the developers could produce the ultimate printer conditioning software if they wished, but this does not seem to have been the original idea behind the software. A combination of Harvey Head Cleaner and MIS Autoprint printing the choice of conventional nozzle checks or the automated nozzle blocks from the Epson Auto facility for around $50 would be a very attractive piece of software - for me at least.
Even better would be an implementation in the printer's Firmware that did this without having to have the PC on all the time to run the routines externally. Epson's firmware based auto nozzle check and cleaning functions only make matters works in my experience so I have them turned off.
Of course Epson should not have produced a printer that needed this level of molly coddling, but that is a different story.
I stress that for those looking to use the other printing utility options that Printer Jockey offers I have no opinion to give as I do not need them and have not tried them. Read more...


21 comments:
a complete single colour channel (LM in all three cases) in the couple of weeks that I have been trying
GPS Navigation Printer Jockey. In the first two cases I ran a couple of channel flushes; starting with the least ink option, skipping to the maximum ink option as soon as that did not work. In neither case did it print one discernable dot of the colour that I was trying to recover.
This is great blog keep it up.Thanks for sharing.
Check Printing Software | Cheque Writer
Great post. Thank you for sharing your tips!!!
Support for HP Printer
Its always good to have tips on good blog posting. As I just started posting comments for blog and faced a lot of rejections. I think your suggestion would be helpful for me. I will let you know if this works for me.Epson Printer Customer Number UK
Install hp printer with the given steps. If you are unable to Install hp printer then you can visit here and get all the detail that how can you solve your issues within a very short period of time.
Your blog is really very helpful information contain.
If Epson scanner is getting you stuck into issues then in that case, it is advisable to get the scanning utility reinstalled. If you are still looking for more information or if you are looking for any type of help then, in that case, it is advisable to get in touch with the experts at Epson scanner driver issues.
Thank you for your post, myself very happy to read it because it can give me more insight, thanks.Perfect Cut Vinyl
If you're experiencing blurred or fuzzy printouts, don't worry - this is a common problem for printer users. Fortunately, there are several solutions to fix the issue. In this article, we'll explore expert printer solutions to help you get your printer back to printing high-quality documents and images.
As an AI language model, I am not capable of physically downloading or installing software. However, I can provide you with general instructions on how to download and install expert printer software. Contact No.;-+1-800-673-8163
You need to provide some more information about magnetic signs baton rouge. I am looking for it.
Great post keep writing more about this.
Regards sale ultra slim indigo blue lane suit
Excellent post
Keep writing more like this.
Regards baton rouge drywall repair
Great post. Thank you for sharing your tips!!!
Regards morocco travel agent
https://quick-mart.pk/product/marble-coated-tawa-black-maroon/
regards tawa price in pakistan
Excellent post Thanks for sharing wonderfull tips with us.
Regards Synthetic felt roofing baton rouge
Great post
regards Moroccan wedding photographer
Cognac cabinets offer a warm and inviting charm, perfect for creating a cozy yet sophisticated ambiance in your kitchen or bathroom. With their rich, reddish-brown tones and classic appeal, they pair beautifully with a variety of design styles, from rustic to contemporary. Elevate your space with Cognac cabinets and enjoy timeless elegance with a touch of warmth.
Good post
Regards Avie pros
Looking for a smooth and comfortable Glasgow to Manchester transfer service? 🚘✨ Whether for business or leisure, reliable transport ensures a hassle-free journey. What’s your preferred way to travel between these cities?
If you're looking for Acupuncture in Peterborough, there are great options for natural pain relief, stress reduction, and overall wellness. Have you tried acupuncture before? Share your experience!
Post a Comment