Wednesday 28 October 2009

Analysing focal length data in Lightroom

I occasionally want to analyse a set of images to work out what focal lengths I used most to create them; typically they will be in a collection in Lightroom. There is no easy way to do this within Lightroom (up to v2.5 at least) other than to laboriously look at each image's metadata or search in the text for specific focal lengths. ImageReporter allows you to do this and this posting gives more details.


Recently I selected 247 of my favourite images and placed them in a collection. I wanted to know which focal lengths I used most to produce these images to inform me where I should spend any spare cash on lens upgrades.

For some reason there is no quick way to do this in Lightroom. Marc Rochkind, however, has written a free utility called “ImageReporter” that allows me to query Lightroom for this data. It is available from [ here] along with a short description/tutorial of how it works by Marc [ here ].

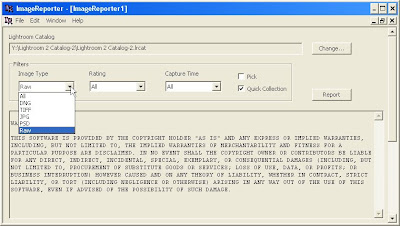
The screenshot below shows the user interface:


The selectable search criteria are pretty limited, but you can choose from several file format types via a dropdown (see screen shot above), star rating and rough time periods. You can also search the whole catalog, picks or the quick collection.

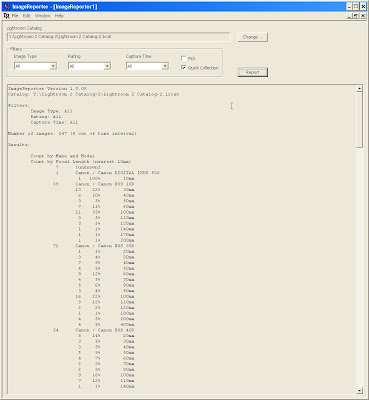
To search my top 247 images in their collection I simply put them into the Quick Collection in Lightroom, ticked the appropriate box; hit the report button and a few seconds later the results came back – see below for a sample of the output.


It produces a whole range of reports grouping the data by lens make & model, camera make & model, cropping factors, the average focal length for each lens, ISO setting and more.

There is no print function in ImageReporter so I saved these reports (via the option in the File drop down menu) and opened them in Notepad – you can use Word or pretty much any text editor I guess.

ImageReporter rounds all focal lengths reports to the nearest 10mm which personally I find irritating, but it does allow for some brevity in the report and is much better than the alternative manual methods for extracting the data.

Conclusion
No doubt Adobe will get around to including this sort of data reporting in Lightroom one day, but until then ImageReporter is a very useful and simple to use piece of software –especially good as it’s free.
Read more...

Sunday 12 July 2009

Building a PC for photography and Lightroom

A couple months ago I decided to build a desktop PC designed mostly to produce a good price/performance with Adobe Lightroom and Photoshop. The posting and a few follow up ones describe what I built and how much faster it was than my old PC.


My criteria for selecting the components for my new photography optimised desktop PC build were:
  • A good balance between price and performance
  • Reuse my Windows XP software and transfer my existing applications with the least hassle
  • Large capacity storage for digital images
  • Cool and quiet operation
  • Upgradeable
  • A total price of around £600

Processor choice
The core to the whole system is the processor (CPU). After a good deal of research I decided to use an Intel Core2 duo E8400 as it shows up very well in several reviews, including CustomPC’s on image processing (go - here - for a graph from CustomPC showing the relative GIMP performance of a large range of processors). As well as being powerful it also uses less power than most processors and wins on the price/performance ratio scale. I decided to cool it with a Scythe Kama Angle cooler. Also if need be the E8400 is supposed to be highly overclockable.

When I went to buy it I discovered that Scan.co.uk offered an OEM version of the faster E8500 at only a couple of pounds more than the E8400 retail version – The retail version comes with an Intel cooler so since I planned to use a specialist CPU cooler it was a waste – so I bought an E8500 (£150), along with the Scythe Kama Angle (£28), which came from an eBay shop, with Artic Silver Ceramique CPU coupling compound.

Motherboard choice

The E8500 is a 775LGA socket processor, but my old Foxconn board would not support it – after a bit of looking at reviews (which mostly seemed to focus on the overclocking options of the board) I decided that the Asus P5Q Pro (£108) would “do” – while not the best overclocker it seemed to offer good standard speed and I don’t really plan to go into overclocking unless I have to.

Power Supply Unit
I wanted a good reliable, energy efficient modular power supply unit (PSU), with enough power to allow me to upgrade if need be – I decided that the BeQuiet Dark Power 650W (£106) would do the job.

PC case
I have never really given much thought to such a mundane thing as a computer case before, but I have now realised that if I want to have a quiet, cool case which is pretty easy to build a PC in and then to upgrade that the case makes a lot of difference. After a good deal of web searching I bought an Antec P182 (£105) – which is solid, has three 120mm Antec Tricool variable speed fans and plenty of space for discs and peripherals. It also has sound absorbing side panels and a front door to keep it quiet. This came from eBuyer.

Memory
I decided to transfer the 4gb of Crucial DDR2 PC2-5300 from my old PC

Hard disks

I was planning to transfer the Western Digital 640gb Green HD from my old PC with the Windows XP operating system installed on it along with the eSATA external hard disk (a twin of the operating system disk) as backup. During the build I found that the Samsung SpinPoint F1 1tb (1,000gb) which seems to be the current best size/speed deal around at the moment had come down in price at eBuyer (£78), so I bought one of those as well to store images on.

Optical discs

I toyed with the idea of upgrading to a Bluray disc, but decided to wait until the media prices come down. So I transferred the LG & Pioneer DVD read/writers from my old machine to the new one.

Graphics card and monitors

I wanted to keep the twin monitor system from my old PC so I transferred the Asus EAH 3650 256mb DDR3 twin DVi card along with the Dell 24” Ultrasharp and my old NEC 18.5” LCD screens.

The build

Never having built a PC from scratch I asked my brother to supervise and set aside a day to do it. The actual build was quite easy for the most part – I had prepared by watching several videos on the web of people building PCs and read a “How to build your own PC” book – so working slowly and reading instructions I installed the PSU, the motherboard, the processor, CPU cooler, hard discs, memory, optical discs and graphics card (in that order).

I had anticipated that installing the CPU would be the most hairy moment, but it was remarkably easy. I had never really realised that when manufacturers talked about “zero force insertion” that they meant that you simply put the CPU on the socket and clipped it into place with a lever over it – it really was “zero force” and extremely easy.

The real problem was the installation of the Scythe Kama Angle CPU cooler. It took both of us several attempts to clip the four legs of the cooler into place and some sweaty moments before we were reasonably sure that the cooler was installed properly. We then discovered that the secondary power socket for the motherboard was located “under” one of the arms of the cooler’s radiator – having to take the cooler off again to plug in the power did not appeal at all given the problems we had had in getting it installed the first time. Luckily there was just enough clearance and access through the top of the case to work the plug into place without taking the cooler off – but it was a very close run thing.

The rest of the build was just a steady progression with no dramas or problems.

Turning it on…

I never expected it to turn on and work seamlessly – that would have been just too easy, and so it played out.

When I first turned it on it started and then the dreaded “blue screen of death” came up with an error message – the helpful Microsoft advice to solve the error message was to reinstall the old motherboard…

After several hours of booting from CDs and using various pieces of test software (such as Memtest98) we concluded that the hardware was OK and that it was an OS problem, so we decided that we simply had to reinstall the operating system and that the change from the old system to the new one was simply too much for it to handle. This we did, which, along with all the service packs, patches etc, took a couple of hours.

During the installation my brother suggested that I put the operating system swap file in a separate 4gb partition on the faster Samsung to speed up general operation – which I did.

Then it simply turned on again and worked!

In use…

All my original software worked as well and when they were plugged in all the peripherals such as scanners, graphics tablets etc worked too. The only thing that did not work, and after several weeks of trying still does not, was the eSATA disk. It simply refuses to work and stops the PC from booting up if connected. Since the caddy it is in has a USB2 port as well which seems to work fine I have decided to put it down to experience and move on.

The PC is very quiet – in fact I have to put my ear to the box (under my desk) to hear much at all when it started up at first – this is with all three fans set to their intermediate speed setting. After a bit I started to notice that the graphics card fan was making a bit of noise, but compared to the old PC it was much, much quieter.

The CPU seems to run generally at around 37-40°C moving up to just over 50°C under stress testing – so I am very happy with the overall cooling of the system.

The whole package cost £575 (£497 without the extra Samsung hard disk) from a variety of suppliers, along with the transfer of pieces from my old PC. Well within my budget so I am again happy so long as it delivers the promised performance improvement. I could have done it much cheaper by re-using my old PSU & case, but I wanted a more reliable, upgradeable and quieter package than that would have allowed - but it would have saved £211, and without the extra hard disk the whole upgrade could have been done for £286.

Over the next few blogs I am going to report on how the new PC actually performs against my expectations – which previously I thought should be 3x-4x my old Pentium 4 based PC along with a few tweaks that I will make to the system.
Read more...

Wednesday 8 July 2009

Test of Inov8’s replacement battery for my Panasonic G1 digital camera

A month or so ago I said that I was going to try a generic battery from a reputable manufacturer – Inov8 – in my Panasonic G1. Here is my experience of it over the last few weeks.


Inov8 are one of a number of reasonably reputable replacement camera battery brands. Since they were the first one to offer a replacement for Panasonic’s expensive Li-ion DMW-BLB13E I decided to try it, although it was not exactly cheap in its own right at £26.95 from a reputable eBay seller.

Below is a photo of the blister pack that the battery arrived in – followed below by a scan of the back of the packaging with details including Inov8’s stock code for it - B1346.


The Inov8 battery says it is a replacement for the DMW-BLB13 – I don’t know if the missing “E” is significant.

Below are a couple of photos showing the product details printed on the Panasonic and the Inov8 batteries respectively.


As you can see both are made in China, both operate at 7.2v and the capacity of the Inov8 is slightly larger than the Panasonic- 1300mAh versus 1250mAh, so it ought to last longer. The Panasonic also shows a 9.0Wh rating whereas the Inov8 does not offer a Wh figure.

I put the Inov8 into the Panasonic battery charger that came with the camera and charged it up – which seemed to work fine. I then popped it into the G1 and was rather concerned when the warning in the photo below came up on the screen.


A message saying the “This battery cannot be used” is a bit scary. I turned the camera off and on again and the message went away, but it has resurfaced each time I have taken the battery out and put it back in again. After this on/off/on cycle the camera seemed to work fine so I took around 100 photos as a test and all was well, so I charged it up and took it along as a backup on a weeks holiday.

On holiday I recorded the number of shots I took with each battery (the original and the Inov8) to try to get a feeling for the comparative battery life.

The first use of the Inov8 to exhaustion only yielded 110 photos – although I probably used the image viewing more than usual and had liveview on more than normal I was alarmed by the low number – I measured 300+ when I first got the G1 in much colder Winter weather. You can find my earlier battery life results posted – here.

I was also surprised how quickly the battery meter progressed from two bars (three bars indicates it is full) to “Red” to exhausted – around 10 shots. This was much quicker than I remembered from previous tests on the original battery.

Somewhat alarmed I then repeated the test on the original Panasonic battery trying to use it in a similar way – This yielded 195 photos; much less than my original tests, but nearly double the supposedly larger capacity Inov8.

To be fair I repeated the test with the Inov8 battery and the second test yielded 135 photos and again the progression from 2 bars to exhausted was very rapid. The second test almost certainly used liveview much less as around half of the shots were taken in quick succession in one session.

Conclusion
After my tests I am very disappointed in the performance of the Inov8 battery. It seems to have much less capacity than the original Panasonic, despite rating itself as having a slightly larger one. It seems to fail much more quickly than the original (e.g. it goes from 2 bars full to exhausted) very quickly – within about 10 shots. The opening message saying “This battery cannot be used” is not at all reassuring, even if it is easily cleared. Perhaps the “E” on the Panasonic battery code explains all this – perhaps it stands for something like “Electronic” and this explains the error message and rapid exhaustion with little warning.

All-in-all I am pretty disappointed with this battery – it is not dirt cheap at around half the price of the Panasonic version and while I shall use it and keep it as a back up battery I don’t think that I can rely on it. It certainly does not live up to its billing on the packaging of “Superior lasting performance”.

I suppose that it is possible that the battery is not a genuine Inov8 battery and that someone is selling cheap imitations repackaged in Inov8 packaging, but I have no way of telling – of course if anyone from Inov8 reads this review and wants me to try one from them direct I would be only too happy to oblige.
Read more...

Tuesday 7 July 2009

Canon G9 – test of image quality after “Lens error, camera restart” incident

In my last posting I worked through what I did when my G9 suddenly experienced a “Lens error, camera restart” incident – go here for more details. At the time I did a quick image quality test to check that all was well. I have now done a more detailed test and here is my experience.


I am about to go away for a week and want to take a compact camera with me and the G9 would be ideal, but after the recent incident I was only willing to do this if I could convince myself that the image quality had not been impaired by the fairly robust treatment I had had to give the lens to get it working again.

In order to do this I decided to try to replicate an image that I took a few months ago that I was happy with and which had printed up well. This is an image of a window from my local church which has quite a lot of fine detail all over the image – the original image is below.


I looked up the original EXIF data to replicate it; this was ISO 80, f5.0 with aperture priority, auto focusing with a focal length of approximately 29mm.

This afternoon I set out to replicate the image, which is shown below.


Apart from it being a different season (there are leaves on the tree now), totally different light conditions and a slightly shorter focal length (25mm vs 29mm) the image above is good enough for my test.

I synchronised the settings in Lightroom so that the same settings that might affect image sharpness etc were used on both; such as clarity, contrast, vibrance, sharpening and noise reduction etc.

I have looked over the whole of both images and found that the image quality on the post incident image is as good as the earlier one – in fact it may be better… I have checked centre to edge and the two 100% extracts of the same part of the image below show that there is no loss of detail in the post incident image and the auto focusing is working fine.


Conclusion

The G9 is behaving itself again and its image quality is as good as it was beforehand, so I shall be taking it with me on the trip.
Read more...

Thursday 2 July 2009

Canon G9 – “Lens error, restart camera” error

I went to use my Canon G9 compact digital camera recently after a long lay off for it while I explored the Panasonic G1. I charged up the battery and turned it on just before putting it in my suitcase for a three day trip – all I got was some whirrs and bleeps and a message on screen saying “Lens error, restart camera”…


The lens shutter opened, the lens projected a bit then stopped, with the whirrs and bleeps and then a message on the LCD screen saying “Lens error, restart camera”. It then turned itself off. The photo below shows the screen error message (please excuse the finger marks - I was in a hurry) and the one below that the position the lens stopped in.


Not panicking I decided to turn it off, leave it a few minutes and try again - no change. I tried it a couple more times; still no change. I then took out the battery and left it for 10 minutes; still no change.

Since it was now time to catch the train I took out the battery and left it on the shelf with its lens partially extended to sulk and consider its future until I came back and picked up the Panasonic G1 instead.

When I returned three days later from my trip I popped the battery back in and tried again – no change. I tried a few times with the odd prod of the lens to try to encourage it to move. Nothing happened so I left it and had a search on Google for solutions.

The general message I got from various sites was that Canon was unlikely to be interested in fixing it as they nearly always claim that this sort of problem is due to sand/grit etc in the mechanism or being dropped and hence not covered by any sort of warranty.

My camera is about 18 months old, but very lightly used – it has only taken about 500 photos as it has only really been used as a back up to my DSLRs and rarely needed. I have taken a good deal of care of it and when not in use it has been kept in its Lowepro D-Pods 30 case that I reviewed earlier and that review can be found – here. I have certainly never dropped it or abused it.

I’m not wildly patient and after reading about the problem and its solution on several web sites I followed the most comprehensive advice that I found – here.

The 7 Fixes...

I followed the suggested fixes - which as you would imagine are progressively more risky – through to the final level – Fix 7.

Fix 1 - Essentially what I did initially – turn it off and on again.

Fix 2 - Again essentially what I did next – taking the battery and memory card out; putting in a new battery and then trying again.

I rummaged around in the loft to find the USB AV cable as recommended when I reached Fix 3.

Fix 3 - Insert the AV cable in the camera and turn it on – the idea is that this turns off the screen and diverts a little extra power to the lens motor and that might do the trick. It didn’t for me.

Fix 4
- Lay the camera on its back and press the shutter release while turning on the power – this might trick the camera into moving the lens as it tries to focus while powering up – didn’t work for me though.

Fix 5 - Blow compressed air around the lens to try to shift any particles clogging up the works. I didn’t have any compressed air, but I do have a large Giottos “Hurricane” blower which I tried – to no avail.

Fix 6 - Tap the USB cover on the camera against a hard surface a few times – This is getting into serious “you do this at your own risk” territory as it may make things works or solve the problem but damage something else inside the camera in the process. Not feeling as if Ihad much to lose I gave it a go – again to no effect.

Fix 7
- “Try forcing the lens” is the advice. It could really do terminal damage, but if you don’t fancy a big repair bill and the camera is out of warranty then … I didn’t feel that I had much to lose so I did some extensive wriggling of the lens, pushing it and pulling it – all the while listening for the telltale click that says it has reseated itself. I thought I heard it a couple of times and occasionally the lens moved and the lens changed the position it ended up in, but for probably about twenty tries I kept getting the same error message.

Naturally I got a little less gentle as time progressed and eventually the lens closed as I pushed it back in against a flat surface.

When I turned it back on the lens came out and protruded much further than before, but it was still not right. After going through the cycle around five more times the screen lit up and instead of the error message I got a camera settings screen – progress at last.

I pressed the shutter release and the flash fired and an image appeared on the screen – but the image was very out of focus. I tried zooming which worked and then gently (now I was beginning to think that it might be OK I became more cautions) wriggled the lens about.

I turned the camera off and the lens retracted and the shutter closed – when I turned it on it seemed better, although the familiar "Powershot G9" turn on screen did not come up; just the camera settings screen.

After a few more tries the camera started working normally again and the focus seemed OK.

I took the camera out for a quick test and viewed the images in Lightroom at 100% - they seem OK.

Result

After several on/off cycles it is still working fine – so it looks as I have brought it back to life; but more by luck than skill I feel. In reality most of the movements I tried with the lens were firm but not sharp shocks or knocks.
Read more...
Friday 22 May 2009

Maintaining and upgrading my desktop PC for photography – Part 4: How fast is my system?

Having upgraded and reduced the noise levels from my PC I decided to ask myself how fast my three and a half year old Intel P4 based PC is compared with a reasonably priced new one…


There are lots of bespoke PC speed benchmarks used by various reviewers, but most of them are either pretty esoteric or focused on PC gamers; my interest is really how quickly I can get through Lightroom and Photoshop jobs.

Looking through the various benchmarks I decided that Custom PC magazine’s benchmark suite (downloadable from – here) with its GIMP based speed test was a reasonable way to compare my system with its Intel P4 CPU with the current generation being tested by Custom PC.

The screenshot below shows the results from my system.


Essentially my system is slow; very slow when compared with modern processors.

The GIMP result ("Image editing" in the results screenshot above) of 370 compared with Custom PC’s measurements of 1,135 for their recommended Intel Core 2 Duo E8400 processor, which was overclockable to 1,623 in their test (May 2009, pg 79 – see table below)


Double click the graph above if you want to see it in more detail - the blue part of the bar is the speed for the CPU at its rated clock speed; the red part represents the speed the Custom PC managed to achieve by overclocking the processor to something like its maximum stable clock speed - in the case of the E8400 the base clock speed is 3GHz and the overclocked speed was 4.4GHz

In theory a PC using the E8400 should be 3x - 4x faster in my image processing applications than my current outfit.

At this point I decided to get a new computer as the Foxconn motherboard would not take the twin core processors, despite being an Intel LGA775 socket system. Since I was going to have to change the motherboard I decided to go for a new system – on top of that I decided to build my own to optimise the re-use of existing components, make as quiet a PC as reasonable from the start and to build in an upgrade path for future upgrades.

As an extra incentive modern power supplies should be more energy efficient, and the processors and hard disks should be as well.

That will be the subject of my next upgrading posting – I will work out some “real life” tests to run on my old system so that I can convince myself the upgrade is worth it.

Conclusion

My PC is slow and it is time to update!
Read more...

Wednesday 20 May 2009

Maintaining and upgrading my desktop PC for photography – Part 3: Upgrade the main components

Having done some simple software system maintenance which successfully boosted the system’s performance and improved the system and CPU cooling and reduced the PC's noise levels it is now time to think about further hardware improvements.


There are several hardware areas that can be reasonably easily upgraded without any specialist knowledge or much risk to the system as a whole; and they are sensibly priced. These are:
  • System memory (RAM)

  • Upgrading a USB 2 external hard disk to an eSATA interface

  • The main internal hard drive

  • The graphics card for a twin monitor system
System memory
It is generally accepted that one of the most effective ways of boosting performance is to add in more system memory (RAM). Since I already had all four slots on the motherboard filled with 4x 512mb memory modules giving me 2gb in total I needed to change at least some of the memory. I have always been a bit mystified why if there was 2gb of memory installed the system only thought there was 1.5gb (as reported by right-clicking “My Computer” and looking at the “Properties” option under the “General” tab), but that’s PCs for you.

Windows XP will only recognise up to 4gb of RAM with the system’s “Physical Address Extension” turned on (which it is in Service Pack 2 onwards), unless you move to a 64 bit version of XP or Vista, so there is no point going above 4gb.

I like to use memory from a reputable supplier, and Kingston and Crucial came immediately to mind. Crucial have a neat system scanner utility [downloadable from – here] that scans your system and recommends compatible upgrades, which they guarantee will work with your system if you buy it from Crucial. I ran “Crucial Scan” and it recommended a set of 2x 2gb memory modules for my system, giving 4gb in total. I was slightly wary as the manual for the motherboard (a Foxconn 925XE7AA) says that it only supports up to 1gb memory densities, but with the Crucial guarantee I decided to risk it – when the manual was written I suspect that 2gb memory densities were not available. I ordered it, along with an anti-static wrist strap to use while installing it. They arrived in the post a couple of days later, along with a free 2gb Lexar USB memory stick – all for £38 – not exactly a huge investment.

I installed it with the usual concerns about zapping the entire system with static or some act of clumsiness; but using the anti-static wrist strap, natural material clothing and avoiding static creating environments I installed the memory. This was not without alarm, however… It did not simply succumb and meekly sit into the memory slots; no it resisted and I thought that I was going to damage the motherboard, so I re-read the instructions a couple of times and noticed in a diagram that I should be pushing at the ends of the card, not in the middle where logic told me I should. After a bit of jiggling around they both eventually popped into place.

When I turned it all on it booted up fine and on checking I could see that more memory was installed – again rather puzzlingly 2.75gb, not the full 4gb. I gather that this figure is after some system overheads have been deducted, such as graphics cards etc; but in any case it nearly doubled the available RAM.

Did it make a difference?
Well it is not immediately obvious – the system seems more resilient with more applications open so it is almost certainly working, but I guess that there is some optimisation I have yet to do in Photoshop and Lightroom, but I am confident that if I end up with some huge multi-layers image files in Photoshop the extra memory will come into its own.

Upgrade external hard disk to an eSATA interface

eSATA is a connection standard just like USB, FireWire etc. It is based on the Serial ATA (SATA) connection initially used inside computers for internal hard drives as a replacement for IDE standard drives; connecting directly into sockets on the motherboard. SATA disks can be used as external hard drives using SATA enclosures, but most of them use the USB2 standard interconnect to connect too the PC.

eSATA stands for external SATA. By installing an eSATA plate in the computer case connected to a spare socket on the motherboard you can create an external connection for an eSATA enabled external hard disk. This should boost the connection speed from USB2’s max of 480 mbits/sec to 1.5 or 3gbits/sec depending on the SATA generation (I or II) used. The cable length, however, can only be about 1-1.5m and no power is available so the connected disk will need its own power supply. The diagram below, from sata-io.org, shows the relative typical interface speeds for the common inter connection types – 1394 is better known as FireWire.


This performance boost seems worthwhile, especially if Photoshop is using an external hard disk as a scratch disk in your set up, as it is in mine.

I chose to buy an high quality Icy Box 351 3.5” SATA enclosure (about £35 on eBay) offering USB2 and eSATA, which come with an eSATA plate and connector, which I planned to use as part of my hard disk replacement process, as described in the next section.

I installed the plate using the same precautions against static as I used for the memory, along with an extra set of 4x USB ports for good measure. Both installations were very straight forward – the eSATA plate is the one with the red cable coming out of it in the photo below.


Internal hard disk upgrade

My main internal hard disk has been doing sterling duty for 3½ years and I should probably replace it as a precaution in any case as it occasionally makes ominous grinding noises on start up. But in that 3½ years technology has moved on apace and now faster, bigger, lower energy and cheaper disks are around.

After looking around it seems the Western Digital currently have a good reputation. In their range the current best price/performance model seems to be the 640gb disks, which come in a low energy “Green” variant. I bought a pair Western Digital 640gb Hard Drive SATAII 7200rpm 16MB Cache - OEM Green Power from eBuyer for about £50 each – one to transfer the system hard drive to and one for the eSATA box.

To transfer to the new hard drive I wanted to use one of the disk image transfer systems as I did not fancy reinstalling all my software with all the tweaks that have accumulated over the years. To do this I chose Acronis’ Migrate Easy 7.0 – they offer a 15 day free trial (from – here) which was all I needed to try it out. The software was easy to use and transferred the 200gb disk to the new one in the eSATA box in about 2 hours – and it worked fine when I swapped them over.

Twin monitor system
I have wanted to upgrade my system to a twin monitor system for some time. I decided to buy a 24” Dell Ultrasharp 2408WFP monitor and keep my old NEC MultiSync 1850X as the second screen. To use both in DVI format I needed a new graphics card with two DVI outputs; not knowing a lot about graphics cards and not planning to do any really graphics intensive activities like gaming I rather randomly chose an Asus EAH3650 with 256mb of DDR3 memory.

It all worked well enough, although the first Dell monitor arrived and went pink within a day or so, but Dell replaced it without demur by overnight courier so I can forgive them that quality issue this time, but I found out that I can only profile one of the monitors with my ColorVision Spyder 2 monitor profiling system – so I chose to profile the Dell and accept the inaccuracy on the NEC – not ideal and not something I had thought about in advance.

I have also found that there are plenty of peculiarities about using a pair of unmatched monitors, but one free utility I have found useful is the MultiMonitor TaskBar – available from here – which allows easy switching of applications to the other monitor and adds a task bar to the second monitor.

Having gone to some effort to reduce the PC’s noise the fan in the new graphics card increased it a little…

Conclusions…

I have a quieter machine which is a bit quicker and more nimble, now with twin monitors.
Read more...

Tuesday 19 May 2009

Generic replacement battery for the Panasonic G1

In my previous postings about the Panasonic G1 I have noted the high cost of Panasonic’s DMW-BLB13 replacement batteries for the G1. I refused to pay the price, waiting for the better known replacement battery manufacturers to come up with their own versions. These are now coming through…


OEM camera manufacturers’ prices for spare batteries for their cameras are nearly always very high and I have for years bought generic batteries for my digital cameras and never had a problem. As an added bonus the generics also tend to have a larger power capacity than the OEM versions, so in theory should provide more images per charge.

I do, however, make sure that I buy either a reputable replacement battery brand such as Hahnel, Hama, Ansmann, Uniross or inov8, or a reputable dealer who offers a guarantee and has a reputation to lose. I tend to avoid the no name versions of unknown provenance available through eBay from the Far East.

I have, however, been monitoring eBay for an early sign that people are making batteries for the G1 as the Far Eastern versions tend to show up first there and herald the arrival through more reliable channels.

Sure enough for the last few weeks my automated search for the battery on eBay has been producing results for versions of unknown provenance, but today a version from inov8 showed up - more details about inov8 from the website - here.

The versions available from the Far East range in price from £13 upwards – the inov8 version is priced initially at £26-95 through a UK based supplier, which while still a bit more than I would expect to pay is pretty much in the right ballpark. So I decided to buy a spare.

When it arrives I’ll test it out and report on how it works.
Read more...

Sunday 19 April 2009

Update on my experience with my Panasonic Lumix G1 – three months on

It is about three months since I posted the last review of my experience with my Panasonic Lumix G1 with its two lenses – the 14-45mm and 45-200mm zooms. This posting is an update on how I feel three months on from the initial enthusiasm of buying and trying a new camera to the reality of which camera do I choose to use every day?


It is quite simple really – three months on I still like the G1 very much. I find that it is the camera I pick up to take for a walk, to wander into the garden to take a photo of a flower or to take a photo for a blog posting, or simply want to take out on the off chance that a photo opportunity might arise – in short it has become my every day “go to” camera. The twin lens set up covers most needs and its compact lightness makes if an easy companion.

What have I learned about it in the last three months?

Using the live view screen

I have been surprised how easily I have moved from religiously using the view finder to frame every photo to mostly using the liveview screen on the back of the camera. I find that I now usually use it in preference to the electronic viewfinder (evf); not because the evf is no good, but because I am developing a new way of working with the G1.

I find myself holding the camera above my head and on the ground to seek out new angles; taking the articulated screen for granted. I also use the camera to look around corners – for instance rather than unplugging my computer monitor and dragging it away from the wall to read its serial number I simply stuck the G1 behind it with the ISO turned up to 1,000 and used the articulated screen to search out the label and photograph it. It is much quicker…

In many circumstances I find that the eyepiece sensor is too sensitive when using the camera in tight spaces (such as the use above) so I have turned off the sensor (via Custom Menu 1) and use the dedicated button to switch between the evf and LCD screen as needed.

Handling

The more I use the camera the more I like the handling. Direct access to ISO settings with a dedicated button and the “My Menu” feature all speed up my most commonly used features.

I have occasionally had to resort to the manual to work out how to do something – for instance how to scroll through pictures on the camera’s LCD while keeping the enlargement I wanted (done via the press button in the hand grip) to check focus.

Camera strap

I have found myself using a conventional neck strap to carry the camera about – I normally use Op-Tech quick release straps on my cameras, but they are too big and bulky for the G1, so for the time being the best strap I have been able to find is the one that came with my Canon G9. This, of course, does not have a quick release option so I have bought some small 10mm quick release clips to try, but have not yet got around to making up a strap with them.

Spare battery

I have learnt that I can live without a spare battery until someone comes up with a much cheaper generic version that Panasonic’s ridiculously over priced OEM version. 300+ images per charge is enough for me.

Tripod mount

On my cameras I use various Arca type quick release components and all my DSLRs have either Kirk or Really Right Stuff L brackets on them. Kirk do not make a G1 plate yet and RRS make a small bi-directional plate for the G1. Since importing direct from the US to the UK is now so expensive (a combination of low exchange rate, high import taxes, duties and fees that can double the price of a small component like this) that I have stopped doing it, so I tried out a generic Wimberley P-5 camera plate. This worked fine until I wanted to change the battery, at which point I realised that the plate partially covers the battery compartment door. I have now resorted to using a basic small universal Kirk camera plate that comes with their BH-3 ball heads. This is just small enough not to foul the battery compartment door.

Image quality

Image quality is excellent, but I still find it a bit lacking in contrast compared with my Canon 40D, mainly in low light. On the other hand I find I am taking photos in light that I would not normally bother to carry the heavier DSLR kit around in, so it may just be a perception problem – in any case I am finding that more and more of the images that make it into my photo portfolio are taken with the G1. The photo below was taken on a visit to a local pottery after a rain shower – I would not normally have taken a camera with me, but I took the G1 and this photo really grew on me…

I continue to only use RAW capture and I pretty much do all my image processing through Lightroom 2 and I am very happy with the results, with the occasional help from Photoshop.

I routinely use ISO ratings up to 1,250 and, Yes, I would prefer there to be less noise, but to be honest in the days of film I would not have taken most of the photos at all and the only reason I normally need the higher ISO setting is because I am using it in low light situations where I would not normally have a camera on me in the past. So it is not really an issue for me – it just shows me how much the G1 is allowing me to take photos outside of my usual range.


Dust
I hate dealing with dust on image sensors – so far this has not been an issue with the G1. I change the lenses over regularly, but carefully in as dust free environment as I can find, and so far I have not seen a dust spot on any images I have looked at. Panasonic’s (thank you Olympus I presume) dust reduction system clearly works.

So dust has not been an issue I am happy to report.

Conclusion

I am very happy with the G1 – it encourages me to take more photos and the people who see them like the results and that is all that I can really ask of a camera.

I look forward to trying out new lenses as the come along.
Read more...

Update on keeping my Epson 4800 printer clog free

I have not written anything for about my clogging battle with my Epson 4800 inkjet printer for several months because there has not been much to report, but after a pretty clog free period since Christmas 2008 I thought it was time to give an update…


Essentially I turned my printer off for a couple of months through November and December 2008, but as the New Year approached I wanted to print again. I did not expect it to work straight away as the reason for turning it off in early November was that nozzle clogs had appeared after a period of not running Harvey Head Cleaner regularly due to pressure of work etc.

Sure enough several colours were missing and I ran through the gamut of clog recovery techniques, but was not getting too far quickly enough so I took a deep breath and ran a Power Clean cycle – the first time I ever have as I have always been advised to avoid them if at all possible. I then immediately ran a second Power Clean cycle quite by accident – I meant to tell it to run a nozzle check and hit the wrong button on the printer’s control panel…I desperately tried to stop it by turning off the printer, rebooting the computer etc but nothing deterred it; it just simply carried on from where it had got to in its cycle. I was not at all happy as the two cycles used 308ml of ink between them…

When I did eventually run a nozzle check all was OK except that the maintenance tank now needed changing (which I did using the technique I posted earlier – [here]) and the Light Magenta (LM) was completely missing. I ran a couple of prints and still it was missing, but the cartridge was nearly empty so I put in afresh one, ran a single cleaning cycle and all was perfect – not a single line missing in any of the nozzle check patterns.

Since then all has pretty much been sweetness and light!

Since the New year I have been religiously following my clog free method of printing a nozzle check once a day using Harvey Head Cleaner; print a full spectrum print either via Autoprint or a real photo at least every third day; all the while keeping the printer sealed in a all encompassing cover with a damp sponge inside the paper tray to keep the humidity inside the printer above 40% - for most of this year it has hovered around the 45% mark. Full details of my anti clogging regime can be found – [here].

I have had a single bout of colour channel loss – this was the Photo Black (PK) channel. Essentially running daily auto nozzle checks I had not noticed that there had been a paper jam and nothing had printed for a few days; this combined with the sponge drying out leading to lower humidity caused the problem. The paper had not fed because the tray holding the sponge had slipped down into the paper tray impeding the paper loading mechanism – to stop that happening again I put in a blob of Blu Tack (
which is easily removable if need be) into the compartment to stop the tray sliding down.

A couple of weeks later PK disappeared again and this time the printer monitor was indicating that PK was running low, so I changed it. It immediately came back and there has been no problem again.

During all this time the printer was taking it upon itself to run its “auto something or other” cycle every week or so – each time using up about 9.5ml of ink; all to no purpose as far as I can see – see [here] for my previous observations and frustrations on this bit of the 4800’s story.

Conclusions

The power cleaning cycle seems to have cleared out the system admirably. This followed by my anti-clogging regime has kept the system working fine except when the regimen went wrong and when a cartridge had nearly run out. Which does rather reinforce my observations over the last couple of years that the most likely colour to give a problem is the one with the lowest ink levels in its cartridge – making me think that there is still something about ink levels and cartridge pressure to sort out…
Read more...

Sunday 29 March 2009

Eliet Minor shredder – 1 year on report

Around a year ago I published a couple of reviews on the Eliet Minor garden shredder. I thought that it would be useful to post my experiences with the shredder over the last year or so.


A year ago I bought an Eliet Minor garden shredder and concluded that I was happy with its performance – go here to read my previous reviews.

Am I still happy with it?
After a full year of use I am still very happy with the shredder and do not regret buying it at all. It gets through a prodigious amount of material in an hour or two so I have not had to use it too often, which was one of the reasons I bought it in the first place.

Does it produce good compost?

Yes – the shreddings compost down quickly and while some long’ish (about 6”) woody bits do find their way through the multi-purpose screen these are either easy to pick out and feed back through the standard screen or can be left in – they are quite heavily abraded as they pass through the blades and I have found that they tend to rot down more quickly than if they were simply cut to the same length and put on the compost heap.

I have, however, learnt a few things about the Minor in the last year:

Using the screens

I have found it necessary to swap between screens quite regularly as the standard screen does not like much in the way of wet and mushy material going through it – it quickly clogs up. It is not entirely obvious, but the multi purpose screen only fits in one way round and the as supplied standard screen fits more easily one way round than the other. To help swap them over quickly I have found it helpful to mark the top of the screens so that I put them in the right way round – as in the photo below.


Both screens are robust, being made from solid steel and tight fitting. I have thus found it helpful to have a small lump hammer and a crow bar to hand to speed up the removal and fitting process with gentle taps and tugs here and there to facilitate the changeover.

I have mislaid the screen securing pins a couple of times when changing over screens – on the last occasion I found one in the compost heap…

Really, really mushy material
On a couple of occasions I have wanted to shred the wet and mushy contents at the bottom of the pile. These even blocked up the multi purpose screen, so I simply take out the screen and push it through the blades without any screen in place. Since the area is protected by the micro-switched grill I can not see that this is dangerous. In any case I have only had to put a very small amount of material through this way.

Safety switches

I can confirm that the micro-switches on the grid protecting the outlet and the lever near the inlet both work. On occasion I have accidentally knocked the lever near the inlet and it immediately cuts off the engine. A couple of times the engine has been reluctant to start because one of the micro-switch’s contacts are not made properly. Just popping them back into place by re-closing the lever or grid sorts out the problem.

Is there anything not to put into the shredder?

Apart from the obvious things like stones the only plant material that I have found to avoid are Phormiums’ tough, sword-shaped leaves. These long fibrous leaves have properties a bit like flax (hence their colloquial name of New Zealand flax) and you could probably make rope from them. In any case in large quantities (we have several in the garden and they produce armfuls of prunings at this time of year) they tend to act like rope around a propeller, so I either feed them in very sparingly with a large amount of really woody material or use my old Scheppach Lonos 2 to crush them up enough for the compost heap.

Otherwise it takes everything in its stride.

Be a bit careful about what you shred…
With the low material flow rates through my older shredders I never found any fumes coming off shredded material to be a problem. With the Minor, however, with its large flow rates combined with its truly shredding action I found that shredding a large old Ivy plant caused some fumes to avoid. The shredder cuts finely and exposes a large surface area of material for composting, but this can also release a lot of fume if the material is prone to produce it – the Ivy clearly did. A bit of research indicated that shredding fresh Laurel leaves can also produce an unpleasant fume, so I now let Laurel cuttings go brown before shredding them.

Health and safety

Through long years of working in engineering environments I automatically wear safety glasses when using anything like this. I also wear ear defenders, along with a dust mask when shredding dry material. I double glove (eg a pair of thin nitrile coated inner gloves and a large pair of heavy duty outers) as I find that to keep up with the machine’s appetite for material it is impractical to check what you are picking up too closely and we have a lot of seriously thorny material in our garden. This solution keeps pretty much everything out.

Starting the engine

My Minor is fitted with the Briggs & Stratton engine option. This is started with a pull cord and as with all my petrol engined garden machinery it can be a bit reluctant to start after a long lay off. I don’t find this machine to be any better or worse than others in its ease of starting. When hot it restarts easily with a single pull of the cord.

Also…

Remember that this is a petrol driven engine and that it produces exhaust fumes. Standing by it while it is running for a long time can be a bit unpleasant, so I take regular breaks and work in a well ventilated (draughty even) area.

Conclusion
I am very happy with my choice and anticipate many years of service from it.
Read more...