Sunday, 25 January 2009

Panasonic Lumix G1 Review – Part 6 : 45-200mm f4-5.6 lens

I picked up a Panasonic 45-200mm lens for my G1 on eBay at about half the current UK shop price. Here are my first impressions of the lens used with the G1.


The official name for the lens is the “Lumix G VARIO 45-200mm F4-5.6 ASPH Mega O.I.S” with a model number of “H-FS045200” – I will simply call it the 45-200 lens from here on. You can find out full details about it on Panasonic’s web site – here. I have extracted the key specifications and they are shown in the screen shot below. For comparison the details for the 14-45mm lens can be found – here.


Double click the image if you want to see it full size


For me the key specs are the size and weight, the focal length range with reasonably fast apertures, and that it has image stabilisation built in (since the G1 does not have it built into the camera body) and that it focuses quickly, accurately and quietly. Image quality is of course the key thing that I have to test for myself, along with the focusing requirements.

First Impressions

The first impression of the lens when I took it out of the box was how small and light it was. For a 90-400mm 35mm equivalent f4-5.6 lens it is tiny, as you can see in the photo below of it with its lens hood in place, compared with a Canon 40D + 70-200mm f4 IS L lens – the comparative weights of these set ups are 870g for the G1 and 1,850g for the Canon, making the G1 set up less than half the weight.

This ticks the size and weight box very nicely.


A quick look at and feel of the lens before putting it on the camera showed that it is from the same family as the 14-45mm lens that I already have. The lens mount is metal, the finish (colour and feel) is similar and the overall impression is of a good quality lens, although not comparing to a Canon L zoom (nor in size or weight either). The zoom and focus rings are similar and work the same way on the two lenses. They share the same 52mm filter size.

Unlike the Canon 70-200 mm L lens that I have the lens barrel does extend when you zoom from 45 to 200mm, extending the length of the lens from 99mm (152mm inc lens hood) to 136mm (189mm inc lens hood) (measurements taken from the camera body to the front of the lens or lenshood). Like the 14-45 lens the 45-200mm lens’ focusing is effectively silent, with no observable movement of any element of the lens when it focuses; so it must be an internally focussing design. The focus speed is good enough (much, much quicker than a Canon 70-300mm USM lens I once had).

Image Quality

As always I have only used RAW files to capture the images so any comments I have on image quality reflect what I see in RAW files in, or printed through, Lightroom 2.2.

The first set of images I took were in good light and one of my cats obliged by sitting still long enough to be photographed. When I looked at them I was pleasantly surprised and happy with the results. The cat’s whiskers and fur was nicely detailed and the colours were clear and punchy - see below taken at 200mm (400mm 35mm equivalent) with stabilisation turned on at max aperture of f5.6, 1/640thsec, ISO 200 - the photo was taken through leaves so there are some areas with out of focus leaves in the foreground .


Image Stabilisation
The performance of the Image Stabilisation on this lens is much more important to me than on the 14-45mm as the longer focal lengths combined with the temptation to hand hold the combination could be an excellent recipe for blurred photos. Since this is likely to have a big impact on image quality I looked at this first.

I have done some real world tests hand holding the lens at 200mm with the IS turned on and off to test its performance at both long and relatively short range. I have also compared it with a Canon 70-200mm f4 IS L lens on a 40D – this lens is reputed to be one of the sharpest mid-range zoom lenses available, so it might be an unfair test.

In each case I have set the camera to shutter speed priority and varied the shutter speed taking whatever aperture that gave. In all cases I started at 1/500th Sec and worked my way down in single increments to around 1/40th or 1/30th sec. keeping the ISO constant. With the wide range this covers the aperture has usually gone from f5.6 to the minimum available for the lens (f22). I did not use any additional means of support – just my two hands and as good technique as twenty years of taking photos has taught me.

I looked at the images at 100% in Lightroom using its compare function as well as printing off A4 prints.

How effective is the image stabilisation?

One of the first things to say is that I think that some of the image softness I saw was probably due to diffraction limiting rather than out and out image shake.

With the x2 multiplication factor on the G1 I would expect to have to use at least 1/400thsec with the lens at 200mm. In all cases 1/500thsec produced a sharp image. In the long range test with image stabilisation turned on the image started looking shaky at 1/160thsec, but I was able to get some reasonably shake free images down to 1/80thsec on and off.

With stabilisation turned off I was only able to get shake free images at 1/500thsec, with some at 1/400thsec. Below that no photos taken at 1/250thsec or less was ever shake free.

So for reliable shake free photos the stabilisation system seems to be good for about 1 stop, but for occasional shake free images it seems to offer a bit over 2 stops (the difference between 1/400th and 1/80thsec. This is a bit less than I was expecting, and may be due to the light weight of the overall system compared with the heavier DSLRs that I am used to using, giving it less inertia to counter image shake inducing movements.

As I mentioned I ran a parallel test with the Canon 70-200mm f4 IS L lens on my 40D… To make the test fair I reduced the focal length on the 45-200mm to 155mm (giving a 35mm focal length equivalent of 310mm on the G1 vs the 320mm on the 40D).

I have to say that the image sharpness and contrast from the Canon combo is noticeably better straight out of the camera than from the G1 combo, but until I looked at the Canon images on screen I was quite happy with the G1’s. After tweaking in Lightroom and printing them, however, they looked very similar. The Canon images still looked more contrasty and the colours a little more punchy, but that might be because I am simply more used to working with Canon images than those from the G1.

At 155mm with stabilisation turned on the G1 was shake free down to about 1/125thsec; with it turned off I could manage shake free shots down to 1/250thsec, but also some shaky images at 1/400thsec – this equates to about a one stop advantage again, although it makes images at all speeds more reliably shake free; giving roughly a 2½ stop advantage with varying reliability.

The performance of the Canon combo was, however, much more clear cut and impressive. At 200mm the stabilisation system produced a noticeably more stable image in the viewfinder. In Lightroom and in print the stabilisation worked all the way down to 1/60thsec, compared to 1/250thsec with stabilisation turned off, although I was quite capable of producing shaky images at 1/320thsec. This equates to at least a 2 stop advantage, with up to the 4 stops claimed by Canon on occasion; so about a stop better than for the G1 combo.

General image quality

I looked in detail at the images I printed at A3 from the G1 at 155mm and 200mm, and the Canon at 200mm – all shot at 1/500thsec with stabilisation turned on and one stop down from their maximum apertures at ISO 200 to make sure that the image quality was as good as normal real life was going to produce, to get a feel for the image sharpness of the lens.

Comparing the Canon at 200mm and the G1 at 155mm showed them to be very similar. Both were sharp in the centre and held it to the edges – so a pretty good result. At 200mm on the G1 images at the centre were reasonably sharp, but softened towards the edges. This was not, however, dreadful and looking at the prints at a normal viewing distance was not really noticeable.

During the stabilisation trials I felt that I was seeing image softening due to diffraction effects at small apertures rather than image shake. I would have to run a tripod based trial to determine what the diffraction effect limits are for this lens, but that is rather missing the point of this camera.

My conclusions based on image quality are that this is a very useable lens. At the long focal length extreme the image quality is not as good as at mid-range – this if often the case with zooms and does not deter me from using for images that are likely to be printed to A3.

Conclusion

I am very happy with the lens. Image quality shows up well compared with a top of the range Canon zoom lens of similar specifications (albeit with a shorter focal length range). It focuses adequately swiftly, handles nicely and is a small, neat package to carry around – I shall be keeping it.
Read more...

Thursday, 1 January 2009

Panasonic Lumix G1 Review – Part 5 : Initial impressions of image quality

I have been out and about on several trips recently with the G1 and have had a chance to look through several hundred images and print some from Lightroom 2.2 and show them to friends for comment. Here are my initial impressions.


My main use for the G1 is to be a very portable DSLR replacement which is able to produce better quality images than I can get using my Canon G9 or Ricoh GX100. Apart from the portability and inter-changeable lens options that the G1 offer my main interest is in image quality at high ISO levels.

So far I have not done any comparative image quality tests with my DSLRs or compacts. This would really be pretty meaningless for many situations as I do not tend to use my DSLRs at high ISO levels as I usually use a tripod rather than increase the ISO, although with the latest DSLRs’ high ISO performance this might change when I get one. I have always thought it ironic that I use compacts for their portability so they do not get used with tripods; this means that good high ISO performance would be ideal for them, but with the current state of the art their tiny sensors generally yield have poor image quality much above their base ISO levels of 80 or 100.

So I have simply taken pictures when the G1 was the most appropriate camera to use – e.g. when I planned to take available light photos, but did not really want to carry around a full DSLR kit to do so. In most cases the light levels were going to be low. I have hardly used the flash at all with all the photos that I have looked at in any detail being shot purely with available light.

Most of the photos I have taken have been taken at higher than normal ISO settings – based around the maximum useful 1,250 ISO noted by Michael Reichmann in his Luminous Landscape review – here. I have simply set the camera to aperture priority, multi-element evaluative metering and auto focus with a singe central focusing area; using exposure compensation and manual focusing as needed. I have only saved and used RAW images.

The G1’s normal ISO range options are 100, 200, 400, 800, 1,600, and 3,200 in 1EV steps – to access the intermediate settings such as 1,000 or 1,250 you need to set the camera to 1/3EV ISO increments via the “ISO Increments” menu.

The first thing to say is that the images on screen and in print are hugely better than the ones I saw through the electronic view finder when I took them!

The first occasion I used it was when I visited the “World Wildlife Photographer of the Year” exhibition at the Natural History Museum in London just before Christmas - go here for details of the exhibition. The exhibition was excellent with beautifully presented (backlit) images, nearly all taken with the patience and dedication I can only marvel at. Outside, however, was a lovely winter scene at dusk and after, with an ice rink, winter fair and merry-go-round, all surrounded by trees decked with fairy lights, lit buildings and a sky lit by London’s glow.

Even at 1,250 ISO I was getting speeds around 1/4 to 1/25th second at the maximum aperture, which varied from f3.5 at 14mm to f5.6 at 45mm (28-90mm 35mm equivalent). So the shoot was a pretty good test of the lens image stabilisation system as well. The tree lights made it easy to see whether there was camera shake or not (it was a cool and very still evening).

On the G1’s LCD review screen the images looked pretty good and on importing them into Lightroom 2.2 my first impressions were “wow”.

Below are a couple of shots taken on the day – they have not been tweaked in Lightroom at all except for noise reduction and standard settings for sharpening etc. Any image artifacts around areas such as the dome are due to the downsizing Lightroom did to create the small files I use in my blog – the actual images are fine.


Shooting at high ISOs meant that one of the first things I did was to look at shadow areas at 100% to look for the noise, and sure enough there is luminance and chroma noise there. I am no expert at optimising Lightroom’s controls to get the best image with noise reduction turned on, but I found that using settings of 50 for luminance (L) and 25 for colour (C) noise reduction reduced the noise enough without making them unacceptably soft to produce good screen images and prints. In any case after the chroma noise is reduced by the default setting in Lightroom of 25 C the remaining luminance noise is not really objectionable, and certainly no worse than most film grain would have been at lower ISOs.

Below is a set of three 100% crops with no noise reduction, 0 L & 25 C and 50 L & 25 C respectively of a noisy area around the dome in the background from the 800 ISO image above, taken at 29mm, ¼ sec @ f5.6.

The difference between them can be seen better if you double click on the images to see them full size

No noise reduction

0 L, 25 C noise reduction

50 L, 25 C noise reduction


Below is another set of three 100% crops with no noise reduction, 0 L & 25 C and 50 L & 25 C respectively taken from a 1,250 ISO image taken at 14mm, 1/20th Sec @ f4.5

The difference between them can be seen better if you double click on the images to see them full size

No noise reduction


0 L, 25 C noise reduction

50 L, 25 C noise reduction


Subsequently I have taken images ranging in ISO from 100 to 1,250; mostly at wide open apertures, or one stop down.

The shot below was taken in the Covered Market in Oxford at 33mm, 1/40th Sec, f5.4, 400 ISO.


I also went out in a hard frost with grey skies and took a range of still life and semi-action photos of my cats prancing around the garden. When I downloaded the photos into Lightroom I was a bit surprised to see that they almost looked like B&W photos – the colours were very de-saturated and muted; but then so was the light. I experimented with close up shots – not using a tripod made it impossible to use much more than wide open apertures at the 45mm setting, and they were not brilliant. I was, however, quite happy with the detail I got when everything came together, but in general the images were soft. Not surprisingly the semi-action shots of my cats were not great, but when they sat still for a moment or two they came out nicely, although also suffering from very flat lighting.

I have printed a selection of images at A4/letter and A3 size on my Epson 4800 and I have to say that the response from friends and family is very gratifying – they love them.

Whatever noise I can see on screen at 100% pixel peeping is not an issue in print – even the high ISO prints at A3.

Apart from the noise most of the images, except for those taken in flat grey light, have been pretty good straight out of the camera and I have not tended to do much in Lightroom other than tweak the sharpening, noise and, when needed, the exposure.

14-45 lens and Image Stabilisation

I can not say how many extra stops the image stabilisation allows, but I was happy with the photos taken at ¼ sec (and resting on a railing for extra support) and in general I found that camera shake was not much of an issue. There was plenty of motion blur in many shots, but plenty of images with little evidence of camera shake. So my general conclusion is that the Image Stabilisation is working; I just can not estimate how much.

The lens itself performs pretty well – I do find its high maximum apertures a bit limiting and would like to try out faster fixed and zoom lenses when they become available to try to balance the “size and convenience” vs. “ease of use and image quality equation”.

Conclusion
I am very happy with the image quality I am seeing – this camera excels as a lightweight high quality walk around camera. Most of the best photos have been taken at high’ish ISOs and when I would not have wanted to have a better quality, but weightier and intrusive DSLR kit in tow.

While there is noise in the images Lightroom is able to deal with them quite easily – I have not had to resort to Noise Ninja yet, and they print up beautifully to at least A3.

At the moment I am thinking of the G1 as a keeper, best used for fairly slow paced available light scene and street photography.

I would certainly like to try out the 45-200mm lens if I can borrow or find one at a sensible price – the prices for them are much higher in the UK than the US; being about the same number of £s in the UK as $s in the US, nor are they widely available in the UK yet – and other lenses as they come on to the market.
Read more...

Wednesday, 31 December 2008

Panasonic Lumix G1 Review – Part 4 : Battery life

Since spare batteries are so expensive for the G1 I have spent some time monitoring battery usage in my typical real life use of the camera for the last 10 days or so. Panasonic’s quoted battery life is approx. 330-350 shots – Here is my experience.


The G1 takes Panasonic’s DMW-BLB13E Li-ion rechargeable batteries, rated at 7.2V, 1,250mAh, 9.0Wh. Manufacturer’s quoted battery lives can be pretty meaningless as the life can vary hugely with variables like temperature, flash usage, the amount of reviewing and chimping done, image stabilisation, etc etc – in fact it will be different for every photographer and every time you use it, so my experience can only be a guide to how much anyone will get out of the battery.

I charged the battery a few times in the first few days to make sure that it was operating properly and then simply charged it and put it in the camera to use as and when I felt like it. For the last ten days I have carried the G1 around with me and used it when opportunities arose.

Over about ten days, without recharging the battery at all, I took 309 photos before the battery died. The conditions that I used it under were broadly as follows:
  • Mostly outdoors in temperatures of -2°C to +10°C
  • Hardly any flash usage – 5-10 shots with flash as fill in
  • Image stabilisation – on; for all but a few shots
  • Shooting and saving RAW files only
  • Reviewing and chimping – a reasonable amount, but I do not look after every shot so am probably a light user on this front
The G1's battery life indicator is a typical three bar representation of a battery which shows up on the LCD screen or viewfinder, as shown in the diagram below from the Operating Instructions.

I noticed that the battery indicator dropped from full to two bars at about 220 shots and it then dropped to the next bar down within about 30 shots. This was outdoors in nearly freezing temperatures – when I took it back indoors it went up a bar. The next day I spent time in sub-zero temperatures and took a further 65 images before the camera stopped working. For the last 20 or so the battery indicator was flashing red to tell me of its imminent demise.

A few minutes after I took it back into the warmth the battery came back to life enough to allow me to review all the photos I had just taken.

Conclusion

Using the G1 in typical (UK) winter shooting conditions the battery life for me would seem to be about 300 shots, so long as I am not using the flash much. In warmer conditions I am sure it would more; but in any case I am happy with this life for the type of photography that I will be using the G1 for, and Panasonic’s figure is a pretty reasonable estimate.
Read more...

Monday, 22 December 2008

Panasonic Lumix G1 Review – Part 3 : RAW writing times

In my first post I reported on the RAW file writing speeds using a 2gb Sandisk Extreme III SD card. I have done some more testing with the following results.


Since I tried the Extreme III I have used a couple of other 2gb SD cards in the G1. They are a Transcend 150x and a X4store card – the latter has no rating and since it came free with a camera I suspect that it is a pretty cheap low speed card.

The table below shows the results.


7 or 5 shot time
Buffer full time between shots
Clearing full buffer time
Sandisk Extreme III 2gb SD
2.5 secs / 7 shots
1.25 secs
7 secs
Transcend 150x 2gb SD
3 secs / 7 shots
1.5 secs
10 secs
X4store 2gb SD
2.5 secs / 5 shots
3 secs
16 secs


The key point is that the X4store card only allowed 5 shots to be taken before the buffer filled up, rather than the 7 shots that the G1 is supposed to take. The other two were fine, so the G1 specs seem to assume a certain write speed for the SD cards in use.

The Sandisk Extreme III allows faster continuous shooting than the Transcend 150x. The X4store card is really noticeably slower in all aspects of use, slower continuous shooting, much slower shooting when the buffer is full and it takes an age to clear the buffer.

Conclusion
Card speed matters, but so long as you are above a certain write speed not hugely. Cheap no-name or own brand cards are likely to be slow and disappoint on the RAW writing speed front.

Read more...

Friday, 19 December 2008

Panasonic Lumix G1 Review – Part 2 : Updating software

Since I bought the G1 two updates have become available - Adobe Lightroom 2.2 and a firmware update for the G1 body.


Firstly and most importantly for me Adobe have released Lightroom v2.2, which supports several new cameras' RAW file conversion, including the G1.

Lightroom 2.2 update
Since I currently run Lightroom v1.4 I wanted to try out v2.2 before buying it - so I downloaded Adobe's free 30 day trial from here

It installed without any problems and when I first ran it it told me that it had detected my Lightroom v1 Catalog and asked me whether I would like to import it. Mindful that I did not want to commit to v2 just yet I said "No" and started a new Catalog for Lightroom 2 trials.

Up until now (as the final hangover from my workflow before I started using Lightroom a year ago) I have used Downloader Pro from Breeze Systems to download files and put basic copyright data into each file. This, however, does not recognise the G1's files at all - it does not even think they exist, so I tried Lighroom's import feature (previously I have told Lightroom simply to monitor the folder I download new images to and import any that arrive there, which has worked well).

So I imported some trial images into Lightroom 2.2 from my card reader and sure enough the G1's .RW2 RAW files popped up and I was able to make the usual changes and convert them into JPEGs just as I would expect.

So it appears that the RAW workflow is sorted - now all I have to do is to take some images worth looking at and work out how to get the best out of them in Lightroom 2.

G1 firmware update
Updates for the G1's firmware can be found here

The camera as supplied was running "Body Firmware" ver 1.0 and "Lens Firmware" ver 1.0. The update available is for the "Body Firmware" ver 1.1.

I followed the instructions and tried to download the firmware update file via the USB cable directly from the PC to the G1. When I did that an error message came up saying that the drive (the G1) was locked. So I formatted the SD card again and popped it into my card reader and copied it across - which worked fine.

The instructions do not actually tell you what to do next!

On another page of instructions I found that pressing the playback button was the way to proceed. This brought up a screen like the one below - pressing "Yes" updated the "Body Firmware". The instructions recommend re-formatting the SD card (otherwise problems may occur; to quote the instructions - "otherwise it may cause the camera body to malfunction").


So I now have a trial version of my preferred RAW workflow software to play with over the next couple of weeks and updated camera firmware.
Read more...

Monday, 15 December 2008

Panasonic Lumix G1 Review – Part 1 : First impressions

I was recently tempted into buying a Panasonic G1 with the standard 14-45mm lens. Here are my first impressions – I shall be writing more as time goes on.


Background
I have been tempted to like the Four Thirds format since the Olympus E-1 appeared; I especially liked the ultrasonic sensor cleaning system as I hate having to clean sensors all the time. So while most serious DSLRs now have an equivalent dust reduction system I will always have a soft spot for Olympus’ innovativeness in leading the way. I did in fact I have an E-1 for about a year, but I could not justify having two DSLR systems so I sold it in favour of expanding my Canon EOS system – the E-3 was just too late in arriving.

But I always liked the feel of the E-1 and recently read Michael Reichmann’s review of the G1 (go – here – to read it). Michael has not previously been a fan of the Four Thirds format, describing it as an “evolutionary dead-end”, so when he produced a pretty positive review of the Micro Four Thirds format G1 it set me thinking – especially his finding that images from the G1 are very usable in 13x19” prints upto about ISO 1250.

The idea of the Micro Four Thirds system is that it can retain the same sensor size as a conventional Four Thirds camera, but by eliminating the mirror and prism, and using a liveview only system with an electronic view finder it can shrink the mount, reduce the distance between the back of the mount to the sensor (from 40mm to 20mm) and shrink the lenses to make a really significantly smaller package than a conventional DSLR. I guess the resulting format is more like a rangefinder in lens/sensor configuration than a DSLR – since Panasonic have a commercial tie up with Leica and use Leica badged lenses on many of its digital cameras it is reasonable to assume that Leica’s expertise in designing excellent and compact rangefinder lenses will percolate into Panasonic’s Micro Four Thirds lenses. By keeping the same sensor size as the Four Thirds format it retains the 2x magnification factor relative to 35mm systems. Unlike a bridge camera with its fixed optics the Micro Four Thirds system is all about interchangeable lenses.

If you want more technical information than Micheal Reichmann’s offers then DPR Preview has it - here.

Amateur Photographer have recently (13th December 2008) printed their review of the G1. They give it a fairly warm welcome. One of the criticisms of most standard Four Thirds cameras is that their dynamic range is not as good at their competitors. I noticed in the AP review that they are saying that Panasonic (or perhaps Kodak) seem to have solved this problem. In the review AP measured an 11EV (11 stops) dynamic range, which they say is on a par with Sony’s Alpha 900 and better than Nikon’s D300 or Canon’s 50D. In previous reviews AP measured the Olympus E-520 at 8-9EV, the Olympus E-3 at around 9EV, the Sigma DP-1 at 7EV, while saying that it was 1EV better than most compacts, including the Canon G9 at 6EV. If true this should make it much easier to produce images with good highlight and shadow detail.

I have a couple of Canon EOS DSLRs (a 40D and a 30D) which I use for most of my planned photography and a couple of compacts (a Canon G9 and a Ricoh GX100) to carry around on the off chance. So while I am pretty happy with the two compacts when I can keep the ISO rating at their lowest ISO settings they are not much good for any situation needing ISO 200+. Also both are a compromise in other ways such focal lengths available, RAW writing speed, focus speed and accuracy etc. Since I am mostly concerned with image quality I always use these cameras in RAW image capture mode.

On the subject of image quality – digital image quality is usually related to individual sensor pixel size, assuming similar quality lenses. Both the Canon G9 and the G1 have 12.1 megapixel sensors; the Canon 40D’s is 10.1. The table below shows the relative sensor areas and consequent individual pixel sizes.


Canon G9
Panasonic G1
Canon 40D
Mega pixels
12.1
12.1
10.1
Sensor size - mm
7.6 x 5.7
18.0 x 13.5
22.2 x 14.8
Sensor area - cm2
0.43
2.43
3.29
Pixel size - μm
1.9
4.5
5.7
mp per cm2
28
5.0
3.1


As you can see in the table the G9’s sensor and hence pixels are much smaller than the G1’s, which should result in better signal to noise ratios and better high ISO performance. In fact the G1’s pixel size at 4.5μm compares favourably with Canon’s 50D at 4.7μm.

What I really want is a camera of compact dimensions, low weight and interchangeable lenses which is capable of producing excellent image quality that I can carry around when I know I will want to take photos, but don’t really want to have to lug the whole DSLR kit around – I would guess that nearly all DSLR users would like this.

The G1 at least seemed to offer this possibility. It was announced in September 2008 and started shipping around November 2008. I had a look around at prices and found one on eBay for around £400 so I bought it – about £100 less than the cheapest on-line retailer that I could find. Now quite why someone would be selling after having it for only a few weeks I can not say.

First Impressions

For the record the Panasonic Lumix DMC-G1 is a 12.1mp camera and it came with Panasonic’s Lumix Vario G 14-45mm f3.5-5.6 ASPH/Mega OID (optical image stabiliser) lens – which I will simply call the “lens” from now on.

Handling

My first impression of the kit was that he lens was tiny – really much smaller than normal DSLR lenses.

I have reasonably small hands and when I first picked it up it felt solid and like a serious camera, despite it being essentially a plastic camera. The surface is quite a tactile and the grip is quite substantial - It simply feels comfortable in the hand.

It is small as can be seen in the photos below of my Canon G9, the G1 and my Canon 40D with a standard 17-55mm f2.8 lens attached (along with a Really Right Stuff L bracket).
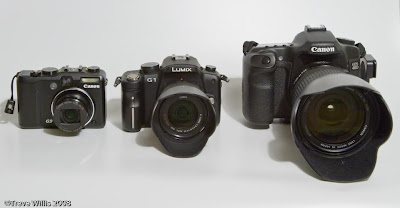
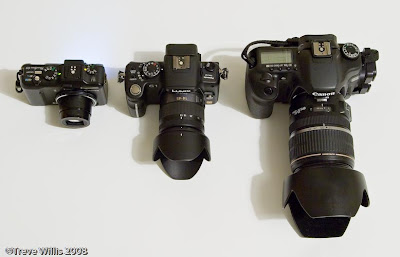

Photos showing the relative sizes of the Canon G9, Panasonic G1 + 14-45 f3.5-5.6 lens and Canon 40D + 17-55mm f2.8 lens combinations


The table below lists the weights of these three cameras in their ready to use configuration as in the photos above; eg including lens, battery, storage card, lens hoods & caps as well as the camera straps and in the case of the 40D the L bracket.


Canon G9
Panasonic G1
Canon 40D
Weight – g
378
666
1,720


While the G1 is pretty light compared with the 40D, being more than a kilo lighter, it is much heavier than the G9. The G9 easily fits into a jacket pocket (the Ricoh GX100 fits into an even smaller pocket), but the G1 does not – mostly because the G9’s lens withdraws into its casing when it is turned off and the G1’s does not. It really is a camera to tuck into the corner of a small bag or to carry around in one hand or slung around your neck. That said, it is however, much easier to carry than the 40D and much more unobtrusive. Although I have not yet tried or even handled the 45-200mm lens for the G1 the specs for it indicate that it is both much smaller and lighter than any equivalent lens for a DSLR, so as a system ranging from the 35mm equivalent of 28mm to 400mm it looks pretty compact and light. Panasonic plan to market a 20mm f1.7 lens in 2009 and this might be thin enough to make the whole set up (jacket) pocketable, especially if it is a “pancake” type lens.

Ease of use

I am not a great one for reading manuals and I found that simply picking up the camera and using the accumulated knowledge of working with a dozen or more digital cameras over the last few years I simply “got on with it”. I found it pretty intuitive to use, although I did have to resort to the manual to work out how to set exposure compensation as I noticed when reviewing some images on the LCD screen that I had accidentally dialled in compensation when I had not meant to – I discovered that it is quite easy to do that as the front dial on the hand grip just below the shutter release button toggles between setting the aperture (in aperture priority mode, which is the one I nearly always use) and exposure compensation by pressing it in; rotating the wheel changes the setting.

I like the array of buttons that can be used to make changes as searching through screen menus often means missing the shot. There is a dedicated ISO setting button, but I prefer the G9’s dial for changing ISO setting, although it is quite easy to accidentally knock it. Many of the most commonly used settings can be reasonably quickly accessed via the Quick menu (Q.MENU) button just behind the shutter release. This also remembers the last Quick menu item you used to change settings so repeated changes of a particular setting during a shoot is reasonably quick if that is what you only use the Quick menu button for. The Fn button might be useful if you could set which functions it accessed, but the camera works this out for you from what you recently used so it is not reliably useful.

So my first impressions of ease of use are that it is much like most digital cameras these days and easy and quick to pick up how to use most of its main functions. No doubt I will have to delve into the manual in due course to extract more from it, but for now I am happy to just use it.

The Lens
The lens has a slower f-stop range than I would ideally like in f3.5-f5.6 – I would prefer a constant f stop, such as Canon’s f4 lens range, and for it to be faster, but this would almost certainly make it bulkier and more expensive; so I will just see how it performs over time.


The lens is made from an engineering plastic, but the lens mount is made from metal, indicating to me that it is a quality lens - there is little slop when the zoom is extended, and the front element does not rotate when focussing (making the use of filters easier – it has a 52mm filter thread). On the left hand side is there is a single switch the turn the image stabilisation on and off. The supplied lens hood is the usual bayonet mounted petal type and it fits snugly and feels to be good quality. The lens cap is a centre squeeze type so is easy to take on and off.

The zoom ring is quite stiff and a bit stiffer towards the wide angle end of the range - I prefer this to it being too sloppy. The manual focus ring has no effect if you are in an autofocus mode, but in manual focus mode it immediately switched the EVF or screen into 5x mode to make focussing more accurate; the focus area can be moved around the screen with the arrow buttons – I like that. The focus ring itself is light, but not too light, and moves easily.

The focussing motor is essentially silent – I do not think that it makes any more noise than my Canon USM lenses. When it focuses in autofocus mode nothing seems to move.

All-in-all the lens looks, feels and works fine.

The Electronic View Finder (EVF) and Display

I have never really got on with an EVF before, but the reviews said that it was much better than most and that is exactly what I have found. It is certainly grainy to look at and flickers. When I zoom in and out or move the camera about the EVF image wobbles and flickers, but it is only momentary. The actual image is very contrasty and tends to flip flop between dark and bright when you scan around for the right composition; again this tends to be fairly short lived. So far I have not found it a limiting feature, but it is not for capturing fast moving action.

The main 3” display is pretty good – not as good at the latest DSLRs’ screens, but good enough for most use. It does, however, have one huge advantage in that it is a fully articulated screen. It can be turned around to protect the screen in transport, or swivelled into any angle so that it can be used above your head, at waist level, looking left or right, or even behind you) – in fact pretty much any direction that you might like to use. As you move the screen about flipping it over to look left or right the camera senses the change and flips the image to compensate to that it is always the right way up.

Sensors on the EVF detect the presence of something close – normally your eye – and automatically switches the main screen off and the EVF on. I have found this fine so far, but it might be irritating if it tends to turn off when not up to you eye. So far it has not annoyed me, but in any case the feature can be turned off. There is a switch to manually swop between the EVF and the screen. The EVF also has dioptre adjustment.

When you press the shutter release the EVF blacks out just as a DSLR would when the mirror flips up, but it seems to blank out for longer than a DSLR would – even with quite fast shutter speeds the black out time is quite noticeable.

Autofocus
While this might not normally seem much of an issue the G1 (and I guess all Micro Four Thirds cameras in the future) uses contrast detection autofocus rather than the phase detection system that is used in DSLRs. This is the same system most liveview implementations in DSLRs use and it is usually slow and painful.

Panasonic, however, seem to have worked out how to do it as I have found that the camera focuses quickly and accurately. It may not be up to the standard of top notch DSLRs, but it is much better than the compacts I have used and I have no complaints - again I do not anticipate using it for fast moving action shots.

There are plenty of choices for setting auto or manual focus, with options like face detection, tracking focus, multiple area (23 areas) focus or single area focus. The latter can be resized and moved about. I tend to leave it in the middle and use the normal half-press method to lock the focus, then recompose for the final shot.

With the 14-45 lens the focusing is pretty swift – perhaps not a snappy as a Canon with a USM drive lens, but pretty quick. I have certainly used much slower focusing lenses on DSLRs. The image tends to glide quickly into focus rather than snap in, but I was pleasantly surprised by its speed and accuracy. When focus is found the focus area marking lines in the EVF turn green, a green spot appears in the top right hand side of the screen and the camera beeps.

Battery

Batteries are pretty critical to digital cameras – without juice the camera is dead regardless of how good it is. The G1 takes a DMW-BLB13E 1250mAh li-ion battery. It is quite a chunky battery – about the same length and width as the Canon G9’s NB-2l, but about 50% thicker – the dimensions are 43.5 x 36.5 x 21.5mm, with the actual contacts protruding about another 1.5mm from one end.

Since battery power is so important I like to buy a spare battery as soon as I buy a camera, but this battery ranges in price from £59 to £83 in the UK with no generic replacement available yet as far as I can find. This is way more than I am willing to pay, so I will wait until I decide whether to keep the camera or not before buying a spare, and in any case I will wait until the price comes down or a generic from a reputable maker such as Hähnel appears.

I have no idea how long a charge will last for yet – I’ll do some real world tests and report the results later. I did fill up a whole 2gb card (138 shots) while testing burst rates etc without any noticeable drop in battery charge level, but that is not much of a real world test as I did not look at the reviews very often during the test.

RAW file burst rate

One of the drawbacks of the Canon G9 and Ricoh GX100 is their tardy RAW writing times. The G1 is supposed to have a 7 image RAW file buffer with a burst rate of 3 frames per second in its high speed burst mode setting.

Using a Sandisk Extreme III SD card the G1 took 7 shots in about 2.5 secs before the buffer became full, which is about 3 frames per sec, and from there on took about one shot every 1.25 secs – after a dozen shots I got bored so I presume that it continues firing at that rate until the card is full. After the burst the buffer takes about 7 secs to clear. If you start shooting again before the buffer is clear it takes as many shots at 3 fps as there is space in the buffer for before switching to the 1 shot every 1.25 secs rate.

I am pretty happy with this and I don’t think that it will limit my picture taking at all as I do not really anticipate using the G1 for action photography.

With RAW files only (not with JPEGs as recorded simultaneously as I never seem to use them and they just take up more card space) the 2gb card holds about 135-140 images; being about 14mb each.

Image Quality.
The colour space is switchable between sRGB and Adobe RGB – I set all my other cameras to Adobe RGB, so the G1 is set to that too.

Since the whole point of this camera is superior image quality in a compact and portable package this is the key for me. I set the camera to record RAW files and looked forward to looking at them and printing them from Lightroom. Oh, but…

I have Lightroom 1.4.1 and guess what? Adobe has stopped adding in new RAW file compatibility to this version, only Lightroom 2.

If I want to use Lightroom as a RAW converter for the G1, along with recently launched cameras such as the Canon 5D MkII and the Canon G10, then I will have to spend £100 to upgrade to Lightroom 2 whether I like it or not. In fact Adobe’s web site is currently saying that Lightroom 2 will not support these until sometime in December when Lightroom 2.2 is due. If I wanted to use Adobe Camera Raw instead (which does support them, but only the version compatible with CS4; not CS3) I will have to upgrade to Photoshop CS4, although I am quite happy in every other way with CS3 for the time being.

In fact the Adobe site says that its DNG converter does not work properly yet with G1 files – it triples their size! Apparently they are working on this and it is due to Adobe only being able to do linear demosaicing, which triples the file size.

So I have not actually looked at image quality yet…

I will download the 30 day trial version of Lightroom 2 from Adobe when version 2.2 is released and hope that this is in time to be able try it out over Christmas. Hopefully I will not then mess up my existing Lightroom set-up (I seem to remember in a review I saw somewhere that the catalogs are not interchangeable so once converted to Lightroom 2 I suspect that there is now way back to Lightroom 1.4). This will tell me whether I am going to keep the G1 or not.
I could use the supplied Silkypix software, which is reputed to produce OK RAW conversions, but to have a clunky user interface. Since I moved from using a multiplicity of packages (Capture One, Breezebrowser, Qimage to name but a few) to using Lightroom as the core of my digital workflow I do not want to learn a new piece of software just to be able to use a particular camera – there lies madness. I simply want to spend more time taking pictures and less in front of a computer working on them. If this is not sorted out properly then this would be a deal breaker for me – perhaps why the camera appeared on eBay so quickly…?

Perhaps I ought not to sulk and just try Silkypix (or perhaps I should call that Sulkypix?).

Conclusions
So, a nice little camera to use, but a shame I can not view and convert the RAW files in Lightroom without upgrading to Lightroom 2.2, whenever it appears. Perhaps Panasonic would like to start using DNG files… just a thought.

I shall be adding to the blog over the next few weeks as I use the camera and get to know it better – and I start to print images from RAW files taken with it.

Read more...

Saturday, 13 December 2008

My photographic Santa wish list for 2008/09

What would I like Santa to bring me this year – photographically speaking?

Three things really:


1 ) A printer equivalent to my Epson 4800 Pro that simply works when I ask it too – even if I leave it unused for weeks at a time. Is that too much to ask for?

I don’t want extra image quality, more colours etc – I am quite happy with what my 4800 produces – I just would like it to work on demand; not when its temperament allows it to.

I don’t care who it comes from; Epson, Canon or HP… perhaps even Sony, Kodak or Fuji. Whoever…

2 ) I have been waiting for an update to the Canon 5D for a year or more – what I had in mind turns out to really be a Nikon D700. So the 5D MkII has 21mp and video, whereas what I really wanted as an up to date 5D with 12mp (or perhaps a few more, but 12 seems fine for what I want to do) with improved noise or dynamic range capture, plus weather sealing, better autofocus, anti-dust systems, etc etc and a competitive price.

I also don’t really want to have to upgrade my computer to take the huge files that will result from the MkII when I mostly print at A4 & A3, going up to A2, and stitch together into large panoramics… If it weren’t for my substantial investment in lenses and systems accessories, like flashguns, I would switch to a Nikon D700 and a D300 today.

3 )
Which brings me onto my third wish – software that is supported for more than a year or so. Last Christmas I tested out Lightroom; liked it and bought it. I moved pretty much all my workflow into Lightroom. Now Adobe have released Lightroom 2 and guess what?

If I want to use it as a RAW converter for any of the recent camera launches (such as the Canon 5D MkII, the Canon G10 or Panasonic G1) then I will have to spend £100 to upgrade to Lightroom 2 whether I like it or not. In fact Adobe’s web site is currently saying that Lightroom 2 will not support these until sometime in December. If I wanted to use Adobe Camera Raw instead (which does support them, but only the version compatible with CS4; not CS3) I will have to upgrade to Photoshop CS4, although I am quite happy in every other way with CS3 for the time being.

So, Santa, if you are listening – are these wishes really too unreasonable or difficult to deliver?
Read more...

Sunday, 26 October 2008

Turning off my Epson 4800 printer for a month or more…

If you have read many of my posts in this blog you will realise that I have had lots of problems with nozzle clogging on my Epson 4800. Recently I realised that I was not going to be able to pursue my normal strategy to reduce nozzle clogging for a month or more, so I decided to try a different one based on my recent observations and experience. This post is about what I did and what happened.


To keep my 4800 happy and readily available for printing I normally follow a strategy of using Harvey Head Cleaner to print a nozzle check daily, along with printing a full spectrum print every three days through MIS Autoprint and keeping the printer humid by using a sponge full of water in the paper tray and a printer cover to keep the humidity in.

Recently, however, I have found that while this works very well the automated “something or other” (this posting gives more about my thoughts on this) that the printer does about once a week is quite likely to knock out various colour channels and that there is nothing I can do to stop it. Turning off all the auto nozzle checks and cleaning options has no effect. Some people have called this a “priming” function – but whatever it is it seems to do more harm than good and uses up a lot of ink.

About 6 weeks ago I realised that I was not going to be able to use the printer much at all nor be able to service the normal anti-clogging routine. So what to do?

I have become convinced that the key to a happy printer is humidity and avoiding the priming (or “something or other”) routines if possible. So I decided to turn off the printer and molly coddle it in a different way.

This I what I did:
  • I filled the sponge in the paper tray with water
  • I did a puddle soak to make the print head as humid as possible
  • I put in an additional water pot inside the printer cover as near the print head as possible
  • I wrapped the printer cover as tightly as possible to keep the humidity in
  • I reset all the Oregon weather station's humidity max & min readings - I use this to monitor the humidity inside the printer
Before bedding the printer down it was running perfectly with a perfect nozzle check.

I left the printer like this for a bit over a month (my records say it was 37 days). During that time I did nothing more than to refill the water sponges and about mid way through I set up another puddle soak.

Last Saturday I needed to do a biggish batch of printing so I woke it up.

How was it?
When I turned it on it did its “auto something or other” (which used 9.5ml of ink) before running the nozzle check I requested. Of the eight ink channels 5 were still perfect and the Light Black, Light Magenta and Light Cyan were completely missing – I can’t say I was surprised.

I ran a single nozzle clean and all three came back perfectly. The nozzle clean used 4.6ml on ink. I was pretty happy and relieved with this result!

So after 37 days of no use one single low intensity nozzle cleaning cycle restored the printer to a perfect nozzle check.

During that time the humidity inside the printer was mostly in the range 50-55% and according to the Oregon weather station the minimum in that time was 46% and the maximum was 67%. The reading from the paper tray was 53% min & 72% max, and from the room itself the range was 39% min & 63% max.

So I am more convinced than ever that humidity is the key to a happy nozzle clog free printer.

Why?
These printers seem to run OK for 12 to 18 months and then start experiencing these problems. This makes some people say that humidity can not be an issue as why would it suddenly change?

I do not know, but I can make some informed speculations.

I suspect that it is all to do with contact or wetting angles (go here for some background to wetting and contact angles); essentially the ease with which a liquid wets the surface it is sitting on or in contact with. Because the main problem I (and many others) experience is sudden whole ink channel loss it implies that it is not really about clogging – more likely the ink simply separates from the print head, which could easily be caused if the wetting angle is humidity sensitive. This sudden ink channel loss could also be due to an air bubble in the line, but personally I have never seen one of them.

If, however, the ink no longer wetted the surface of the nozzles/print head any slight loss of pressure might cause it to detach from the nozzle/print head, which would cause all the nozzles for that specific ink channel to stop working all at the same time.

Why might this start happening after 12-18 months?

I can think of a couple of reasons:
    a) The capping station seal around the print head may deteriorate a bit causing the atmosphere inside the capping station to dry out. This might cause ink separation if it is humidity critical.

    b) There may be a coating on the print head that reduces the wetting angle. If that wears due to ink flow going through the head, or due to any other form of use, then the coating might simply stop working causing the wetting angle to increase; making the whole system sensitive to low humidity.

One final thought: All of this is obviously quite challenging if you live/work in a desert…
Read more...

Friday, 5 September 2008

The Mystery of my Epson 4800's auto cleaning…

For some time, since I have been keeping the humidity high in the region of the print head and running Harvey Head Cleaner daily (I have reduced it from twice daily to once with no ill effect) with an MIS Autoprint every three days, I have only really had one problem with my 4800 – every now and then (about once a week) the printer does “something or other” which looks and sounds like a cleaning cycle. Sometimes a whole ink channel or two are missing after this, but the nozzle check says that no more ink than usual has been used up since the last one. So what is happening?


Since I have turned off both auto nozzle checking & cleaning on the printer’s control panel it ought not to be running cleaning cycles without my asking it to.

For some time, however, I have suspected that, since this “auto something or other” looks and sounds like a cleaning cycle, it probably is. I have noticed anomalously high ink usage every now and again on nozzle check printouts and wondered if there was a connection.

This morning it did its “auto something or other” before printing out the nozzle check requested by Harvey Head Cleaner. Yesterday the nozzle check was perfect, but after this “auto something or other” cycle this morning both Light Magenta & Cyan inks were completely missing, but the nozzle check said that only 0.2ml had been used – the normal amount for a nozzle check. I immediately ran another nozzle check, without doing anything else, and guess what – the printer thought that it had used another 10.4ml of ink since the last one, which is about right for a cleaning cycle, but much too much for sitting around doing nothing for a minute!

I have noticed this before and I am now convinced that it is running auto cleaning cycles about once a week despite my having told it not to and that it only reports the ink usage in the nozzle check printout after the one immediately after it does the cleaning cycle.

For some reason these cleaning cycles often mess up a printer that was working perfectly – although I do find that a single cleaning cycle usually restores the ink.

Can anyone cast any light on this?
Read more...

Sunday, 24 August 2008

Upgrading Epson 4800 printer driver from v5.55 to v6.50 – think before you do it!

Recently I was trying to work out why my Epson 4800 printer was not printing on A3 and roll paper properly. As a part of the process I installed Epson’s latest printer driver v6.50. I quickly discovered that I would really rather not have done so.


For a couple of months I have been living with the fact that whenever I printed on A3 paper the printer would leave a 14mm or 20mm margin at the top or left of the page, whatever it had actually been asked to print. Since this was happening using both Lightroom and Qimage to print I determined that it was the printer or driver, not the printing applications themselves. Printing using roll paper was also not working properly – it was not starting to print in the right place and not cutting at all. Printing using A4, however, seemed to be OK…

I decided to fix the problems and did the usual things to fix these types of problems – reinstall the driver, and if that does not cure it, then the firmware.

First I downloaded the latest printer driver from Epson v6.50 (dated the 7th March, 2008), replacing v5.55 which was the one I had been using. I did not see any harm in this, but I was wrong (more on this below). This did not cure the eccentric printing, however, so I downloaded the firmware (the same version as the one I had been using) and installed that via Epson’s LFP Remote Panel. Initially LFP would not recognize the printer’s existence (although it was printing OK), but after a few cycles of re-booting the computer and the printer it accepted that it was really there. After updating the printer started printing accurately on the page where requested.

But…
Printer driver v6.50, however, was a pain. Basically for two reasons.

Firstly all my paper and set-up specific settings carefully saved in both Qimage and Lightroom were lost. Both remembered the ICC profile settings (happily), but both lost all the other settings; such as media, paper handling and quality settings. So I had to go back through all the combinations and reinstall them, and since I had not exactly copied all of them down as they were stored in the applications and backed up I had not thought it necessary, this was a time consuming and frustrating process.

Secondly it has changed the layout and operation of the various panels so I had to relearn all of them and I can not find any documentation from Epson about what the changes are.
Below are screenshots from the Main, Page Layout and Utility panels - double click on them is you want to see them full size.


There is an extra panel, to the right hand side in the screenshots above, showing the Current Settings which can be turned on or off as desired.

They seem to cover the majority of the previous functions in much the same way, but annoyingly different, so setting up quality for a particular paper is a bit hit & miss.

There are a few interesting enhancements – the main one I have noticed is that the custom paper settings are replicated on the Media Type dropdown (see screenshot) below, rather than hidden in the custom settings panel.


The printing status screen (see screenshot below) has been re-worked to include cartridge codes (but they use Epson's old ones, not the new ones - e.g. the LLK cartridge options are listed as T5649 & T5659 , not T6059 & T6069 for the 110ml & 220ml versions respectively that Epson currently uses)


Conclusion
If you use pre-sets or saved printing settings in applications such as Lightroom and Qimage think very carefully before upgrading, unless you really want some of the enhancements in v6.5 (whatever they are). If you do, then carefully record what they are before the installation or you may lose them as I did.
Read more...

Saturday, 16 August 2008

Sources of advice on restoring old photographs

Every now and again I get asked to copy an old family photograph, which usually involves restoring it as well. Although there is a lot of useful information and tutorials on-line to help I find that since I do not do these restorations very often I find it easy to forget what worked last time and where I found the methods in the first place. In this posting I recommend a couple of books that have helped me immeasurably when I need it.


Typically what happens is that I am given an old print or seven and asked to “just make a couple of copies” of them. They are usually faded and spotted with damp, mould or tarnish, as well as being a bit care worn with folds, rips and holes. There is often an unfaded line where the frame held them and colour photos are usually not only faded but also colour shifted. On top of all that the paper they are printed on originally is often textured, which a decent scanner will pick up beautifully, making the whole image look very unhealthy (see a 100% crop from a typical sample below).


I usually scan them into Photoshop using an Epson Perfection 3200 Photo scanner, which produces a pretty good starting point.

But what to do with them?

As I said earlier there is a lot of really good advice and tutorials on-line and in magazine articles, but I want to be able to remember what I did and find solutions to new problems efficiently (no two projects have the same problems and solutions). So I have resorted to the old fashioned method of buying books on the subject – this means that I can easily find what I want quickly and know where to find the methods that worked for me the last time.

The one technique I use on nearly all scans is to use the “Dust & Scratches” filter with the history brush to remove all the little specks and flecks that were both in the original and on the scan.

I have settled on having two books as my source for most restorations. They cover similar areas of the topic, but have quite different approaches.

Firstly I use Katrin Eismann’s book “Adobe Photoshop Restoration and Retouching (Voices That Matter)” – full details can be found on Amazon but clicking the icon below.


The second is Ctein’s book “Digital Restoration From Start to Finish: How to repair old and damaged photographs” – full details can be found on Amazon but clicking the icon below.


While Eismann and Ctein cover the same sort of restoration ground they have different preferences. Eismann prefers to use masks (not too surprising as she wrote what many regard as the definitive book on masking – “Photoshop Masking & Compositing (Voices That Matter)”), whereas Ctein mostly avoids using masks in favour of using radical moves with curves.

Personally I find Eismann’s way easier to replicate, but at times I can only get a decent result using Ctein’s methods.
Read more...